Vitosol 100-FM/200-FM Installation, Operating and Service
5786 604 - 02
14
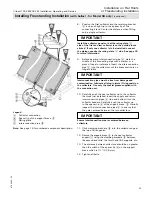
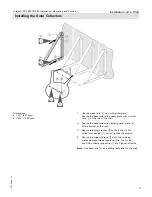
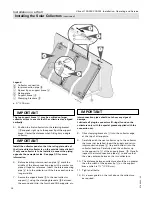
Installing the Solar Collectors
Legend
A
Rating plate (must be on the outside of the outer
collectors)
Note:
See page 7 for numbered component description
1. Hook the collector into its mounting plates
8
and lay
down onto the mounting rails
3
.
2. Secure the collector with four clamping brackets
9
onto the mounting rails. Tighten the two outer
clamping bolts only. Turn the T-slot bolt
90°.
3. Before inserting connecting pipe
mark the middle
of the connecting pipe with a marker or a piece of tape
for reference. Insert the connecting pipe into the
collector until the brass section is no longer visible.
Ensure interconnection pipe is centered between
collectors.
4. Position the second collector as in step 1.
5. Carefully push the second collector against the first
and insert the connecting pipes
until they are
centered between the collectors. Distance between
the two installed collectors should be ¾” (21 mm).
6. Install all additional collectors.
7. Tighten all clamping brackets
9
.
Remove all labels and foil cover from glass only after
the system is fully operational.
Number of collectors
1
2
3
4
5
6
8
10
Dimension r SV collector
inches
(mm)
0.8
(21)
0.8
(21)
1.2
(31.5)
1.2
(31.5)
1.7
(42)
1.7
(42)
2.1
(52.5)
2.5
(63)
Dimension r SH collector
inches
(mm)
0.8
(21)
1.2
(31.5)
1.7
(42)
2.1
(52.5)
2.5
(63)
2.9
(73.5)
3.7
(94.5)
4.5
(115.5)
Installation on Sloped Roofs
IMPORTANT
IMPORTANT
IMPORTANT
Interconnecting pipes must be free from damage and
contamination. Lubricate all plug-in joints (O-ring seals) on
the collectors. Use only the special grease supplied with
the connection set.
On the first and last collector, the side to which the rating
plate
A
is attached must be on the outside. Ensure that
dimension “r” is maintained for first and last collector.
CAUTION
Never step, lean or place objects on the collectors.
IMPORTANT


