background image

VITOROND 200

Installation instructions

for heating engineers

VitorondĂ200

typeĂVD2,


320 to 1080 kW

Oil/Gas fired boilers

5862Ă444ĂGBăăă2/2003

Summary of Contents for VITROND 200

Page 1: ...VITOROND 200 Installation instructions for heating engineers VitorondĂ200 typeĂVD2 320 to 1080 kW Oil Gas fired boilers 5862Ă444ĂGBăăă2 2003 ...

Page 2: ...nt heating system isolate the mains electrical supply e g by removing a separate mains fuse or by means of a mains electrical isolator and safeguard against unauthorised reconnection When using gas as fuel also close the main shut off valve and safeguard against unauthorised re opening Work on gas equipment This must only be carried out by an approved contractor Please observe all commissioning wo...

Page 3: ...testĂ 15 Insertion of turbulators and fitting the boiler doorĂ 16 Heating water primary connectionĂ 17 Safety connection and testing for leaksĂ 18 Installation of the thermal insulationĂ 19 Flue gas connectionsĂ 22 Installation of additional thermal insulationĂ 23 Burner installationĂ 28 Important notes on commissioningĂ 28 5862Ă444ĂGB ...

Page 4: ...kets are minimum clearances Rated output kW 320 380 440 500 560 630 700 780 860 950 1080 a mm 1660 1790 1920 2050 2180 2310 2440 2570 2700 2830 2960 b mm Observe the burner length 5862Ă444ĂGB 5862Ă444ĂGB a 1000 500 200 500 200 b 200 100 ...

Page 5: ...ted flue outlet a front section with fitted boiler door and a number of centre sections subject to rated output A Boiler door B Front section C Centre section D Rear section E Flue outlet Rated output kW 320 380 440 500 560 630 700 780 860 950 1080 Number of sections 9 10 11 12 13 14 15 16 17 18 19 Number of centre sections 7 8 9 10 11 12 13 14 15 16 17 5862Ă444ĂGB A B C D E ...

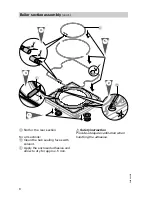
Page 6: ...he rear section For all sections B Clean the hub sealing faces with solvent C Apply the enclosed adhesive and allow to dry for approx 5 min ĂSafety instruction Provide adequate ventilation when handling the adhesive 5862Ă444ĂGB A B C 2 3 4 1 5 ...

Page 7: ...7 Boiler section assembly cont For all sections A Clean the nipples with solvent and apply the enclosed anti seize agent 5862Ă444ĂGB 1 2 A 3 5 4 ...

Page 8: ...ction at the time to prevent leaks at the hub joints Please note Maintain the same distance between the individual sections at the top and bottom Never secure the sections out of true The packing cord prevents the sections being pressed close together Do not force the sections together 5862Ă444ĂGB 4 3 1 2 ...

Page 9: ...tions have been assembled locate the roll of insulation mat enclosed with part two of the thermal insulation behind the rear section and pull underneath the assembled sections as the installation progresses every two sections until it is also located underneath the front section 5862Ă444ĂGB 1 ...

Page 10: ...7 8 9 10 11 12 13 14 15 16 17 18 19 ă320 ă9 480 480 480 ă380 10 480 480 480 ă440 11 480 480 610 ă500 12 480 610 610 ă560 13 480 480 480 480 ă630 14 480 480 480 610 ă700 15 480 610 610 480 ă780 16 480 610 610 610 ă860 17 480 480 480 610 480 ă950 18 480 480 610 480 610 1080 19 480 480 610 610 610 5862Ă444ĂGB Plan view Side view ...

Page 11: ...11 Boiler section assembly cont Only release the compression tool when the sections have been joined with the anchor rods 5862Ă444ĂGB M 16 2 1 3 3 ...

Page 12: ...2 Boiler section assembly cont Please note All section feet must be firmly placed on the plinth accessory or the floor If necessary shim the section feet Installation instructions Plinth 5862Ă444ĂGB 2 1 ...

Page 13: ...13 Distributor pipe and drain installation A PlugĂRĂ2 Overhang a max 5 to 7mm B Quadrant insert for ratchet included with the compression tool 5862Ă444ĂGB a R 2 1 A B ...

Page 14: ...nstallation cont A Distributor pipe Orient the drain apertures upwards B Insertion of the respective intermediate and end sections see service instructions page 17 C Fill and drain valve on site 5862Ă444ĂGB B 3 9 x 6 5 4 2 1 3 A B C ...

Page 15: ...afety equipment must be fitted during any water pressure or leak tests Test the pressure with a class 1 0 pressure gauge Test pressure 9Ăbar A Sensor well B Dummy plug C Manual air vent valve on site D Blanking flange 5862Ă444ĂGB R e R c R e 2x 2 4 3 1 B A C D ...

Page 16: ...o 860ĂkW Insert the respective number of turbulators into each hot gas channel of the third flue see table in doing so push the first turbulator element approx h into the hot gas channel hook in the second or third element and push in Rated output kW 320 to 440 500 and 560 630 to 860 Turbulator elements per hot gas flue 3 2 1 Turbulator elements per boiler 12 8 4 5862Ă444ĂGB M 16 1 4 2 3 A 1 ...

Page 17: ...ain Ă ĂRĂĂ KR Boiler returnĂ ĂDNĂ100 KV Boiler flowĂ ĂDNĂ100 Please note Only open the heating water connections after the boiler has been de pressurised Install all pipe runs free of load and torque stresses Installation instructions Connection set 5862Ă444ĂGB 1 KV E KR ...

Page 18: ...ng pressureĂ Ă6Ăbar Test pressureĂ Ă9Ăbar Low water indicator Boilers must be equipped with a low water indicator Please note Equip boilers with a safety valve which is type tested and meets the requirements of TRDĂ721 and which must be marked subject to the respective system version Install all pipe runs free of load and torque stresses 5862Ă444ĂGB ...

Page 19: ...e note All components required for the assembly of the thermal insulation are included in the insulation carton Please note Position of cross members see table page 20 5862Ă444ĂGB M 16 B 3 9 x 9 5 M 12 2x M 8 1 090 mm 1 044 mm 2x 6 1 5 2x 4 2x 3 1 2 ...

Page 20: ...lation cont Rated output kW 320 380 440 500 560 630 700 780 860 950 1080 a mm 805 805 805 679 679 679 805 805 805 932 679 b mm ĈĈĈ ĈĈĈ ĈĈĈ 502 502 502 628 628 755 755 502 c mm ĈĈĈ ĈĈĈ ĈĈĈ ĈĈĈ ĈĈĈ ĈĈĈ ĈĈĈ ĈĈĈ ĈĈĈ ĈĈĈ 628 5862Ă444ĂGB b a c ...

Page 21: ...21 Installation of the thermal insulation cont Please note Burner cablesĂfA and lÖ are included in the thermal insulation packaging A Black side outwards B Cut out to the rear 5862Ă444ĂGB 1 B A 2 3 ...

Page 22: ...flue outlet with the shortest possible run and with a slight inclination to the chimney stack Flue outletĂ Ăoutside 300Ămm 2 Create a test aperture 3 Seal in and thermally insulate the flue pipe all connections must be gas tight 5862Ă444ĂGB ...

Page 23: ...rmal insulation Please note Hook in the side panels in accordance with the table on page 24 Where required align the side panels by turning the hexagon screws in the cross member 5862Ă444ĂGB B 3 9 x 9 5 5x B 3 9 x 9 5 2x B 3 9 2x 2 3 1 ...

Page 24: ...ut kW 320 380 440 500 560 630 700 780 860 950 1080 a mm 628 628 628 502 502 502 628 628 628 755 502 b mm 502 628 755 502 502 502 628 628 755 755 502 c mm ĈĈĈ ĈĈĈ ĈĈĈ 502 628 755 628 755 755 755 628 d mm ĈĈĈ ĈĈĈ ĈĈĈ ĈĈĈ ĈĈĈ ĈĈĈ ĈĈĈ ĈĈĈ ĈĈĈ ĈĈĈ 755 5862Ă444ĂGB a b c d ...

Page 25: ...l unit Please note Boiler temperature sensorĂ is included in the control unit package Insert the probe and the boiler temperature sensor as far as possible into the sensor well Mains supply plugĂfÖ included in the control unit package Do not kink the capillary tubes or sensor function may be compromised 5862Ă444ĂGB B 3 9 x 30 1 2 3 4 ...

Page 26: ...llation of additional thermal insulation cont Route cables so that they are not subjected to excessive temperatures A Low voltage cables B 230 V cables C Strain relieving burner cables 5862Ă444ĂGB 1 3 4 2 B A C ...

Page 27: ...27 Installation of additional thermal insulation cont A Centre top panel from 500 kW B Boiler type plate 5862Ă444ĂGB B 3 9 x 9 5 B 3 9 x 9 5 B 3 9 x 9 5 4 1 2 3 B A ...

Page 28: ...rture Ă360Ămm Cut out the insulating mat in the burner door according to the blast tube diameter H After the burner installation seal the annular gap between the flame tube and the insulating block with the flame tube gasket supplied Please note The flame tube must protrude at least 125Ămm from the front edge of the burner flange into the boiler To safeguard perfect function maintain the required ...

Reviews: