background image

14

Playing Discs

Playing Discs

Playing Discs

Playing Discs

Playing Discs

.

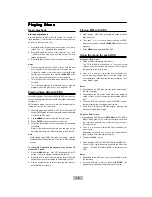
General operation

IMPORTANT: 

Please note that some DVD movie discs may

not have all the features described in this chapter. For
example, older movies may not allow you to select multiple
camera angles. Refer to the instructions or liner notes that are
included with each disc to determine what features and
operations are available on that particular disc.

1.

Turn your television set

s power on, and set the channel

to the video input.

2.

Press 

POWER

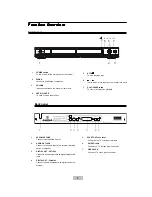
 on the front panel to turn on the main power

of this system. The front panel display lights up, and the
DVD logo screen appears on the television screen.

3.

Press 

OPEN/CLOSE

, and place a disc on the disc tray.

Press it again to close the tray.

Note

Load the disc placing the label side face up, and using the
disc tray as a guide for proper alignment. When playing a
double-sided DVD disc, load it with the desired playing
side face down.

4.

Use the master

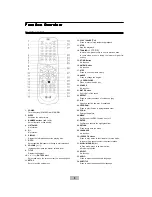
 VOLUME  (+/-)

 buttons to increase or de-

crease the volume level.

5.

Press 

MUTE

 to shut off the sound. To restore the volume,

press it again.

6.

To start playback, press 

/ll


. To interrupt or pause play-

back, press 

/ll


again.

Note

Some discs will start playing automatically, and others will
display a menu on the television screen. Use the  / / /
or  the number (

0 ~ 9, >10

) buttons to select desired a  track/

chapter and then press 

ENTER


to start playback.

7.

To stop playback, press 

STOP

    .

8.

To skip  to the next or previous track / chapter press   

l

repeatedly during playback.

Basic playback

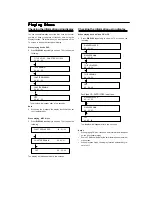
Fast search

Fast search

Fast search

Fast search

Fast search

1

Press  

 / 

  to fast reverse or fast forward.

-

For DVD / MP3 discs
FF(fast forward):FFX2 --> FFX4 --> FFX6 --> FFX8 -->
PLAY
FF(fast reverse) : FRX2 --> FRX4 --> FRX6 --> FRX8 -->
PLAY

-

For VCD / CD discs
FF(fast forward) : FFX1 --> FFX2 --> FFX3 --> FFX4 -->
PLAY
FR(fast reverse) :  FRX1 --> FRX2 --> FRX3 -->FRX4--
>PALY

2

To resume normal play, press 

PLAY/PAUSE  /ll

.

Slow motion playback

Slow motion playback

Slow motion playback

Slow motion playback

Slow motion playback

To view playback in slow-motion, press 

SLOW 

on the remote

control unit during playback.

When playing DVD discs:

Press 

SLOW

 repeatedly to select the slow motion speed and

direction as follows:
SF ( slow forward) , SR (slow reverse) .
SFX2 

 SFX4 

 SFX8 

 SRX2 

 SRX4 

 SRX8 

SLOW OFF.

When playing CVD, SVCD or VCD discs:

Press 

SLOW

 repeatedly to select the slow motion speed as

follows:
SFX1 

 SFX2

 SFX3 

 SLOW OFF.

Notes

The smaller the number, the slower the speed.

This function is not available for CD or MP3 discs.

On some discs, the slow-motion playback function is not
available.

Repeat playback

Use this function to set the player to repeat individual tracks
on CD or Video CD discs, chapters or titles on DVD discs, an
entire disc, or all the discs loaded in the player.

When playing DVD discs

:

Press 

REPEAT

 repeatedly to select the following:

CHAPTER REPEAT ON  

 TITLE REPEAT ON 

 REPEAT OFF

When playing CVD, SVCD, CD and MP3 discs

Press 

REPEAT

 repeatedly to select the following:

REPEAT ONE 

  REPEAT ALL  

  REPEAT OFF

When playing MP3 discs (In menu mode):

Press 

REPEAT

 repeatedly to select the following:

REPEAT ONE  

  REPEAT ONE ALBUM   

  REPEAT ALL 

REPEAT OFF

Notes:

Use the repeat function with the programming mode to
repeat tracks or chapters.

This function is only available when playback is selected.

When playing CVD and SVCD discs, set the PBC (playback
control) mode to OFF to use this function.

The front panel display will display 

REP 1 

when

chapter repeat mode is selected; and 

REP ALL

when

repeat mode is selected.

Basic playback

Summary of Contents for Draft DVD-3

Page 1: ...1 VIETA DVD 3 Draft Operation Manual ...

Page 2: ...only with dry cloth 7 Do not block any ventilation openings Install in accordance with the manufacturer s instructions 8 Do not install near any heat sources such as radiators heat registers stoves or otherapparatus including amplifiers that produce heat 9 Do not defeat the safety purpose of the polarized or grounding type plug Apolarized plug has two blades with one wider than the other Agroundin...

Page 3: ...e may form on the pickup lens in the following condi tions Immediately after a heater has been turned on In a steamy or very humid room When the unit is suddenly moved from a cold environment to a warm one If moisture forms inside this unit it may not operate properly In this case turn on the power and wait about one hour for the moisture to evaporate On adjusting volume Do not turn up the volume ...

Page 4: ...lecting the disc menu language 12 Selecting the parental control 12 Change the parental control password 13 Returning to the original factory default settings 13 Playing Discs General operation 14 Basic playback 14 15 Fast search 14 Slow motion playback 14 Repeat playback 14 A B repeat playback 15 Playing video CDs with PBC 15 Playing MP3 with PBC 15 Using the menu for each DVD 15 Checking the inf...

Page 5: ...rs Each chapter is assigned a chapter number enabling you to locate the chapter you want Depending on the disc no chapters may be recorded Track Video or audio CD Sections of a picture or a music piece on a VIDEO or a CD Each track is assigned a track number enabling you to locate the track you want Conventions about this manual Instructions in this manual describe the controls on the system You c...

Page 6: ...isc installing precautions Do not install more than 1 disc on disc tray Do not place the disc on the tray up side down Do not try to close the disc tray when the disc is not in stalled properly Gener Gener Gener Gener General Inf al Inf al Inf al Inf al Infor or or or orma ma ma ma mation tion tion tion tion Inserting batteries into the remote con trol You can control the system using the supplied...

Page 7: ...ect to the audio input of an external recording device or amplifier 3 DIGTIAL OUT OPTICAL Connect to audio equipment with digital optical audio input 4 DIGITAL OUT COAXIAL Connect to audio equipment with digital coaxial au dio input 5 STOP To stop playing a disc 6 In disc mode press to skip to next or previous track 7 PLAY PAUSE To start or interupt disc playback 5 SCART OUT connector Connect to t...

Page 8: ... In tuner mode press to tuning the lower or higher fre quency 15 ST MO Button No function 16 AM FM Button No function 17 STEP Press to see the picture slowly 18 ANGLE Press to change the angles 19 OPEN CLOSE Open or close the disc tray 20 SOURCE No function 21 MUTE Button Shut off all of the sound 22 REPEAT Press to select variations of continuous play 23 A B Specify a section and play if repeated...

Page 9: ...O IN jack on a TV not supplied If your TV is not equipped with SCART video input jacks you can select one of the following alternative connections Option 1 Connect the S VIDEO OUT jack to the S Video input jack on the TV using a S Video cable not supplied Option 2 Connect the VIDEO OUT jack to the video input jack on the TV using a video cable supplied Use the AUDIO OUT jacks For connecting to an ...

Page 10: ... NTSC MULT Downmix Downmix Downmix Downmix Downmix Select the DOWNMIX for LT RT STEREO The default setting is STEREO LT RT LEFT TOTAL RIGHT TOTAL A two channel delivery format for Dolby surround four chan nels audio left center right and surround are matrix encoded two channels The terms refer to a Dolby sur round compatible downmix STEREO All sound is reproduced and played through the front left ...

Page 11: ...nds would be inaudible and must be brought upwards in level to be heard Dolby Digital satisfies these needs through the dynamic range controlling Selects the dynamic range compression to fit the individual listening situation of the audience The variable range is from FULL 7 8 to 1 8 or OFF The default setting is OFF FULL Audio with fully compressed dynamic range 7 8 1 8 Audio with partially compr...

Page 12: ... will show Parental Violation Preferences setup Selecting the disc menu language Selecting the disc menu language Selecting the disc menu language Selecting the disc menu language Selecting the disc menu language Select a desired language when playing a DVD disc that has menu data recorded in multiple languages PREFERENCES PAGE AUDIO MAINPAGE I G DISCMENU PARENTAL PASSWORD DEFAULTS 2 G 3 PG 4 PG 1...

Page 13: ... To change the parental control password use the SETUP menu select PREFERENCES to access the password menu Press ENTER to enter the old password 3308 XXXX will appear as you enter the numbers When prompted to enter a new password enter a 4 digit code and enter it again when prompted to confirm password Press ENTER once more to change the password from 3308 to the new 4 digit password you have ente...

Page 14: ...r DVD MP3 discs FF fast forward FFX2 FFX4 FFX6 FFX8 PLAY FF fast reverse FRX2 FRX4 FRX6 FRX8 PLAY For VCD CD discs FF fast forward FFX1 FFX2 FFX3 FFX4 PLAY FR fast reverse FRX1 FRX2 FRX3 FRX4 PALY 2 To resume normal play press PLAY PAUSE ll Slow motion playback Slow motion playback Slow motion playback Slow motion playback Slow motion playback To view playback in slow motion press SLOW on the remo...

Page 15: ...s the MENU button PBC OFF will appear on the TV screen If a disc is playing the playback will stop 2 Press the to start or restart playing the disc from the beginning or use number button to select track you like 3 Use the number button to select track you like then you press ENTER to confirm it Playing MP3 with PBC 1 When playing a MP3 disc press MENU button to switch MP3 menu ON 2 Then use curso...

Page 16: ...e sets to off You can check information about the disc such as the total number of titles or chapters or tracks or time using the Display function The information you want appears on the TV screen or and on the front panel display When playing back a DVD 1 Press DISPLAY repeatedly to show on TV screen as the following TITLE 02 05 CHAPTER 001 006 00 34 56 TITLEREMAIN 00 34 56 CHAPTERELAPSED 00 01 2...

Page 17: ...AY PAUSE ll 5 To stop playback press once 6 To cancel the program press again Note This function is not available for DVD and MP3 disc Selecting audio mode for karaoke mu sic When playing karaoke or similarly When playing karaoke or similarly When playing karaoke or similarly When playing karaoke or similarly When playing karaoke or similarly f f f f for or or or orma ma ma ma matted D tted D tted...

Page 18: ...n the television screen 1 4 7 2 5 8 3 6 9 Picture CD disc playback In the menu use the buttons to select the desired albums titles and press ENTER A slideshow will begin from this point During playback you can Press or to select another title picture in the current folder Press on the remote to rotate flip the picture files Press to pause resume playback Press to stop playback Note Some files on K...

Page 19: ... picture on the television screen and to pan through the enlarged image 1 Press ZOOM on the remote control unit repeatedly to se lect the following magnification factors ZOOM x 1 5 ZOOM x 2 ZOOM x 3 ZOOM OFF 2 Press to pan through the enlarged image Notes This function is only available during playback This function is not available when playing CD or MP3 discs This setting will be cancelled autom...

Page 20: ...that the speakers and components are connected securely Check that the connecting cords are away from a trans former or motor and at least 3 meters away from a TV set or fluorescent light Move your TV away from the audio components The plugs and jacks are dirty Wipe them with a cloth slightly moistened with alcohol Clear the disc The sound loses stereo effect when you play a Video CD or a CD Set t...

Page 21: ...o signal to noise ratio 60 dB Dynamic range DVD 80 dB CD 80 dB Video outputs CVBS Video 1 Vp p 75 ohms S video Y 1 Vp p 75 ohms C PAL 0 3 Vp p 75 ohms NTSC 0 286 Vp p 75 ohms Scart out 1 Vp p 75 ohms Optical and Coaxial out 1 Vp p 75 ohms Audio line outputs Audio L R 2 Vrms 1k ohms Main Unit Power supply 110 230V AC 60Hz Hz power consumption 15W maximum Dimensions W 435 x H48x D 278 mm Weight 2 4k...

Reviews: