background image

INCIDENTS THAT ARE EXEMPT FROM GUARANTEE:

1. The guarantee period exceeds the stipulated time. 

2. When the product has been handled by centres or personnel that are not authorised by VIETA AUDIO S.A.

3. When the product has been damaged by incorrect handling or use for purposes other than those it is intended 
for and that are not contemplated in the user’s manual, or when it has broken pieces, scratches, cracks, wear and 
tear, damage produced by particles of paint, sand, water or food within the unit..

4. This guarantee does not cover expenses or damages caused by transport. 

5. Loss, robbery or accidents produced by fire, liquid, chemical substances, excessive heat, inadequate 
ventilation, vandalism, electrical storms, incorrect or excessive power supply, lightening, impact, other external 
forces, radiation. 

6. Any additional cost related to installing or uninstalling the product.  

7. Products purchased outside Spanish territory or from distributors that are not authorised. 

8. The data contained on our products (photo files, music, digital support, etc.) are not covered by the guarantee 
under any circumstance; it is the client’s responsibility to make back-up files before giving us the product. 
Likewise, any incorrect configuration or installation of software or incompatibility issues with hardware 
belonging to other equipment, including drivers and controllers.

9. Maintenance, repairs or parts replacement due to use and wear and tear. 

10. Rechargeable and/or disposable batteries (life cycle depends on usage frequency). 

11. Small faults or variations in the quality of the product that do not affect its value or the purpose for which it 
was created. 

12. Negligence.

13. Accessories:


 

Plugs and cases. 


 

Connector cables.


 

Headband.


 

Eartip and sleeve kits.


 

Decorative finishes.

14. Any issue detected on receipt of the goods must be notified to customer care 902.367.607 or sat@vieta.es. 
In accordance with article 366 of trade law, VIETA AUDIO S.A. will not accept any claims regarding broken goods, 
impacts or missing packages 24 hours after the goods have been delivered. 

CUSTOMER CARE / Tel. +34 902 367 607 / Fax. +34 93 574 26 83 / www.vieta.es

TERMS OF GUARANTEE

VIETA AUDIO S.A. guarantees its products for a period of 24 months. The guarantee period starts on the date of 
purchase of brand new products that have never been used by the first end user.  

This guarantee covers any possible manufacturing flaws for any Vieta products sold on Spanish territory by 
authorised distributors. Vieta products acquired in other countries will be covered by the guarantee supplied by 
the local distributor. 

This guarantee will only be valid when accompanied by an invoice for the product that includes the client’s 
name, the distributor and the date of purchase. VIETA AUDIO S.A. agrees to repair any product with a problem 
occurring during normal use as detailed in the user’s manual and when being used for the purpose for which it 
was designed.

The guarantee will not be extended because a component is changed or the product is replaced.

EN

G

LI

SH

Contents


Safety precautions ......................................................................................20

 Important information .................................................................................21

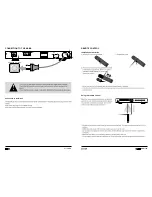
 Connection to the mains .............................................................................22

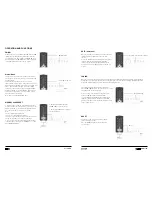
 Remote control

  Installation of batteries .........................................................................23

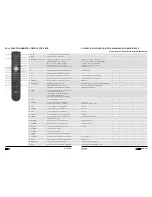
  Function .........................................................................................24 - 25

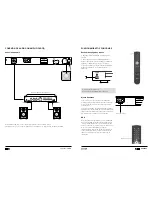
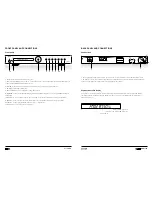
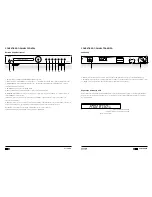
 Front panel and connections ......................................................................26

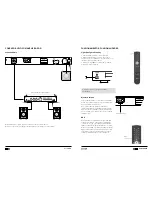
 Back panel and connections ......................................................................27

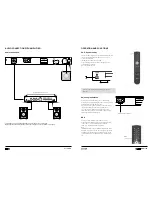
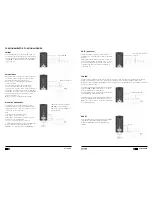
 Audio connection with amplifier .................................................................28

 Operation and functions

  ON, OFF and Standby ..........................................................................29

  Adjusting the antenna ..........................................................................29

  RDS ......................................................................................................29

  FM/AM ..................................................................................................30

  Stereo/mono .........................................................................................30

  Memory and preset ..............................................................................30

  Auto (autotune) .....................................................................................31

  Tuning ...................................................................................................31

  Reset ....................................................................................................31

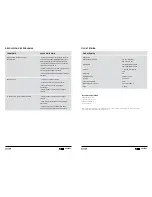
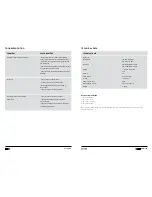
 Troubleshooting ..........................................................................................32

 Technical data.............................................................................................33

Summary of Contents for VH-HT010

Page 1: ...ep well for future referring Por favor leia o manual de utilizador antes de utilizar o produto e mantenha o para futura refer ncia Veuillez lire le manuel utilisateur avant d utiliser le produit et de...

Page 2: ...nexi n Diademas Kits de los extremos de los auriculares almohadillas para las orejas Acabados decorativos 14 Cualquier incidencia detectada al recibir la mercanc a ha de ser notificada al servicio de...

Page 3: ...emente cuando lo introduzca en la toma Evite dispositivos que generen calor No coloque objetos sobre el cable de suministro el ctrico No realice trabajos encima de la unidad ni cambie el cable de sumi...

Page 4: ...uevas y usadas ni de diferente tipo Si el mando a distancia no se utiliza durante un periodo prolongado retire las pilas para evitar su corrosi n Dirija el mando al sensor que est en el panel frontal...

Page 5: ...sirve para ver los tiempos en el CD Pista actual tiempo transcurrido pista actual tiempo restante todas las pistas tiempo transcurrido del disco completo todas las pistas tiempo restante del disco co...

Page 6: ...3 TUNING Sintonizaci n para la sintonizaci n manual gire el mando a la derecha para aumentar la frecuencia y a la izquierda para reducir la frecuencia 4 FM AM permite cambiar entre el modo FM y el mod...

Page 7: ...ancia para activar la recepci n de informaci n como nombre de la radio frecuencia de la emisora tipo de emisora hora y fecha Nota Si se pulsa el bot n RDS y no aparece informaci n RDS deber comprobar...

Page 8: ...Sintonizaci n autom tica Cuando se enciende el equipo deben guardarse los canales Para ello use la funci n de sintonizaci n autom tica AUTOTUNE Para usar la funci n de sintonizaci n autom tica desde...

Page 9: ...OBLEMA CAUSA SOLUCI N El equipo est encendido pero no En el modo de reposo es necesario pulsar el tiene energ a bot n del sintonizador TUNER en el mando a distancia para volver a activar el sintonizad...

Page 10: ...it was created 12 Negligence 13 Accessories Plugs and cases Connector cables Headband Eartip and sleeve kits Decorative finishes 14 Any issue detected on receipt of the goods must be notified to custo...

Page 11: ...NGLISH 20 Tuner FM AM IMPORTANT INFORMATION Handling instructions Protect the power cord Positioning Do not put your fingers or any other objects into the unit Interference Condensation SAFETY PRECAUT...

Page 12: ...Installation of batteries Using the remote control 220 240V AC 50Hz Stere o Output RL FM ANTENNA AM VH H T0 10 BK S L 20W AC 2 20 240 50 Hz AC 2 20 2 40 V 50H z FU SE T 0 5A L 2 50 V FM A M AUTOTUNE M...

Page 13: ...anual tuning backward in tuner 11 TIME Press the key by times shows in CD disc current track elapsed time total tracks elapsed time of full disk current track remaining time total tracks remaining tim...

Page 14: ...lights you need to press POWER button again to power on 3 TUNING For manual tuning right tuning for high frequency left tuning for lower frequency 4 FM AM To switch FM or AM mode 5 AUTOTUNE Press it f...

Page 15: ...s the quality of the signal received For an optimal result it is therefore very important that you make sure that the radio receives the best possible antenna signal This tuner features RDS on the FM...

Page 16: ...u can also save the tuned station by the buttons in the front panel firstly to press PRESET or then press MEMORY button AUTO Autotune When the unit has been turned on channels must be saved This is do...

Page 17: ...ght 2 60 kg TROUBLESHOOTING PROBLEM CAUSE REMEDY No power when the unit is turned on In standby mode you need to press TUNER button in remote control to re activate the tuner Check that the plug has b...

Page 18: ...Negligencia 13 Acess rios Kits e pe as das tomadas Cabos de liga o Auscultadores Kits dos extremos dos auscultadores e almofadas de auscultadores Acabamentos decorativos 14 Qualquer incidente detetad...

Page 19: ...u ferimentos Segure o plugue com firmeza quando entrar no socket Evite dispositivos geradores de calor N o coloque objetos sobre o fornecimento de energia el trica N o executar o trabalho na unidade o...

Page 20: ...o para o sensor no painel frontal da unidade Quando o sinal do controlo remoto for recebido a unidade reage em conformidade O controlo remoto funciona com um alcance de 6 metros Por vezes o controlo r...

Page 21: ...s exibe no disco CD Faixa actual Tempo decorrido Faixa actual Tempo restante Total de faixas Tempo decorrido do disco completo Total de faixas Tempo restante do disco completo 12 STOP Para parar a rep...

Page 22: ...reita para alta frequ ncia e para a esquerda para baixa frequ ncia 4 FM AM Para alterar entre o modo FM ou AM 5 AUTOTUNE Premir a tecla para analisar as esta es de r dio existentes 6 MEMORY Para guard...

Page 23: ...ont m RDS no receptor FM Para activar as informa es pode premir a tecla RDS do controlo remoto como por exemplo texto de R dio frequ ncia da Esta o tipo de Esta o Hora e Data Nota Se a tecla RDS premi...

Page 24: ...al premindo primeiro PRESET ou depois prima a tecla MEMORY AUTO Autotune Quando a unidade for ligada os canais devem ser guardados Isto realizado atrav s de meios da fun o autotune Para utilizar a fun...

Page 25: ...x la x pr 50 x 430 x 290 mm Peso 2 60 kg RESOLU O DE PROBLEMAS PROBLEMA CAUSA SOLU O Sem energia quando se liga a unidade No modo standby precisa premir a tecla TUNER do controlo remoto para reactiva...

Page 26: ...t pi ces d tuis C bles de connexion Diad mes Kits couteurs et coussins d oreille Finitions d coratives 14 Toute incidence constat e lors de la r ception de la marchandise et non signal e au centre de...

Page 27: ...viter les dispositifs g n rateurs de chaleur Ne pas placer des objets sur le cable d alimentation lectrique Ne pas r aliser de travaux sur l quipement ni changer le cable d alimentation lectrique Sit...

Page 28: ...on du signal l quipement ex cutera la fonction demand e La t l commande fonctionne jusqu 6m de distance S il y a beaucoup de lumi re il se peut que la t l commande fonctionne mal Dans ce cas l quipeme...

Page 29: ...de stations manuelle en arri re du syntoniseur 11 TIME Temps Appuyer sur cette touche pour visualiser le temps coul du CD Piste actuelle temps coul Piste actuelle temps restant Toutes les pistes temp...

Page 30: ...TUNING syntonisation tourner le bouton droite pour augmenter la fr quence et gauche pour la r duire 4 FM AM changement du mode FM au mode AM 5 AUTOTUNE syntonisation automatique recherche automatique...

Page 31: ...pour activer la r ception de l information comme nom de la radio fr quence de la station type de fr quence heure et date Note Si en appuyant sur la touche RDS l information correspondante n apparait...

Page 32: ...Y Syntonisation automatique Utiliser la fonction de syntonisation automatique AUTOTUNE pour sauvegarder les chaines Pour ce faire appuyer sur la touche AUTO du panneau frontal ou de la t l commande Sy...

Page 33: ...ndeur 50 x 430 x 290 mm Poids 2 60 kg R solution d incidences INCIDENCE CAUSE SOLUTION L amplificateur est allum mais n a pas d nergie Brancher l unit la prise lectrique V rifier que la prise a t corr...

Page 34: ...www vieta es...
Reviews: