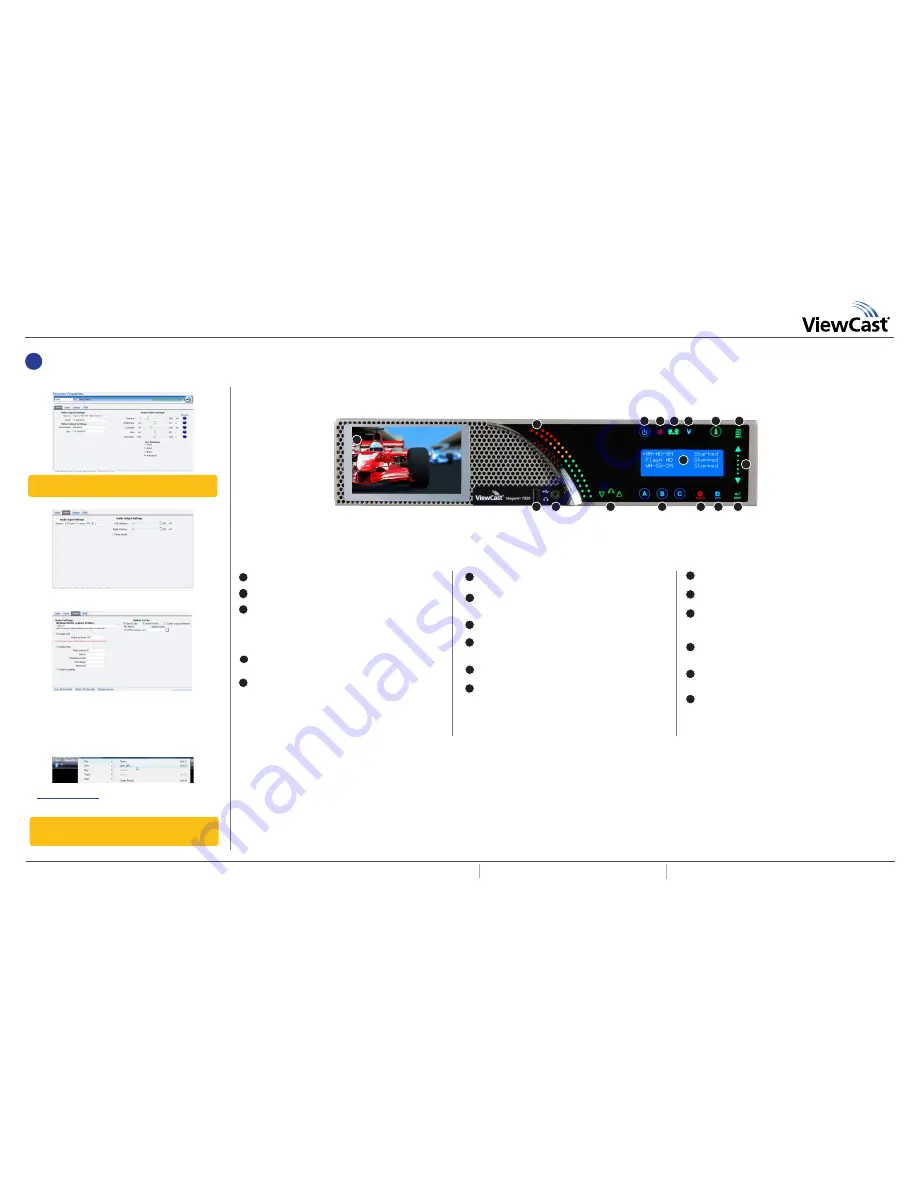
The Niagara 7550 Front Panel
Quick Start Guide
Niagara
®
7550
Contact ViewCast Technical Support at
support@viewcast.com.
40-03261-04-A
© 2011 ViewCast Corporation. ViewCast
®
, Niagara
®
(and design)
TM
are registered trademarks of ViewCast Corporation or its subsidiaries. All other trademarks are the property of their respective owners. Product specifications and availability may change without notice.
US / Canada
l
800-540-4119
| Europe / Middle East / Africa
l
+44 1256 345610
|
Asia / P852 2251 8778
A
L
M
N
P
O
D.
Stereo Headphone Connection
• The headphone connection is for audio monitoring.
E.
Stereo Headphone Connection Volume Buttons
• Controls the audio level output of the headphone connection.
F.
Preset ABC Buttons
• Assign an encoder(s) to the A, B, or C buttons.
• Touch A, B, or C then
Stream
to start the encoder(s).
• Touch A, B, or C then
Stop
to stop the encoder(s).
G.
Stream
• Touch once to start the encoder that is highlighted/selected in the
LCD display.
H.
Stop
• Touch once to stop the encoder that is highlighted/selected in the
LCD display.
I.
Enter
• Controls menu operations.
• Touch
Enter
or accept the menu choice highlighted on the
LCD display.
P
Q
Q
B
C
D
E
A.
Wide Screen Video Confidence Monitor
• Displays incoming video source.
A.
Audio Level Meter
• Indicates audio input presence.
C.
Power Button
• When the system is powered down, the power button is still
illuminated.
• Touch this button once to turn on the system.
• Touch this button twice to turn off the system.
• Touch and press for 8 seconds to execute an immediate power off.
D.
Alarm
• Indicator light remains solid when an application alert has
occurred.
E.
Remote Control
• Indicator light remains solid when another user is accessing the
system across the network from a computer.
A
B
C
D
E
F
G
F
I
G
H
J
F.
Video Present
• This light illuminates yellow when the system is not encod-
ing. It is blue when a valid video signal is being encoded.
G.
Alarm Information
• Touch to view a log of the most recent alarms recorded.
• Touch
Enter
to clear alarms from the log.
H.
Menu
• Touch to activate the system menu on the LCD display.
K.
LCD Display
• The LCD display shows the status, system menu, and allows you to
perform basic functions.
A.
Up/Down Arrows
• Touch the Up or Down arrow to navigate through the LCD menu.
C.
USB Port
• Allows the export of files to USB memory devices, installing
updates or firmware, or connecting USB devices.
K
L
M
N
O
H
I
J
K
Use the following guide to familiarize yourself with the front panel controls
.
15)
On the Video tab, verify video
Input
is
SerialDigital
and set the size
to
CIF
.
16)
Click the Audio tab and set audio Source to
SDI Input 1
.
17)
Click the Output tab. By default, the
Enable Pull
check box is enabled
and the
Pull from Port
field contains the port number
7007
.
18)
If not desired, clear the
Save to File
check box.
Click
Submit
.
19)
When the Operation Successful window appears, click
OK
. Test this
streaming profile from the Encoders window by clicking the red-
circle in the
Streaming
column for this encoder profile.
20)
Open Windows Media Player from your desktop. Position the cursor
to the left of the Now Playing option, right click, and select
File >
Open URL
.
21)
Enter the serial number and port number (in the format
http://hdxxxxxxxx:7007
) in the Open URL window. Press
Enter
. Your streaming video from the system displays in the
Windows Media Player window.
Note:
You may also use the front panel menu and
Streaming
button to start streaming. See the User Guide for step-by-
step instructions.
4.
First start setup
continued
Note:
The Niagara 7550 supports streaming output resolu
-
tions up to 1280 x 720.
G


