background image


Niagara Pro II User Guide 

ViewCast  


119 

Configuring alerts 

Click 

Configuration


Alerts

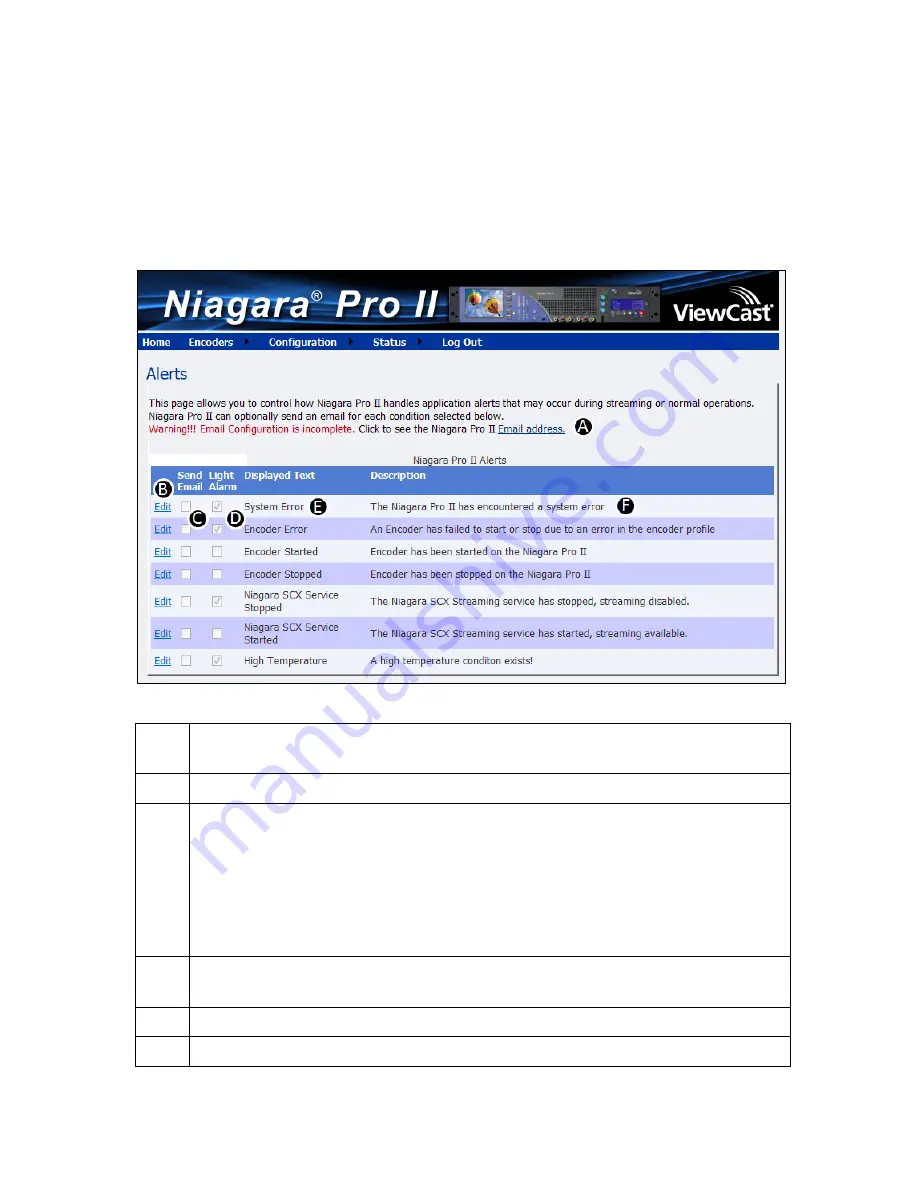
 from the menu bar on the home page. The Alerts Window (Figure 142) 

allows you to configure alerts for different situations that may occur during streaming or other 
operations.  

Figure 142. Alerts fields 


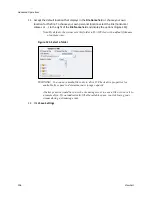
To configure alerts: 

Click this link to configure email settings on the 

System Configuration Settings


window. 

Click the 

Edit 

link next to the alert you want to change settings on. 

Click the 

Send Email

 checkbox to send an email to multiple recipients should an alarm 

occur. 

Note: You can optionally send an email alert to specific email address in the 

event of an application alarm. You must specify the email address where 
you want an alert sent, along with your email server user name, password, 
and server name. For more information about configuring the system to 
send email alerts, see the 

System Configuration

 section. 

Select 

Light Alarm

. The alarm light on the front panel of the system will automatically 

light when an alarm condition exists.  

Displays the type of alert. 

Provides a description of the type of alert. 

Summary of Contents for Niagara Pro II

Page 1: ......

Page 2: ...dvised of the possibility of such damages ViewCast Corporation is not responsible for any third party license fees that may occur with the use of our products by an end user including but not limited...

Page 3: ...system functions 9 Install overview 10 Prerequisites 10 Package contents 10 System requirements 11 Specifications 11 Niagara Pro II front panel 12 Niagara Pro II back panel 14 Connecting the system 1...

Page 4: ...b 49 Output tab 50 Editing an Adaptive Adobe Flash Dynamic streaming encoder 52 Video tab 53 Audio tab 59 Output tab 60 Editing an Microsoft Adaptive Smooth Streaming encoder 62 Video tab 63 Adaptive...

Page 5: ...nfiguring network properties 120 Configuring network card s 120 Configuring IP address 121 Configuring advanced network settings 121 System configuration settings 122 Setting current system configurat...

Page 6: ...57 CPU status 157 Memory available 157 Setup system menu 158 Network link status 158 Network MAC address 158 View network settings 159 Enable DHCP 159 Set static IP addresses 160 Set gateway address 1...

Page 7: ...dia Silverlight standard definition Microsoft Live IIS Smooth Streaming as well as container support for 3GPP and 3GPP2 You can configure and use the Niagara Pro II right out of the box for most strea...

Page 8: ...ave your changes Note Provides supplemental information Note The prompt may not display if IMPORTANT Provides important data that affects how the system or software responds IMPORTANT You must install...

Page 9: ...l the equipment in a rack Mechanical Loading Mounting of the equipment in the rack should be such that you do not cause a hazard due to uneven mechanical loading Circuit Overloading Consider the conne...

Page 10: ...mercial environment This equipment generates uses and may radiate radio frequency energy and if not installed and used in accordance with the instruction manual may cause harmful interference to radio...

Page 11: ...ied to the European Union does comply with the RoHS directive ViewCast certifies that this equipment shipped to the European Union conforms to the 2002 95 EC directive For current RoHS statement see w...

Page 12: ...e system thereby voiding the limited warranty Note You may stack multiple Niagara Pro II units as these appliances accommodate stacking Do not install the system in any area where the temperature is l...

Page 13: ...cing issues to authorized service personnel only The plug socket combination that serves as the main disconnecting device must be accessible at all times Protect the power cord from anyone walking on...

Page 14: ...actory Restore is complete You can perform a Factory Restore at any time This process returns the system to the software load that came with the system Perform a Factory Restore if the system becomes...

Page 15: ...n protocol domain name server DHCP DNS network Configure and connect your audio and video source to the Niagara Pro II Select your output formats and streaming settings Enter your streaming server inf...

Page 16: ...you comply with the following prerequisites All packaged items are undamaged and in working order Your environment meets all system requirements Safety instructions notices and warnings detailed in B...

Page 17: ...iagara streaming media system for assistance in obtaining any missing parts or for parts replacement System requirements Ensure your computer meets the following system requirements Browser interface...

Page 18: ...sent the indicator light blinks orange three times blinks green three times then returns to steady off C Audio level meter indicates audio input presence D Volume buttons control the audio level outpu...

Page 19: ...The LCD display shows the status and system menu and allows you to perform functions for the Niagara Pro II Q Press the Power button once to start the system Press the Power button once to turn off th...

Page 20: ...sions C USB 2 0 Connectors Use to connect USB storage devices or USB devices such as keyboard and mouse D Control RS 422 Connector Standard RS 422 port 9 pin D connector that you can use with deck con...

Page 21: ...ors for unbalanced audio sources Connecting the system Complete the following steps to configure all Niagara Pro II connections The example uses composite video input and unbalanced audio The followin...

Page 22: ...Start an encoding session Stop an encoding session View the status of an encoding session Access Health Check the CPU status View available memory Check the current temperature of the unit Not applic...

Page 23: ...The home page menu bar allows you to use Niagara SCX commands Menu Command Function Home View general administrative information about the Niagara Pro II Encoders All Encoders View the encoder profil...

Page 24: ...streaming Network Properties View information on network properties and addresses for both NIC ports and modify these properties System Configuration Modify the system configuration including setup f...

Page 25: ...uide ViewCast 19 Niagara Pro II browser windows flow Figure 6 shows the interrelationship and flow of the available configuration windows you may use to configure the Niagara system Figure 6 Niagara P...

Page 26: ......

Page 27: ...ustomize your encoding settings and assign specific encoding profiles to the Preset ABC buttons on the front panel The web interface provides the ability to control your system remotely from a compute...

Page 28: ...the system Refer to Figure 6 for a diagram and the following menu bar commands Home Encoders o All Encoders including Encoder Properties o Presets A B and C o Groups Configuration o Machine Properties...

Page 29: ...tance in obtaining any missing or replacement parts Connecting to an electrical power source Niagara Pro II ships with one of the following power cables North America power cable International power c...

Page 30: ...plays the initializing messages Figure 7 Figure 7 Initializing Messages After the system powers up the first time the Welcome message appears 3 Press Enter The system prompts you to set the date Figur...

Page 31: ...ly setup the Niagara Pro II Figure 12 Confirmation screen 14 Press Enter to exit the setup menu and reboot the system The booting screen appears Figure 13 Figure 13 Booting screen Connecting to an IP...

Page 32: ...the proper option 3 Press Enter The setup menus appear Figure 14 Figure 14 Setup menus 4 Select Network 5 Press Enter The network interface screen appears Figure 15 Figure 15 Interface screen 6 Selec...

Page 33: ...ddress 18 Press Enter The IP address screen appears Figure 20 Figure 20 IP Address screen 19 Use the Up and Down arrow buttons to change the numeric value 20 Press Stream to move to the next field 21...

Page 34: ...tup 28 ViewCast Figure 22 Gateway Address screen 26 Use the Up and Down arrow buttons to change the numeric value 27 Press Stream to move to the next field 28 Press Enter The network settings screen a...

Page 35: ...If this is the first time you are using the system refer to the First Start Setup section before continuing To start up 1 Press Power The LCD readout displays the initializing messages Figure 23 Figu...

Page 36: ...igure 24 System menu 2 Press Enter The shutdown screen appears Figure 25 Shutdown screen 3 Select Power Off System Press Enter The Power Off System screen appears Figure 26 Power Off System screen 4 S...

Page 37: ...this encoding session 4 Press Stream to start the encoder The starting screen appears Figure 29 Figure 29 Starting screen 5 The system menu appears with Encode selected Press Enter The encoder screen...

Page 38: ...een Note You must define encoder groups before you can assign them to a Preset button 8 Select Yes 9 Press Enter The select group screen appears Figure 33 Figure 33 Select group screen 10 Press Enter...

Page 39: ...ing less than 80 you may start another encoder without adversely affecting system performance To check CPU usage 1 Press Menu The system menu appears 2 Use the Up and Down arrow buttons to select Acce...

Page 40: ...has two USB ports and the front panel has one You can connect almost any standard USB storage device to one or both of these ports You can then export any AV files you may have created on the system s...

Page 41: ...ont panel The system menu appears 3 Use the Up and Down arrow buttons to select Export Files Figure 40 Figure 40 Export files 4 Press Enter The USB device screen appears Figure 41 Figure 41 USB Device...

Page 42: ...the desired file for export Note You can only select the USB root as a destination 9 Press Enter The exporting screens appear Figure 45 Figure 45 Exporting Screens Note When the system is finished exp...

Page 43: ...uttons The web interface works with any computer that has a current web browser and operating system For the best experience ViewCast recommends Internet Explorer or FireFox The Niagara system must ei...

Page 44: ...n when the system is idle The Admin Log In window appears Figure 49 Figure 49 Admin Log In Window 4 Type the User Name and Password IMPORTANT The setting to log in for the first time defaults to the u...

Page 45: ...ssigned the encoder This name appears on the LCD display on the front panel E Displays the status of the last action F Displays the result of the last action G Click this link to create a new encoder...

Page 46: ...Encoder window 2 Select the Encoder Type from the drop down list 3 Enter the name of the encoder Note Valid characters are alphanumeric space dash underscore and dot 4 Select the Publisher from the dr...

Page 47: ...ped icon Figure 53 in the Streaming column for the encoder you want to start streaming Figure 53 Stopped Icon 2 Messages appear detailing the encoder start progress Figure 54 Figure 54 Encoder Start S...

Page 48: ...e 56 Started Icon 2 Messages appear detailing the encoder stop progress Figure 57 Figure 57 Encoder Stop Status Note If the encoder was saving to file stopping can take longer than if that encoder was...

Page 49: ...utput tabs to edit the settings Begin with configuring the video and audio settings then the streaming properties The server and destination settings are different for each type of encoder From the En...

Page 50: ...ltiple data rates and multiple formats to provide the best user experience for different viewing audiences Osprey 5X0 Video Device 1 1 Osprey 5X0 Video Device 1 2 Osprey 5X0 Video Device 1 3 Osprey 5X...

Page 51: ...tional fields appear so you can enter the exact size you want the resulting video to be Figure 61 Note The size in the Width and Height fields must be divisible by 2 Figure 61 Custom fields 5 Enter th...

Page 52: ...ure video non telecine content Applies motion adaptive interlacing to all video It detects which portions of the image are still and which portions are in motion then applies different processing to e...

Page 53: ...am Note If you click Custom as the Input Size the system will automatically adjust the width and height of subsequent streams according to the custom settings C The bit rate displays in kilobits per s...

Page 54: ...s Note Click Cancel to stop this action Del Click this link to delete the stream Disable Click this link to disable this stream The settings are still visible but appear to be crossed out Note If the...

Page 55: ...dio 1 Balanced Osprey 5X0 Audio 1 DV 1394 Osprey 5X0 Audio 1 SDI 1 2 Osprey 5X0 Audio 1 SDI 3 4 Osprey 5X0 Audio 1 Unbalanced Osprey 5X0 Audio 2 AES EBU Osprey 5X0 Audio 2 Balanced Osprey 5X0 Audio 2...

Page 56: ...Indicate the maximum HTTP Cache by dragging the slider for the number of files to maintain Note The Stream Path that displays is a combination of the Host Address Subfolder and Filename 5 Select Creat...

Page 57: ...A better practice would be to use the streaming server to save a file or to save it to a remote drive If you inadvertently fill all available space you risk losing your stream during a streaming event...

Page 58: ...edit the settings Begin with configuring the video and audio settings then the server and destination settings The server and destination settings are different for each type of encoder From the Encod...

Page 59: ...ce can be initialized into multiple inputs denoted below The whole number denotes the physical input and the decimal denotes the virtual input For example for device 1 4 the whole number 1 denotes the...

Page 60: ...eo to play on a mobile video device that requires a non standard size for compatibility When you click Custom two additional fields appear so you can enter the exact size you want the resulting video...

Page 61: ...which portions of the image are still and which portions are in motion then applies different processing to each scenario Figure 73 De Interlace settings Note Telecine and inverse telecine only apply...

Page 62: ...Advanced Operations 56 ViewCast...

Page 63: ...f you click Custom as the Input Size the system will automatically adjust the width and height of subsequent streams according to the custom settings C The bit rate displays in kilobits per second Thi...

Page 64: ...for a particular stream Click Update to accept the changes Note Click Cancel to stop this action Del Click this link to delete the stream Disable Click this link to disable this stream The settings a...

Page 65: ...nced Osprey 5X0 Audio 1 DV 1394 Osprey 5X0 Audio 1 SDI 1 2 Osprey 5X0 Audio 1 SDI 3 4 Osprey 5X0 Audio 1 Unbalanced Osprey 5X0 Audio 2 AES EBU Osprey 5X0 Audio 2 Balanced Osprey 5X0 Audio 2 DV 1394 Os...

Page 66: ...ream name 3 Enter the Stream Name 4 Select Stream to File System to enable archiving content to the file system 5 Accept the default location that displays in the Folder field or choose your own locat...

Page 67: ...a Flash Media server to save a file or to save it to a remote drive If you inadvertently fill all available space you risk losing your stream during a streaming event 6 Select a Create unique folder t...

Page 68: ...d Output tabs to edit the settings Begin with configuring the video and audio settings then the streaming properties The server and destination settings are different for each type of encoder From the...

Page 69: ...ce can be initialized into multiple inputs denoted below The whole number denotes the physical input and the decimal denotes the virtual input For example for device 1 4 the whole number 1 denotes the...

Page 70: ...ization is useful when you are capturing video to be played on a mobile video device that requires a non standard size for compatibility When you click Custom two additional fields appear so you can e...

Page 71: ...forms no de interlacing of video that is not telecine Available for NTSC video only MotionAdaptive Is an algorithm for de interlacing pure video non telecine content Applies motion adaptive interlacin...

Page 72: ...l automatically adjust the width and height of subsequent streams according to the custom settings C The bit rate displays in kilobits per second This field can only contain whole numbers Note Two str...

Page 73: ...ns Edit Click this link to change the settings for a particular stream Click Update to accept the changes Note Click Cancel to stop this action Del Click this link to delete the stream Disable Click t...

Page 74: ...DV 1394 Osprey 5X0 Audio 1 SDI 1 2 Osprey 5X0 Audio 1 SDI 3 4 Osprey 5X0 Audio 1 Unbalanced Osprey 5X0 Audio 2 AES EBU Osprey 5X0 Audio 2 Balanced Osprey 5X0 Audio 2 DV 1394 Osprey 5X0 Audio 2 SDI 1...

Page 75: ...t support PlayReady requires external License Server provider support The URL and the seed must be acquired from the license hosting provider 5 Select the Key URL http https 6 Enter the PlayReady key...

Page 76: ...would be to use a remote file server to save a file or to save it to a remote drive If you fill all available space you risk losing your stream during a streaming event Smooth Streaming files created...

Page 77: ...o edit the settings Begin with configuring the Video and Audio tabs then the Output tab The streaming properties and advanced streaming settings are different for each type of encoder From the Encoder...

Page 78: ...can be initialized into multiple inputs denoted below The whole number denotes the physical input and the decimal denotes the virtual input For example for device 1 4 the whole number 1 denotes the ph...

Page 79: ...on a mobile video device that requires a non standard size for compatibility When you click Custom two additional fields appear so you can enter the exact size you want the resulting video to be Figur...

Page 80: ...bles the video in a 24 fps progressive format Applies inverse telecine de interlacing to all telecine video Performs no de interlacing of video that is not telecine Available for NTSC video only Motio...

Page 81: ...prey 5X0 Audio 1 SDI 1 2 Osprey 5X0 Audio 1 SDI 3 4 Osprey 5X0 Audio 1 Unbalanced Osprey 5X0 Audio 2 AES EBU Osprey 5X0 Audio 2 Balanced Osprey 5X0 Audio 2 DV 1394 Osprey 5X0 Audio 2 SDI 1 2 Osprey 5X...

Page 82: ...Advanced Operations 76 ViewCast 4 Optional Select Mute Audio to silence the audio 5 Click Save Settings...

Page 83: ...em overwrites the previous file Click Create unique file to create a file that the system does not overwrite 2 Accept the default location that displays in the File Name field or choose your own locat...

Page 84: ...e would be to use the streaming server to save a file or to save it to a remote drive If you inadvertently fill all available space you risk losing your stream during a streaming event IMPORTANT The N...

Page 85: ...Presets to edit the settings Begin with configuring the video and audio settings then the streaming properties The server and destination settings are different for each type of encoder From the Encod...

Page 86: ...an be initialized into multiple inputs denoted below The whole number denotes the physical input and the decimal denotes the virtual input For example for device 1 4 the whole number 1 denotes the phy...

Page 87: ...the encoded video from the drop down list Full size for full screen video CIF for video scaled from full size to size QCIF for video scaled from full size to of CIF size Custom You can also specify a...

Page 88: ...les the video in a 24 fps progressive format Applies inverse telecine de interlacing to all telecine video Performs no de interlacing of video that is not telecine Available for NTSC video only Motion...

Page 89: ...sprey 5X0 Audio 1 Unbalanced Osprey 5X0 Audio 1 AES EBU Osprey 5X0 Audio 1 Balanced Osprey 5X0 Audio 1 DV 1394 Osprey 5X0 Audio 1 SDI 1 2 Osprey 5X0 Audio 1 SDI 3 4 Osprey 5X0 Audio 2 AES EBU Osprey 5...

Page 90: ...Advanced Operations 84 ViewCast 5 Drag the sliders to change the Left Volume and Right Volume 6 Optional Select Mute Audio to silence the audio 7 Click Save Settings...

Page 91: ...nable Save to File to save the encoded content to a file Each time you start this encoder the system overwrites the previous file Note You must enable either Enable Streaming or Save to File If both E...

Page 92: ...les to drive D Check drive properties for available free space to determine your storage capacity A better practice would be to use the streaming server to save a file or to save it to a remote drive...

Page 93: ...Custom Preset from the drop down list 2 Click Edit next to the setting you want to modify IMPORTANT These advanced settings affect the way the encoder performs and if set incorrectly may lead to abnor...

Page 94: ...aming properties The server and destination settings are different for each type of encoder From the Encoder Properties window Figure 106 you can set the encoder to start streaming automatically by cl...

Page 95: ...e can be initialized into multiple inputs denoted below The whole number denotes the physical input and the decimal denotes the virtual input For example for device 1 4 the whole number 1 denotes the...

Page 96: ...ideo scaled from full size to of CIF size Custom You can also specify a custom size for your video This customization is useful when you are capturing video to play on a mobile video device that requi...

Page 97: ...ynamically between the two modes as the content changes Available for NTSC video only Inverse Telecine Drops the redundant fields and reassembles the video in a 24 fps progressive format Applies inver...

Page 98: ...Partnership Project 3GPP defined 3GP as a multimedia container format for use on 3G mobile phones It stores video streams such as MPEG 4 or H 264 and audio streams such as AAC This format has two def...

Page 99: ...ey 5X0 Audio 1 Unbalanced Osprey 5X0 Audio 2 AES EBU Osprey 5X0 Audio 2 Balanced Osprey 5X0 Audio 2 DV 1394 Osprey 5X0 Audio 2 SDI 1 2 Osprey 5X0 Audio 2 SDI 3 4 Osprey 5X0 Audio 2 Unbalanced 2 Click...

Page 100: ...at is the Low Complexity profile 4 The default Audio Encoder is AAC Advanced Audio Coding a standardized lossy compression and encoding scheme for digital audio AAC achieves better audio quality than...

Page 101: ...ation or online message boards for setup details specific for the individual streaming server Note You can stream point to point by selecting a share destination directory for the saved SDP file Remem...

Page 102: ...ns Note By default the system sets this folder to D AVFiles with a default filename of capture mp4 Figure 113 Select a folder WARNING You can save media files only to drive D Check drive properties fo...

Page 103: ...way the encoder performs and if set incorrectly may lead to abnormal encoder operations Refer to Appendix B H 264 Advanced Settings for suggested values for the type of video you are streaming 3 Chang...

Page 104: ...y the encoder performs and if set incorrectly may lead to abnormal encoder operations Refer to Appendix B H 264 Advanced Settings for suggested values for the type of video you are streaming 3 Change...

Page 105: ...dio Output and DRM tabs to edit the settings Begin with configuring the Video and Audio tabs The server and destination settings are different for each type of encoder From the Encoder Properties wind...

Page 106: ...can be initialized into multiple inputs denoted below The whole number denotes the physical input and the decimal denotes the virtual input For example for device 1 4 the whole number 1 denotes the ph...

Page 107: ...o scaled from full size to size QCIF for video scaled from full size to of CIF size Custom You can also specify a custom size for your video This customization is useful when you are capturing video t...

Page 108: ...mbles the video in a 24 fps progressive format Applies inverse telecine de interlacing to all telecine video Performs no de interlacing of video that is not telecine Available for NTSC video only Moti...

Page 109: ...1 Balanced Osprey 5X0 Audio 1 DV 1394 Osprey 5X0 Audio 1 SDI 1 2 Osprey 5X0 Audio 1 SDI 3 4 Osprey 5X0 Audio 1 Unbalanced Osprey 5X0 Audio 2 AES EBU Osprey 5X0 Audio 2 Balanced Osprey 5X0 Audio 2 DV...

Page 110: ...he server You should only use this method if the encoder and server reside within the same network firewall To enable clients to pull the stream from the system set up a session and begin broadcasting...

Page 111: ...il to start 5 Enter a port number that the client will use to push the stream 6 Enter the Server name or IP address 7 Enter the User Name 8 Enter the Password 9 Select Enable Scripting to embed closed...

Page 112: ...123 Note By default the system sets this folder to D AVFiles with a default filename of capture wmv Figure 123 Select a folder WARNING You can save media files only to drive D Check drive properties...

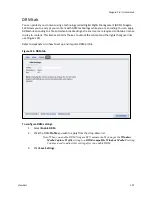
Page 113: ...to play to content This license contains the key to unlock the content and the rights that govern its use Figure 124 Refer to Appendix A on how to set up and import a DRM profile Figure 124 DRM tab T...

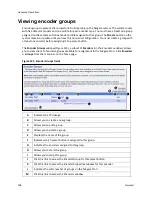
Page 114: ...s window allows you to view the list of encoder groups available for assignment to the Niagara Pro II Click Encoders Groups from the menu bar on the home page Figure 125 Encoder Groups fields A Indica...

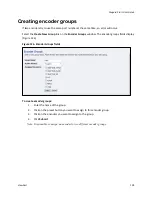
Page 115: ...nk on the Encoder Groups window The encoder groups fields display Figure 126 Figure 126 Encoder Groups fields To create encoder groups 1 Enter the name of the group 2 Click on the preset button you wa...

Page 116: ...while the group starts Note With each encoder started more system resources CPU cycles are consumed It is recommended that the total CPU threshold not exceed an average of 80 Refer to the Checking CP...

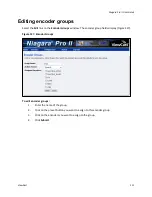
Page 117: ...e Encoder Groups window The encoder group fields display Figure 127 Figure 127 Encoder Groups To edit encoder groups 1 Enter the name of the group 2 Click on the preset button you want to assign to th...

Page 118: ...to configure these buttons are on the Encoder Preset A Encoder Preset B and Encoder Preset C windows Each window shows a graphic representation of the front panel of the Niagara Pro II If you previou...

Page 119: ...st of all groups available appears 2 Select a group 3 Click Submit The Encoder Preset A window updates with the encoder information Figure 129 Select a Group Note The A button in the graphic is highli...

Page 120: ...ou attempt to encode more streams than the system can process simultaneously the streams drop frames and the video stutters This results in a poor viewer experience If you fail to reduce the number of...

Page 121: ...ewing all encoders After assigning encoder profiles to the Preset ABC icons the system updates the Preset column on the Encoder window to reflect these changes To view these changes click the View All...

Page 122: ...ware versions network name serial number and hard drive configurations Click Configuration Niagara Pro II Properties from the menu bar on the home page Figure 137 Machine Properties Most of the data o...

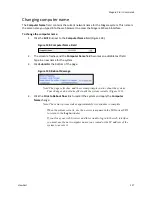
Page 123: ...name for the system 3 Click Submit at the bottom of the page Figure 139 Reboot Message Note The page refreshes and the system prompts you to reboot the system Your changes do not take effect until th...

Page 124: ...dow Note You cannot change the User Name for the web interface from this window 2 Type your current password in the Password field Continue by typing your desired new password in both the New Password...

Page 125: ...settings on C Click the Send Email checkbox to send an email to multiple recipients should an alarm occur Note You can optionally send an email alert to specific email address in the event of an appl...

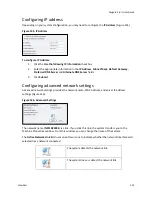
Page 126: ...ration Network Properties from the menu bar on the home page Figure 143 Network Properties Window Configuring network card s The Niagara Pro II has two Gigabit network connections available on the Net...

Page 127: ...fields 3 Click Submit Configuring advanced network settings Advanced network settings provides the network name MAC Address and server IP address settings Figure 146 Figure 146 Advanced Settings The n...

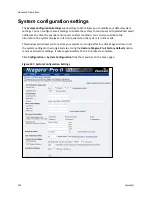
Page 128: ...ion You can also customize the information the system displays on its front panel when the system is in idle mode This window also allows you to restore your system to its original factory disk image...

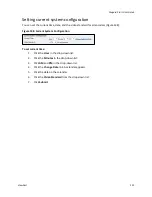
Page 129: ...oders Figure 148 Figure 148 Current System Configuration To set current time 1 Click the Hour in the drop down list 2 Click the Minutes in the drop down list 3 Click AM and PM in the drop down list 4...

Page 130: ...work administrator for assistance 2 Enter the password if required Note For security purposes the password for your account does not display once the system enters it into the Niagara Pro II settings...

Page 131: ...the LCD display screen and alternates between status and encoder information Figure 150 Figure 150 Idle Screen Information To configure idle screen information 1 Click the checkboxes next to the info...

Page 132: ...default directory setting unless you understand the risk of saving your files to a directory not located on drive D If you save your files to another drive on the system the system could delete the f...

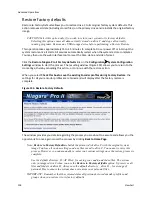
Page 133: ...also may set the time between repetitive intervals for checking the CPU threshold Figure 152 Encoder Startup Settings Note ViewCast recommends a CPU threshold setting of 80 or lower Setting SimulStrea...

Page 134: ...ancelling this action or continue with the restore action When you select Check this box to save the existing Encoder profiles during Factory Restore the settings for all your encoder profiles are ret...

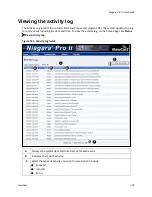
Page 135: ...updates the log for every event including the date and time To view the activity log on the home page click Status View Activity Log Figure 155 Activity Log fields A Displays the system date and time...

Page 136: ...ns 130 ViewCast Warnings D Displays a description of the activity E Click this link to clear all logged activities F Displays the total number of records for the selected view type Click the printer i...

Page 137: ...alerts Figure 156 The Alerts Window updates with every alert event on the system The alerts include any specific alert events for the encoder Figure 156 Alerts fields A Click this icon to clear all al...

Page 138: ...t a USB storage device in one of the USB ports the system automatically detects the removable storage device and assigns a drive letter to the device Use standard Windows methods to transfer audiovisu...

Page 139: ...RM profile 2 Import the DRM profile using the Windows Media Encoder application included with Niagara streaming media appliances or available as a free download from Microsoft Corporation http www mic...

Page 140: ...n the Remote Desktop Connection Figure 157 Figure 157 Remote Desktop Connection 2 Click Options The setting tabs display 3 Click the Local Resources tab 4 Under Remote computer sound click Leave at re...

Page 141: ...hen exiting from Remote Desktop Connection do not log out Instead disconnect from the system This step allows its internal programs to continue running 8 Copy the DRM profiles to a protected location...

Page 142: ...161 Starting Windows Media Encoder 10 When the New Session Wizard displays click Cancel Figure 162 Figure 162 New Session Wizard 11 Click Properties under the top menu bar Figure 163 Figure 163 Proper...

Page 143: ...is process for each DRM profile you wish to import 16 Exit from the Windows Media Encoder application when finished Note If the system prompts if you want to save your encoding session click No option...

Page 144: ......

Page 145: ...should understand and select the appropriate values for your streaming application See Settings for explanations of each setting variable Setting Value Range BFramesMax 0 to 4 GOPSize 1 to 4000 GOPSi...

Page 146: ...e Profile is selected has no effect GOPSize This value sets the maximum interval between IDR also called reference frames Theoretically higher values improve compression because I frames have more dat...

Page 147: ...small details before quantization 100 to 1000 for de noising As a result using Noise Reduction can make the encoded video look smoother but with much less detail QuantizerMax This value sets the maxi...

Page 148: ...ues also increase CPU usage TrellisRDQuantization This value performs Trellis quantization to increase the visual quality of the encoded video the higher the value the better the qualities of the vide...

Page 149: ...ou select those Advanced Encoder Settings These examples are suggestions and you should understand and select the appropriate values for your streaming application See Settings for explanations of eac...

Page 150: ...aced video LookaheadFrames This value is the amount of frames the encoder keeps in its buffers to perform various calculations The higher this value the better the quality and the closer to a constant...

Page 151: ...quantizers for Advanced Simple Profile and for high bit rate encoding more detail from the original video will be preserved For lower bit rate encoding using 0 smooths out the video appearance Quanti...

Page 152: ...ntization This value performs Trellis quantization to increase the visual quality of the encoded video by determining the optimal encoding the higher the value the better the video quality but the hig...

Page 153: ...shared folder is created on the remote PC with full access for both Niagara Pro II and SCXUser On the Niagara Pro II the mapped network drive is created to reconnect at logon using the SCXUser usernam...

Page 154: ...Disable User must change password at next logon 11 Enable User cannot change password 12 Enable Password never expires Figure 167 New User window 13 Click Create 14 Repeat steps 5 through 13 to create...

Page 155: ...ViewCast 149 17 In Computer Management click Groups Figure 169 Groups 18 Double click on Administrators 19 Click Add Figure 170 Administrators Properties window 20 Click Add The Select Users window di...

Page 156: ...C then click OK Figure 171 Locations window 23 Enter niagarapro2 for the object name and then click OK 24 The user niagarapro2 appears in the list of Administrators Figure 172 Administrator Properties...

Page 157: ...ote The shared folder s must be created on the remote PC 1 Open Computer 2 Open the drive where the shared folder will be created 3 Right click select New then Folder Figure 173 Create new folder 4 En...

Page 158: ...ght click on the folder and then select Properties Figure 175 Folder Properties window 6 Click on the Sharing tab 7 Click Share The File Sharing window displays 8 Type a name and then click Add or cli...

Page 159: ...to the remote shared folder that will reconnect at logon Once the mapped drive is created and the Niagara Pro II is rebooted the user will be able to export to the network drive 1 On the Niagara Pro...

Page 160: ...ork Drive Setup 154 ViewCast 9 Click OK 10 Click Finish After a few moments the network share will open 11 Close the window The mapped drive will now appear in My Computer under Network Drives 12 Rebo...

Page 161: ...s accessible using the Niagara Pro II front panel LCD display It is designed to be a visual reference of the LCD screen including the front panel button action to move to the next screen This section...

Page 162: ...Appendix D System Menu LCD Display 156 ViewCast Encoder menu Encoder start Encoder stop Encoder status...

Page 163: ...Niagara Pro II User Guide ViewCast 157 Access health menu CPU status Memory available...

Page 164: ...Appendix D System Menu LCD Display 158 ViewCast Setup system menu Network link status Network MAC address...

Page 165: ...Niagara Pro II User Guide ViewCast 159 View network settings Enable DHCP...

Page 166: ...Appendix D System Menu LCD Display 160 ViewCast Set static IP addresses...

Page 167: ...Niagara Pro II User Guide ViewCast 161 Set gateway address...

Page 168: ...Appendix D System Menu LCD Display 162 ViewCast Set date and time Set video standard x3...

Page 169: ...Niagara Pro II User Guide ViewCast 163 Factory restore Note This process takes approximately 10 minutes please be patient...

Page 170: ...Appendix D System Menu LCD Display 164 ViewCast Export files menu Export to USB drive Shutdown Niagara Pro II Or...

Page 171: ...anced system settings 37 Alerts fields 118 130 Assign an encoders screen 32 Assign an Encoders Screen 113 Assigning a static IP address 26 Assigning Preset A 112 audience for publication 1 AVI Audio t...

Page 172: ...Screen 33 CPU Threshold field 126 Create New Encoder window 40 Create new folder 151 Creating an encoder 40 encoder groups 108 the shared folder 151 Current System Configuration 122 Custom fields 45...

Page 173: ...d Warnings 23 Interface screen 26 IP Address 38 120 IP Address screen 27 L Local Resources Tab 134 Locations window 150 Logging in 37 M Machine Properties 115 Mapping the network drive 153 Media Appli...

Page 174: ...emote Desktop Connection 134 Restore Factory Defaults 127 Restore the Login Password to the Factory Default 117 S Save to File setting 34 Select a folder 51 59 68 77 85 95 105 Select a Group 112 Selec...

Page 175: ...e 131 Users 147 Using preset buttons to start encoding 113 V Valid output container selections for video encoder types 91 Video Filter Settings 45 54 63 72 80 90 100 Video format screen 25 View Alerts...

Page 176: ...ra and design are registered trademarks of ViewCast Corporation or its subsidiaries All other trademarks are the property of their respective owners Product specifications and availability may change...

Reviews: