Overview
12
ViewCast
Niagara Pro II front panel
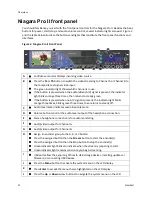
You should familiarize yourself with the front panel controls for the Niagara Pro II. Besides the basic
buttons for power, start/stop, and audio volume control, several indicator lights also exist. Figure 2
and the table below illustrate the buttons and lights that constitute the front panel functions and
interfaces.
Figure 2. Niagara Pro II Front Panel
A
Confidence monitor displays incoming video source.
B
Press the
Ta
or
Tb
button to switch the video streaming to Channel A or Channel B to
the composite test signal video input.
The green indicator light shows which channel is in use.
If the button is pressed when the audio/video (A/V) signal is present, the indicator
light blinks orange three times, then returns to steady green.
If the button is pressed when no A/V signal is present, the indicator light blinks
orange three times, blinks green three times, then returns to steady off.
C
Audio level meter indicates audio input presence.
D
Volume buttons control the audio level output of the headphone connection.
E
Stereo headphone connection is for audio monitoring.
F
Audio/video output for Channel A.
G
Audio/video output for Channel B.
H
Assign an encoder group to the A, B, or C button.
Press the assigned button then the
Stream
button to start the encoder(s).
Press the assigned button then the Stop button to stop the encoder(s).
Green indicator light blinks to indicate when the stream is preparing to start.
Green indicator light remains solid once you begin streaming.
I
USB ports allow the exporting of files to USB storage devices, installing updates or
firmware, or connecting USB devices.
J
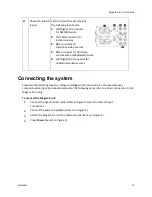
Press the
Menu
button to activate the system menu on the LCD display.
K
Press
Enter
to accept the menu choice highlighted on the LCD display.
L
Press the
Up
or
Down
arrow buttons to navigate the system menu on the LCD
Summary of Contents for Niagara Pro II
Page 1: ......
Page 26: ......
Page 62: ...Advanced Operations 56 ViewCast...
Page 144: ......
Page 163: ...Niagara Pro II User Guide ViewCast 157 Access health menu CPU status Memory available...
Page 165: ...Niagara Pro II User Guide ViewCast 159 View network settings Enable DHCP...
Page 166: ...Appendix D System Menu LCD Display 160 ViewCast Set static IP addresses...
Page 167: ...Niagara Pro II User Guide ViewCast 161 Set gateway address...
Page 168: ...Appendix D System Menu LCD Display 162 ViewCast Set date and time Set video standard x3...


