Niagara Pro II User Guide
ViewCast
23
Easy first time set up
You should read all instructions, notices, and warnings in the
Before You Begin
section before
getting started with your new Niagara Pro II hardware for the first time. Also, ensure you have all
required parts and meet all system requirements before installing this product.
Do not continue with the installation if you find any components missing or damaged. Contact the
ViewCast reseller where you purchased your Niagara system for assistance in obtaining any missing
or replacement parts.
Connecting to an electrical power source
Niagara Pro II ships with one of the following power cables:
North America power cable
International power cable
UK power cable
To connect the power source:
1.
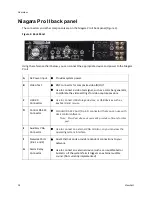
Attach the block end to the power input located on the upper corner on the rear
panel.
2.
Plug the other end of the cable into a wall outlet or surge protection enabled power
strip connected to a wall outlet or other common power source.
WARNING! The plug-socket combination must remain accessible at all times as it serves as the
main disconnecting device.
Do not work on the system, connect, or disconnect cables during periods of lightning activity.
Summary of Contents for Niagara Pro II
Page 1: ......
Page 26: ......
Page 62: ...Advanced Operations 56 ViewCast...
Page 144: ......
Page 163: ...Niagara Pro II User Guide ViewCast 157 Access health menu CPU status Memory available...
Page 165: ...Niagara Pro II User Guide ViewCast 159 View network settings Enable DHCP...
Page 166: ...Appendix D System Menu LCD Display 160 ViewCast Set static IP addresses...
Page 167: ...Niagara Pro II User Guide ViewCast 161 Set gateway address...
Page 168: ...Appendix D System Menu LCD Display 162 ViewCast Set date and time Set video standard x3...


