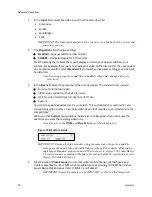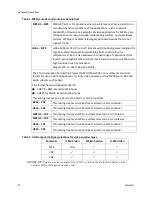
Niagara Pro II User Guide
ViewCast
85
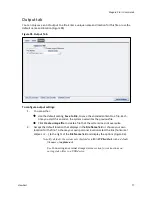
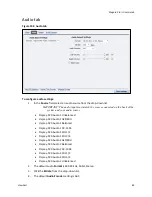
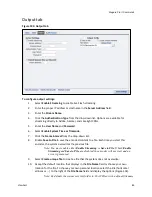
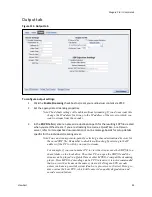
Output tab
Figure 103. Output tab
To configure output settings:
1.
Select
Enable Streaming
to enable live Flash streaming.
2.
Enter the proper IP address or Hostname in the
Server Address
field.
3.
Enter the
Stream Name
.
4.
Click the
Authentication Type
from the drop-down list. Options are available for
streaming directly to Adobe, Akamai, and Limelight CDNs.
5.
Enter the
User Name
and
Password
.
6.
Select
Enable System Time as Timecode
.
7.
Click the
Frame Interval
from the drop-down list.
8.
Enable
Save to File
to save the encoded content to a file. Each time you start this
encoder, the system overwrites the previous file.
Note: You must enable either
Enable Streaming
or
Save to File
. If both
Enable
Streaming
and
Save to File
are disabled, the encoder will not start and an
error is generated.
9.
Select
Create unique file
to create a file that the system does not overwrite.
10.
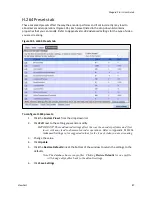
Accept the default location that displays in the
File Name
field or choose your own
location for the file. To choose your own personal location select the link (horizontal
ellipses or … ) to the right of the
File Name
field and display the options (Figure 104).
Note: By default, the system sets this folder to D:\AVFiles\ with a default filename
Summary of Contents for Niagara Pro II
Page 1: ......
Page 26: ......
Page 62: ...Advanced Operations 56 ViewCast...
Page 144: ......
Page 163: ...Niagara Pro II User Guide ViewCast 157 Access health menu CPU status Memory available...
Page 165: ...Niagara Pro II User Guide ViewCast 159 View network settings Enable DHCP...
Page 166: ...Appendix D System Menu LCD Display 160 ViewCast Set static IP addresses...
Page 167: ...Niagara Pro II User Guide ViewCast 161 Set gateway address...
Page 168: ...Appendix D System Menu LCD Display 162 ViewCast Set date and time Set video standard x3...

