background image

32

Other Information

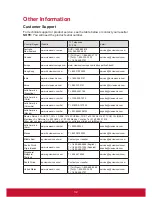
Customer Support

For technical support or product service, see the table below or contact your reseller.

NOTE: 

You will need the product serial number.

Country/Region Website

T = Telephone

F = FAX

Email

Australia 

New Zealand

www.viewsonic.com.au

AUS= 1800 880 818

NZ= 0800 008 822

service@au.viewsonic.com

Canada

www.viewsonic.com

T (Toll-Free)= 1-866-463-4775

T (Toll)= 1-424-233-2533

F= 1-909-468-3757

service.ca@viewsonic.com

Europe

www.viewsoniceurope.com www.viewsoniceurope.com/uk/support/call-desk/

Hong Kong

www.hk.viewsonic.com

T= 852 3102 2900

service@hk.viewsonic.com

India

www.in.viewsonic.com

T= 1800 266 0101

service@in.viewsonic.com

Korea

www.kr.viewsonic.com

T= 080 333 2131

service@kr.viewsonic.com

Latin America

(Argentina)

www.viewsonic.com/la/

T= 0800-4441185

soporte@viewsonic.com

Latin America 

(Chile)

www.viewsonic.com/la/

T= 1230-020-7975

soporte@viewsonic.com

Latin America

(Columbia)

www.viewsonic.com/la/

T= 01800-9-157235

soporte@viewsonic.com

Latin America 

(Mexico)

www.viewsonic.com/la/

T= 001-8882328722

soporte@viewsonic.com

Renta y Datos, 29 SUR 721, COL. LA PAZ, 72160 PUEBLA, PUE. Tel: 01.222.891.55.77 CON 10 LINEAS

Electroser, Av Reforma No. 403Gx39 y 41, 97000 Mérida, Yucatán. Tel: 01.999.925.19.16

Other places please refer to http://www.viewsonic.com/la/soporte/index.htm#Mexico
Latin America 

(Peru)

www.viewsonic.com/la/

T= 0800-54565

soporte@viewsonic.com

Macau

www.hk.viewsonic.com

T= 853 2870 0303

service@hk.viewsonic.com

Middle East

ap.viewsonic.com/me/

Contact your reseller

service@ap.viewsonic.com

Puerto Rico & 

Virgin Islands

www.viewsonic.com

T= 1-800-688-6688 (English)

T= 1-866-379-1304 (Spanish)

F= 1-909-468-3757

service.us@viewsonic.com

soporte@viewsonic.com

Singapore/ 

Malaysia/ 

Thailand

www.ap.viewsonic.com

T= 65 6461 6044

service@sg.viewsonic.com

South Africa

ap.viewsonic.com/za/

Contact your reseller

service@ap.viewsonic.com

United States

www.viewsonic.com

T (Toll-Free)= 1-800-688-6688

T (Toll)= 1-424-233-2530

F= 1-909-468-3757

service.us@viewsonic.com

Summary of Contents for EP1031r

Page 1: ... registering your product for future service Warranty information contained in this User Guide will describe your limited coverage from ViewSonic Corporation which is also found on our web site at http www viewsonic com in English or in specific languages using the Regional selection box in the upper right corner of our website Antes de operar su equipo lea cu idadosamente las instrucciones en est...

Page 2: ...at his her own expense Reorient or relocate the receiving antenna Increase the separation between the equipment and receiver Connect the equipment into an outlet on a circuit different from that to which the receiver is connected Consult the dealer or an experienced radio TV technician for help Warning To comply with the limits for the Class A Class B digital device pursuant to Part 15 of the FCC ...

Page 3: ...ctronic Equipment Directive 2002 96 EC WEEE The mark indicates the requirement NOT to dispose of the equipment as unsorted municipal waste but use the return and collection systems according to local law If the batteries accumulators and button cells included with this equipment display the chemical symbol Hg Cd or Pb then it means that the battery has a heavy metal content of more than 0 0005 Mer...

Page 4: ...9 5 EC This equipment meets the following conformance standards ETSI EN 300 328 EN 301 489 01 EN 301 489 17 EN 62311 Notified Countries Germany UK Netherlands Belgium Sweden Denmark Finland France Italy Spain Austria Ireland Portugal Greece Luxembourg Estonia Latvia Lithuania Czech Republic Slovakia Slovenia Hungary Poland and Malta ...

Page 5: ...r the Annex III of the RoHS2 Directives as noted below Examples of exempted components are 1 Mercury in cold cathode fluorescent lamps and external electrode fluorescent lamps CCFL and EEFL for special purposes not exceeding per lamp 1 Short length 500 mm maximum 3 5 mg per lamp 2 Medium length 500 mm and 1 500 mm maximum 5 mg per lamp 3 Long length 1 500 mm maximum 13 mg per lamp 2 Lead in glass ...

Page 6: ...in the LCD monitor contains mercury Please follow the laws or rules of your municipality to dispose of the tube properly Do not bend power cord Do not use monitor in high temperature humid dusty or oily areas If monitor or glass is broken do not come in contact with the liquid crystal and handle with care Allow adequate ventilation around the monitor so that heat can properly dissipate Do not bloc...

Page 7: ...ink often Position the monitor at a 90 angle to windows and other light sources to minimize glare and reflections Clean the LCD monitor surface with a lint free nonabrasive cloth Avoid using any cleaning solution or glass cleaner Adjust the monitor s brightness contrast and sharpness controls to enhance readability Avoid displaying fixed patterns on the monitor for long periods of time to avoid im...

Page 8: ... Introduction 1 1 Features 3 1 2 Package contents 3 1 3 Physical view and features 4 1 4 Installation 5 2 Configuring the EP1031r EP1032r T 2 1 System connections 6 2 2 Basic settings 7 2 3 Connecting the EP1031r EP1032r T to your network 7 2 4 Time zone settings 10 2 5 Content settings 11 2 6 Player information 12 2 7 Content configuration AppStart 13 2 8 Content configuration FailSafe 14 2 9 Con...

Page 9: ... 25 2 16 System configuration Power save 26 2 17 System configuration Expand Storage by using SD card 26 3 Content Management 4 Authoring in HTML5 5 Working with SMIL 5 1 Input Source 27 5 2 www a smil org for developers 27 6 Technical Data 6 1 Specifications 28 7 Troubleshooting Other Information Customer Support 32 Limited Warranty 33 ...

Page 10: ...y efficiency Disclaimer ViewSonic Corporation shall not be liable for technical or editorial errors or omissions contained herein nor for incidental or consequential damages resulting from furnishing this material or the performance or use of this product In the interest of continuing product improvement ViewSonic Corporation reserves the right to change product specifications without notice Infor...

Page 11: ...Purchase Date EP1031r EP1032r T ViewSonic Multimedia Digital Poster VS15683 EP1031r EP1032r T_UG_ENG Rev 1A 09 24 13 _______________________________________ _______________________________________ Product disposal at end of product life ViewSonic respects the environment and is committed to working and living green Thank you for being part of Smarter Greener Computing Please visit ViewSonic websit...

Page 12: ... support for developers EP1032r T 10 inch multi touch widescreen LCD display and stereo speakers 4GB on board flash local storage with SD card slot Built in wireless b g n network and Ethernet Power over Ethernet Supports full POPAI Screen Media Formats Standards profiles S1 to S12 and E1 to E8 Multiple 3rd party software solution compatibility Industry leading W3C SMIL support for developers 1 2 ...

Page 13: ...s Wireless antenna post VESA mount MIS D 75 Cover HDMI Kensington lock ADB DC IN Reset USB x2 SD card slot Ethernet Audio out jack EP1032r T Wireless antenna post VESA mount MIS D 75 Cover HDMI Kensington lock ADB DC IN Reset USB x2 SD card slot Ethernet Audio out jack ...

Page 14: ...ws 3 Fasten the screws Fix the Kensington lock 1 Press the Kensington lock s button and insert it into the lock slot 2 Plug the lock into the lock hole and then release the button Open the back cover 1 Remove the screw from the back cover 2 To release the back cover slide the cover in the direction shown here and then pull up ...

Page 15: ...ay in the Basic settings menu if no content service has been configured i e first boot up for a brand new unit or after a factory reset Plug in a USB mouse to start configuring the signboard If you have already set content into the signboard contents will start playing back automatically 15 seconds after boot up Note To enter the menu system at any time during playback plug in a USB mouse and hold...

Page 16: ...gs menu is entered the signboard will start playback automatically after 15 seconds if content services have been set previously Auto playback can be canceled by clicking on the button while it s counting down To enter the Advanced Setting menu click the Advanced button 2 3 Connecting the EP1031r EP1032r T to your network Wireless connection 1 Click the Wireless LAN setting and the wireless config...

Page 17: ...ted when the signboard connects to a wireless network Fig 2 3 2 3 The signboard will scan for wireless signals nearby and available AP stations will be listed Fig 2 3 3 4 Click on the station name to connect If the network requires authentication you will be asked to provide the password for access Fig 2 3 4 ...

Page 18: ...tion UI will be launched Fig 2 3 1 2 Click the ON OFF button as indicated below to turn the Wireless interface off Fig 2 3 2 DHCP automatically assign network IP address 3 Turn on the Ethernet interface For DHCP environments configuration will be finished in this step Fig 2 3 5 Static IP manually assign network IP address 4 Click Ethernet to make a static IP configuration Fig 2 3 6 ...

Page 19: ...10 2 4 Time zone settings 1 Click Time zone to launch the configuration menu Fig 2 4 1 2 Choose the correct time zone from available options Fig 2 4 2 ...

Page 20: ... 2 5 Content settings 1 Click the Set content button to launch the configuration menu Fig 2 5 1 2 Input the content source URL and click on Connect The signboard will start playback immediately Fig 2 5 2 ...

Page 21: ...r ID 1 Click Advanced and the advanced configuration menu will be launched Fig 2 6 1 2 Click on Information to view Health Status definitions Green Normal Device connection to the content source URL server is normal Blue Local Device is playing content from the USB drive or SD card Gray Disconnected Device is disconnected Fig 2 6 2 ...

Page 22: ...k AppStart 3 Enter the valid URL of HTML SMIL in AppStart Fig 2 7 1 4 Auto run can be disabled from here Auto run will automatically be enabled when content is played In most cases the network needs to be re configured on site so this prevents the device from starting playback automatically when powered up for the first time on site 5 The Advanced option is used for the 3rd party App configuration...

Page 23: ...ed to play the assigned content 1 Click on the Advanced button The advanced configuration menu will be launched Fig 2 6 1 2 Click on Content and then click on FailSafe 3 Enter the URL of HTML SMIL Media RSS in FailSafe 4 The Advanced option is used for the 3rd party App configurations only Fig 2 8 1 ...

Page 24: ...ay must be disabled 1 Click on the Advanced button The advanced configuration menu will be launched Fig 2 6 1 2 Click on Content and then click on EasyPlay 3 Click Disabled Enabled button to enable EasyPlay and choose from 2 available operation modes Photo Mode and Movie Mode Fig 2 9 1 Configuring Photo Mode 4 Click on Photo to choose photos and music Click on the button as marked in red below and...

Page 25: ...ing on the Play button in the Basic settings or Advanced configuration menus Fig 2 9 3 EasyPlay Schedule configuration 1 Click on Advanced The advanced configuration menu will be launched Fig 2 6 1 2 Click on Content and then click on Schedule 3 Click on the buttons marked in red below to enable disable the EasyPlay schedule for each time slot Type the scheduled time in the dialogue boxes marked i...

Page 26: ...e time as shown in figure 2 9 6 Dark blue represents time overlaps between C D and D E Fig 2 9 6 2 10 Display settings Output Mode The default output mode is set to Panel Fig 2 10 3 If you are connecting to a monitor via HDMI port refer to the device specifications for the best matching setting Note The signboard supports only one output device at a time ...

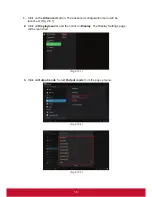
Page 27: ...vanced configuration menu will be launched Fig 2 6 1 2 Click on Display sound and then click on Display The Display Settings page will be launched Fig 2 10 1 3 Click on Output mode Select Output mode from the popup menu Fig 2 10 2 Fig 2 10 3 ...

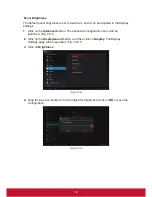
Page 28: ...Advanced button The advanced configuration menu will be launched Fig 2 6 1 2 Click on the Display sound button and then click on Display The Display Settings page will be launched Fig 2 10 1 3 Click on Brightness Fig 2 10 4 4 Drag the blue dot marked in red to adjust the brightness Click on OK to save the configuration Fig 2 10 5 ...

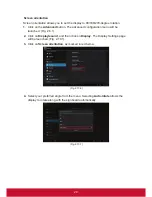
Page 29: ...uration menu will be launched Fig 2 6 1 2 Click on Display sound and then click on Display The Display Settings page will be launched Fig 2 10 1 3 Click on Screen orientation as marked in red below Fig 2 10 6 4 Select your preferred angle from the menu Selecting Auto rotate allows the display to rotate along with the signboard automatically Fig 2 10 7 ...

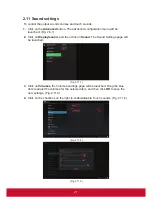
Page 30: ...k on Display sound and then click on Sound The Sound Settings page will be launched Fig 2 11 1 3 Click on Volumes the Volumes settings page will be launched Drag the blue dots to adjust the volumes for the selected item and then click OK to save the new settings Fig 2 11 3 4 Click on the checkbox on the right to enable disable Touch sounds Fig 2 11 2 Fig 2 11 2 Fig 2 11 3 ...

Page 31: ...the AppStart URL Otherwise the player synchronizes with the Android default time server 1 Click on the Advanced button The advanced configuration menu will be launched Fig 2 6 1 2 Click on System and then click on Time Server 3 Click on the Use AppStart URL as time server button to enable disable the time server function 4 Click on Set to save your setting Fig 2 12 1 ...

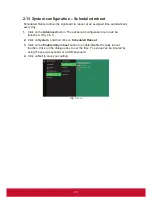
Page 32: ...utton The advanced configuration menu will be launched Fig 2 6 1 2 Click on System and then click on Scheduled Reboot 3 Click on the Enable daily reboot button to enable disable the daily reboot function Click on the dialogue box to set the time The value can be inputed by using the pop up keyboard or a USB keyboard 4 Click on Set to save your setting Fig 2 13 1 ...

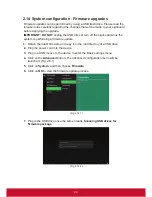
Page 33: ...tem is performing a firmware update 1 Obtain the latest firmware and copy it to the root directory of a USB drive 2 Plug the power cord into the device 3 Plug in a USB mouse to the device to enter the Basic settings menu 4 Click on the Advanced button The advanced configuration menu will be launched Fig 2 6 1 5 Click on System and then choose Firmware 6 Click on OK to start the firmware update pro...

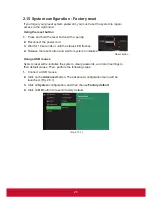
Page 34: ...tatus LED flashes 4 Release the reset button and wait for system to initialize Using a USB mouse System reset will re initialize the system clear passwords and return settings to their default values Then perform the following steps 1 Connect a USB mouse 2 Click on the Advanced button The advanced configuration menu will be launched Fig 2 6 1 3 Click on System configuration and then choose Factory...

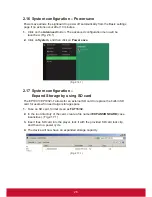
Page 35: ... 2 16 1 2 17 System configuration Expand Storage by using SD card The EP1031r EP1032r T allows for an external SD card to replace the built in SD card for users who need larger storage space 1 Take an SD card format clean as FAT16 32 2 In the root directory of the card create a file named EXPANSIONCARD case insensitive Fig 2 17 1 3 Insert thee SD card into the player lock it with the provided SD c...

Page 36: ... that your investments are never obsolete 5 1 Input Source Using SMIL pronounced smile the language created by W3C for multimedia communications the signboard understands the language spoken by professional tools from companies such as Adobe Apple Microsoft and Real Networks What this means is quicker easier and better integration of your signboard into your digital signage networks opening up ave...

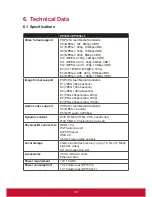
Page 37: ...p baseline S2 JPEG 720p baseline S3 JPEG 1080p baseline E1 PNG 24bpp alpha 480p E2 PNG 24bpp alpha 720p E3 PNG 24bpp alpha 1080p Audio codec support POPAI Screen Media Standards S4 MPEG L2 audio S5 MP3 audio 320Kbps Dynamic content W3C HTML5 HTML CSS JavaScript W3C SMIL 3 0 instructions sub set Physical I O connectors HDMI 1 3a Wi Fi antenna port RJ45 Ethernet USB 2 0 3 5mm stereo audio out jack L...

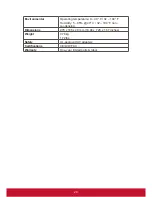
Page 38: ...ture 0 40 C 32 104 F Humidity 5 85 40 C 32 104 F non condensing Dimensions 278 x 186 x 40 mm 10 94 x 7 28 x 1 57 inches Weight 0 78kg 1 72lbs Safety UL approved AC adapters Certifications CE LVD FCC Warranty One year limited parts labor ...

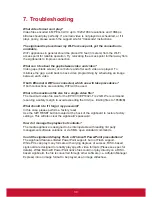
Page 39: ... file size for a single video file The maximum video file size for the EP1031r EP1032r T is 2GB We recommend reserving a safety margin to avoid exceeding the limit i e limiting files to 1850MB What should I do if I forgot my password In this case please perform a factory reset Use the S W RESET button located at the back of the signboard to restore factory settings This will also clear the signboa...

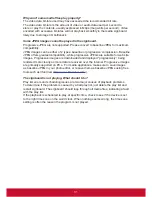
Page 40: ... images Progressive images are downloaded and displayed progressively being rendered more clearly as more data is received over the internet Progressive images are primarily supported on PCs For media appliances make sure to save images as baseline JPEG in your photo editor or resave them as baseline JPEGs using free tools such as IrfanView http www irfanview com The signboard is not playing What ...

Page 41: ...in America Columbia www viewsonic com la T 01800 9 157235 soporte viewsonic com Latin America Mexico www viewsonic com la T 001 8882328722 soporte viewsonic com Renta y Datos 29 SUR 721 COL LA PAZ 72160 PUEBLA PUE Tel 01 222 891 55 77 CON 10 LINEAS Electroser Av Reforma No 403Gx39 y 41 97000 Mérida Yucatán Tel 01 999 925 19 16 Other places please refer to http www viewsonic com la soporte index ht...

Page 42: ...ied with the product b Any damage of the product due to shipment c Removal or installation of the product d Causes external to the product such as electrical power fluctuations or failure e Use of supplies or parts not meeting ViewSonic s specifications f Normal wear and tear g Any other cause which does not relate to a product defect 3 Any product exhibiting a condition commonly known as image bu...

Page 43: ...r by any other party 4 Repair or attempted repair by anyone not authorized by ViewSonic Effect of state law This warranty gives you specific legal rights and you may also have other rights which vary from state to state Some states do not allow limitations on implied warranties and or do not allow the exclusion of incidental or consequential damages so the above limitations and exclusions may not ...

Page 44: ......

Reviews: