background image

ViewSonic

VFM842/VFM1042

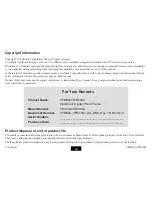
Copyright Information

Copyright

©

 ViewSonic Corporation, 2010. All rights reserved.

ViewSonic, the three birds logo, OnView, ViewMatch, and ViewMeter are registered trademarks of ViewSonic Corporation.
Disclaimer:ViewSonic Corporation shall not be liable for technical or editorial errors or omissions contained herein; nor for incidental 
or consequential damages resulting from furnishing this material, or the performance or use of this product.
In the interest of continuing product improvement, ViewSonic Corporation reserves the right to change product specifications without 
notice. Information in this document may change without notice.
No part of this document may be copied, reproduced, or transmitted by any means, for any purpose without prior written permission 
from ViewSonic Corporation.

For Your Records

Product Name:

Model Number:
Document Number:
Serial Number:
Purchase Date:

VFM842/VFM1042
ViewSonic Digital Photo Frame
VS13442/VS13444
VFM842_VFM1042_UG_ENG Rev. 1B 04-09-10

____________________________________________
____________________________________________

Product disposal at end of product life 

ViewSonic is concerned about the preservation of our environment. Please dispose of this product properly at the end of its useful life. 
Your local waste disposal company may provide information about proper disposal.
The lamp in this product contains mercury. Please dispose of properly in accordance with environmental laws of your location.

iii


Summary of Contents for VFM1042

Page 1: ...n a safe manner as well as registering your product for future service Warranty information contained in this User Guide will describe your limited coverage from ViewSonic Corporation which is also found on our web site at http www viewsonic com in English or in specific languages using the Regional selection box in the upper right corner of our website Antes de operar su equipo lea cuidadosamente...

Page 2: ...ate the receiving antenna Increase the separation between the equipment and receiver Connect the equipment into an outlet on a circuit different from that to which the receiver is connected Consult the dealer or an experienced radio TV technician for help Warning You are cautioned that changes or modifications not expressly approved by the party responsible for compliance could void your authority...

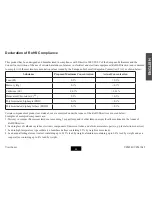
Page 3: ...1 Polybrominated biphenyls PBB 0 1 0 1 Polybrominated diphenyl ethers PBDE 0 1 0 1 Certain components of products as stated above are exempted under the Annex of the RoHS Directives as noted below Examples of exempted components are 1 Mercury in compact fluorescent lamps not exceeding 5 mg per lamp and in other lamps not specifically mentioned in the Annex of RoHS Directive 2 Lead in glass of cath...

Page 4: ...change without notice No part of this document may be copied reproduced or transmitted by any means for any purpose without prior written permission from ViewSonic Corporation For Your Records Product Name Model Number Document Number Serial Number Purchase Date VFM842 VFM1042 ViewSonic Digital Photo Frame VS13442 VS13444 VFM842_VFM1042_UG_ENG Rev 1B 04 09 10 ______________________________________...

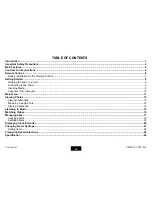
Page 5: ... Connecting to the power 9 Inserting Media 9 Copy files from computer 10 Main menu 11 Viewing Photos 13 Viewing thumbnails 13 Browsing a single photo 14 Playing a slideshow 14 Listening to Music 15 Watching Videos 16 Managing Files 17 Copying photos 18 Deleting photos 19 Displaying Clock Calendar 20 Changing Frame Settings 21 Setting items 22 Frequently Asked Questions 24 Specification 26 ViewSoni...

Page 6: ... the instructions carefully before using the Digital Photo Frame and keeps it for future reference We have done our best to produce a complete and accurate manual however we cannot ensure there are no errors or omissions We also have no responsibility for damages or loss of data caused by improper operation The instruction manual is subject to change for improvement without notice Trademarks and t...

Page 7: ...ses should be placed on the unit y Keep the Digital Photo Frame away from direct sunlight and heat source such as radiators or stoves y Do not block the ventilation openings Slots and openings on the unit are provided for ventilation The openings should never be blocked by placing your Digital Photo Frame on a cushion sofa or other similar surface y Do not place the Digital Photo Frame on unstable...

Page 8: ...en y To clean the plastic casing use a soft dry cloth If it is still not clean apply a small amount of non ammonia non alcohol based mildly non abrasive detergent on a clean soft lint free cloth to clean the surface y To clean the frame use a soft dry cloth Disclaimer Authorized Dealer does not recommend the use of any ammonia or alcohol based cleaners on the LCD screen or plastic casing Some chem...

Page 9: ...ital photos JPEG y Slide show with background music and multiple transition effects y Playback of music files y Playback of video files y Calendar and clock display y Alarm setting y Compatible with SD MMC MS memory cards y USB Host for connecting to the USB mass storage y 2GB Internal memory built in ViewSonic VFM842 VFM1042 ...

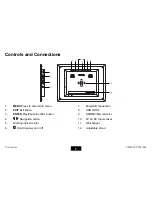
Page 10: ...EXIT Exit button 3 ENTER Play Pause Confirm button 4 Navigation button 5 Working indicator light 6 Hold to power on or off 7 Mini USB connection 8 USB HOST 9 SD MMC MS card slot 10 5V 2A DC Input socket 11 Wall hanger 12 Adjustable stand ViewSonic VFM842 VFM1042 ...

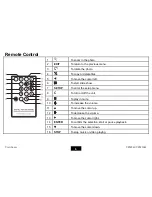
Page 11: ... 6 To start slide show 7 SETUP To enter the setup menu 8 To turn on off the unit 9 To play in mute 10 To increase the volume 11 To move the cursor up 12 To decrease the volume 13 To move the cursor right 14 ENTER To confirm the selection start or pause playback 15 To move the cursor down 16 STOP To stop music or video playing ViewSonic VFM842 VFM1042 ...

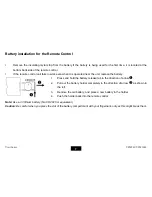
Page 12: ... replace the battery 1 Press and hold the battery release tab in the direction of arrow n 2 Pull out the battery holder completely in the direction of arrow o as shown in the left 3 Remove the old battery and place a new battery in the holder 4 Push the holder back into the remote control Note Use a 3V lithium battery No CR2025 or equivalent Caution Be careful when you press the slot of the batter...

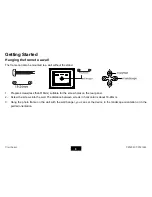
Page 13: ...ws less than Φ6mm suitable for the screw holes on the rear panel 2 Screw the screws into the wall The distance between screws in horizontal is about 18 24mm 3 Hang the photo frame on the wall with the wall hanger you can set the device in the landscape orientation or in the portrait orientation ViewSonic VFM842 VFM1042 ...

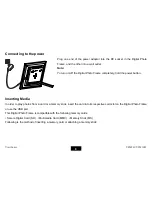
Page 14: ...wer button Inserting Media In order to play photos from a card or a memory stick insert the card into its respective card slot on the Digital Photo Frame or use the USB port This Digital Photo Frame is compatible with the following memory cards Secure Digital Card SD Multimedia Card MMC Memory Stick MS Following is the method of inserting a memory card or attaching a memory stick ViewSonic VFM842 ...

Page 15: ...re than one card into one memory card slot y To remove the cards or the USB memory stick pull it out gently Copy files from computer You can connect the digital photo frame to a computer copy files to the memory device connected to the digital photo frame or to the built in memory depends on the unit you purchase 1 Make sure that your computer has been started before you start 2 Connect the mini p...

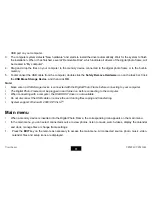
Page 16: ...ected with the Digital Photo Frame before connecting to your computer y The Digital Photo Frame must be plugged in and turned on before connecting to the computer y When connecting with a computer the USB HOST driver is not available y Do not disconnect the USB cable or remove the card during files coping and transferring y System support Windows 2000 XP VistaTM Main menu y When a memory device is...

Page 17: ...he screen Files To browse all the files of the memory source and copy or delete files Setup To customize the settings of Digital Photo Frame Note If several memory devices are connectted to the frame simultaneously the Digital Photo Frame will read the memory source by the priority order as follows USB SD MMC MS 2 Use or key on the remote to select a memory source and then press the ENTER key on t...

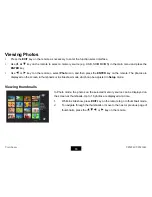
Page 18: ... the remote The photos are displayed on the screen in thumbnails or in slideshow mode which can be adjusted in Setup mode Viewing thumbnails In Photo mode the photos on the selected memory source can be displayed on the screen as thumbnails Up to 16 photos are displayed at a time 1 While in slideshow press EXIT key on the remote to go to thumbnali mode 2 To navigate through the thumbnails or move ...

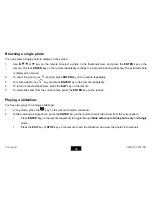
Page 19: ... the remote repeatedly 4 To return to the thumbnail view press the EXIT key on the remote 5 To start slide show from the current photo press the ENTER key on the remote Playing a slideshow You have two ways to running a slideshow 1 In any mode press the key on the remote to start a slideshow 2 While browsing a single photo press the ENTER key on the remote to start slide show from the current phot...

Page 20: ...u and press the ENTER key on the remote 3 Use or key on the remote to select Music icon and then press the ENTER key The music file lists displayed on the screen 4 Use or key on the remote to select a music file and press ENTER on the remote to play 5 Pause playback press ENTER on the remote To resume playback press ENTER on the remote again 6 Press or key on the remote to increase or decrease vol...

Page 21: ... remote to select Video icon and then press the ENTER key on the remote The music file lists displayed on the screen 4 Use or key on the remote to select a video file and press ENTER on the remote to play 5 Pause playback press ENTER on the remote To resume playback press ENTER on the remote again 6 Fast rewind or forward within a video use or key on the remote and then press ENTER on the remote 7...

Page 22: ...remote to select a memory source e g USB SD MMC MS in the main menu and press the ENTER key on the remote 3 Use or key on the remote to select Files icon and then press the ENTER key on the remote The file list appears 4 Use the or key on the remote to navigate between files and folders y To open a folder highlight it and press the ENTER key on the remote To return to superior directory press the ...

Page 23: ...thod you can copy all or selected photos with the ability to resize the photo 1 Press the EXIT key on the remote as necessary to enter the function select interface 2 Use or key on the remote to select the memory device memory card or USB and then press ENTER 3 Use or key on the remote to select Photo icon and press ENTER to go to the thumbnail mode 4 Press COPY DEL key to pop up a window Copy Fil...

Page 24: ...y delete one file at a time 1 Press the EXIT key on the remote as necessary to enter the function select interface 2 Use or key on the remote to select File icon and then press ENTER to confirm 3 Use or key on the remote to select the photo file or music or video file then press COPY DEL key on the remote The screen will pop up a window Delete Files Yes No Use or on the remote to choose the desire...

Page 25: ... all all the white squares show a tick mark 6 Press COPY DEL key on the remote again to pop up a window Delete Files Yes No Use or on the remote to select Yes and then press ENTER Your photos are deleted from the internal memory Displaying Clock Calendar You can switch your Digital Photo Frame to Clock Calendar mode that the current date and time is displayed on the screen with a slide show in thu...

Page 26: ... customize and configure your Digital Photo Frame Press the EXIT key on the remote as necessary to enter the function select interface Use or key on the remote to select the Setup icon The Setup Menu appears on the screen 1 To select Photo Setup Calendar Setup Video setup Music Setup or System Setup use the or key on the remote and then press the ENTER key 2 To select a setting item press the or k...

Page 27: ...ral Rect Close Magic Window On or Off Clock On or Off Resize On or off Cut out when copy On or Off Photo Setup Show tip when copy On or Off Display Mode Calendar Clock or Monthly Calendar Date Format YYYY MMM DD MM DD YYYY or DD MM YYYY Date Adjust the date Clock Mode Adjust the date Clock Time Adjust the time Alarm Status On or Off Alarm Time Set alarm time Calendar Setup Alarm Frequency Once Eve...

Page 28: ... available options include 1 2 3 4 5 6 7 8 9 10 11 12 13 14 15 16 Saturation Adjust the saturation of the screen The available options include 1 2 3 4 5 6 7 8 9 10 11 12 13 14 15 16 Tint Adjust the tint of the screen Power on On or Off Auto Boot Time Set the Digital Photo Frame to turn on at the specified time Power off On or Off Auto Shut Time Set the Digital Photo Frame to turn off at the specif...

Page 29: ... do First make sure that you are using a memory card type that is supported by the Digital Photo Frame Secondly make sure that the memory card is inserted correctly Thirdly check if the file formats on your card are supported or not by the frame only JPEG photos are accessible Provide files with the supported JPEG Note Some digital cameras save images into non standard formats Please refer to the ...

Page 30: ...ot well connected 5 Can I rotate a photo on the screen YES Press key on the remote while viewing a single photo 6 What is the best photo resolution displayed on the screen The best resolution is 800 600 and the max photo resolution of this Digital Photo Frame is 8000 8000 pixels ViewSonic VFM842 VFM1042 ...

Page 31: ... 2 0A USB port USB Host 2 0 Supports USB flash media Supported peripheral devices SD Secure Digital Card MMC MultiMedia Card MS Memory Stick Supported photo format JPEG Maximum resolution 8000 8000 pixels Stroage condition Humidity 90 20 60 C Working condition Humidity 80 0 45 C Dimension VFM842 12 268 3 x 35 5 x 218 3 mm VFM842 52 226 x 24 5 x 176 mm VFM1042 52 306 8 x 36 5 x 253 8 mm ViewSonic V...

Page 32: ... below or contact your reseller Note You will need the product serial number Country Region Web Site Telephone United States www viewsonic com Toll Free 1 800 688 6688 Toll 1 424 233 2530 Fax 1 909 468 3757 Canada www viewsonic com Toll Free 1 866 463 4775 Toll 1 424 233 2533 Fax 1 909 468 3757 27 ...

Page 33: ...commonly known as image burn in which results when a static image is displayed on the product for an extended period of time How to get service 1 For information about receiving service under warranty contact ViewSonic Customer Support please refer to Customer Support page You will need to provide your product s serial number 2 To obtain warranted service you will be required to provide a the orig...

Page 34: ...e attached Customer Support page You will need to provide your product s serial number so please record the product information in the space provided below on your purchase for your future use Please retain your receipt of proof of purchase to support your warranty claim For Your Records Product Name ______________________ Model Number _______________________ Document Number ____________________ S...

Page 35: ...t mx Puebla Pue Matriz RENTA Y DATOS S A DE C V Domicilio 29 SUR 721 COL LA PAZ 72160 PUEBLA PUE Tel 01 52 222 891 55 77 CON 10 LINEAS E Mail datos puebla megared net mx Veracruz Ver CONEXION Y DESARROLLO S A DE C V Av Americas 419 ENTRE PINZÓN Y ALVARADO Fracc Reforma C P 91919 Tel 01 22 91 00 31 67 E Mail gacosta qplus com mx Chihuahua Soluciones Globales en Computación C Magisterio 3321 Col Mag...

Page 36: ...Yucatán México CP97000 Tel 52 999 925 1916 E Mail rrrb sureste com Oaxaca Oax CENTRO DE DISTRIBUCION Y SERVICIO S A de C V Murguía 708 P A Col Centro 68000 Oaxaca Tel 01 52 95 15 15 22 22 Fax 01 52 95 15 13 67 00 E Mail gpotai2001 hotmail com Tijuana STD Av Ferrocarril Sonora 3780 L C Col 20 de Noviembre Tijuana Mexico FOR USA SUPPORT ViewSonic Corporation 381 Brea Canyon Road Walnut CA 91789 USA ...

Page 37: ......

Reviews: