background image

 User Manual, The Hub device


Vignet Confidential and Proprietary                            Version 1 


Page 6 


1.3 Power 

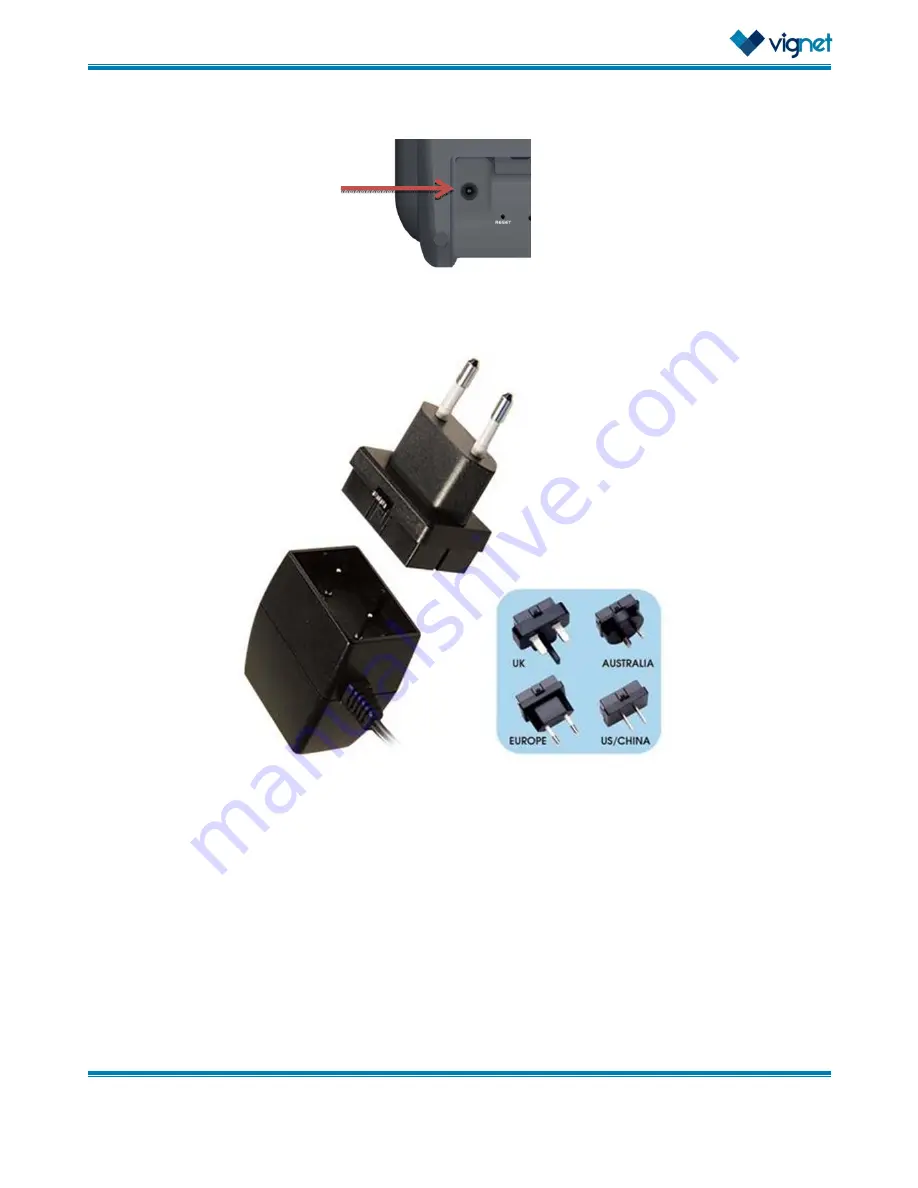
Adapter 

The


power


adapter


attaches


to


the


bottom


of


the


unit.


The


same


power


adapter


can


be


used


for


multiple


countries


including


US,


China,


UK,


Europe


and


Australia.


The


interchangeable


tips


are


optionally


shipped


with


each


unit


and


can


be


ordered


indecently


as


required.


After


plugging


in


the


power


adapter,


you


should


see


the


Hub


automatically


turn


on.


1.4 

Turning the Hub On and Off 

Turning


the


hub


on:


Turn


on


will


occur


immediately


after


applying


power


to


the


hub.


If


the


hub


is


turned


off


manually,


to


turn


on


the


hub,


press


and


hold


the


Power


key


for


1

2


seconds.


Turning


the


hub


off:


1.


Press


and


hold


the


Power


key


for


2


seconds


2.


At


the


prompt,


tap


Power


off


Summary of Contents for AD802

Page 1: ...User Manual The Hub device Vignet Confidential and Proprietary Version 1 Page 1 User Manual for The Hub device AD802 AD803 Document Date Oct 24 2013 ...

Page 2: ...4 1 2 1 Gateway 4 1 2 2 Closed Loop Alert System 5 1 3 POWER ADAPTER 6 1 4 TURNING THE HUB ON AND OFF 6 1 5 BATTERY 7 2 UNDERSTANDING YOUR VIGNET HUB 8 2 1 FEATURES 8 2 2 FRONT VIEW 8 2 3 SIDE VIEW 9 2 4 BACK VIEW 9 3 SPECIFICATIONS 10 4 CLEANING AND MAINTENANCE 11 5 SAFETY AND ELECTRICAL DEVICES 12 6 PROTECTING THE ENVIRONMENT 12 7 REGULATORY 13 7 1 SAFETY 15 7 2 RADIO TYPE APPROVALS 15 ...

Page 3: ...vignetcorp com for contact information in obtaining the latest manual The sections of this manual generally follow the features of your Hub device This manual gives navigation instructions according to the default display settings If you select other settings navigation steps may be different Hub Physical Size Appearance all units in millimeters mm unless otherwise specified ...

Page 4: ...o sensors ich provides tion or a cellu nts from the orld Wide W or Ethernet w to decide a Vigne n I do with grated such o the hub at a connectio ular connect sensor the Web will be su Connections a better con et hub Version 1 h the Vign as Bluetooth any time Th n to the Wor tion hub will pas upported ove s that are no nection is av OR OR net Hub h Bluetooth his may inclu rld Wide We s these throu ...

Page 5: ...ough t o the World W This 1 conne isabled as th Vigne grated such o the hub at sensor the he Vignet Hu Wide Web o ection may i he startup ti et hub B Version 1 as Bluetooth any time Th hub reviews ub through or locally thr nclude Cellu me may be t OR OR Bluetooth Sp h Bluetooth his may inclu s alert condit a Bluetooth ough a netw llar WiFi or too slow to d peaker LE as require ude up to 3 B tions ...

Page 6: ... tips are optionally shipped with each unit and can be ordered indecently as required After plugging in the power adapter you should see the Hub automatically turn on 1 4 Turning the Hub On and Off Turning the hub on Turn on will occur immediately after applying power to the hub If the hub is turned off manually to turn on the hub press and hold the Power key for 1 2 seconds Turning the hub off 1 ...

Page 7: ...ved from the bottom of the unit using a screwdriver This should only be done with the power to the Hub removed It should only be replaced using a new CR2032 battery Wipe the battery clean of any fingerprints and insert the positive pole up angling the battery downward and pressing the battery firmly into place When replacing the battery door be sure the door fits tight around the battery ...

Page 8: ...ght Amber when there is something that user is required to take action on 2 Connectivity LED This is application controlled Intended to light Blue when data is exchange to a remote sensor or the server or Amber when there is an error 3 Notification LED This is application controlled Intended to light Blue when there is an informational message to the user or Amber when there is an error 4 Home But...

Page 9: ...on silences the Power Loss Alert sound until the next abrupt disconnect is triggered 4 LAN Connection Supports Ethernet 10 100 mbps 5 USB1 Slot Supports USB 2 0 Host 6 USB2 Slot Supports USB On The Go through optional cable accessory 7 Wall adapter plug in Power connection for Hub 8 Reset Clears any lock up conditions that may occur from improper use 9 Speaker This is application controlled for si...

Page 10: ...90 175 millicandles Amber LEDs to provide brightness of 175 300 millicandles Buttons Power Button Home Button Mute Button Mute button shall not exhibit an audible clicking sound when pressed Loss of Power Silence Button labeled Power Alert Off A recessed Reset Button labeled Reset Ports USB 1 USB 2 0 Type A Host Port USB 2 USB 2 0 mini USB OTG Port IMPORTANT During USB loading test USB1 terminal w...

Page 11: ... Input 100V 240V 50 60Hz 300mA Output 5V 1500mA Power On Unit will automatically power on after inserting power adapter or after depressing power button for 1 second maximum from the powered off state Operating Conditions Temperature 5 C to 40 C Relative Humidity 15 to 85 RH non condensing Atmospheric Pressure 520 mmHg to 795 mmHg Storage Transportation Conditions Temperature 5 C to 40 C Relative ...

Page 12: ...g point please allow it to obtain room temperature before using it again 6 Do not attempt to open the device or adjust the inner parts yourself Doing so will terminate the product warranty and may cause damage 7 The unit contains no user serviceable parts 8 Do not immerse the device in water or other liquids as this will cause damage to the device If it comes in contact with water dry it immediate...

Page 13: ...t installed and used in accordance with the instructions may cause harmful interference to radio communications However there is no guarantee that interference will not occur in a particular installation If this equipment does cause harmful interference to radio or television reception which can be determined by turning the equipment off and on the user is encouraged to try to correct the interfer...

Page 14: ...cepter tout brouillage radioélectrique subi même si le brouillage est susceptible d en compromettre le fonctionnement This Class B digital apparatus complies with Canadian ICES 003 Cet appareil numérique de la classe B est conforme à la norme NMB 003 du Canada Ce matériel est conforme aux limites établies par IC en matière d exposition aux radiofréquences dans un environnement non contrôlé Ce maté...

Page 15: ...N 300 ETS EN 300 WPA2 WPA CRB ATT 3 th Classic 2 nt nd EU marke C 60950 for ipment used he USA and Radiated Im t 10 V m IEC 60601 1 1 65 EU of t als rovals for th E 47 CFR Pa 203 15 207 ANSI C63 4 FCC part 2 or the EU ma 328 440 683 489 and WEP co G module c 1 EDR and Version 1 ets r the USA m d in residen EU market mmunity IEC 2005 A1 20 he Europea he USA mar art 15 Subp 15 247 and 2003 ANSI 22 a...

Reviews: