background image


MODEL VG06061


 5


PREPARATION STEPS TO FOLLOW BEFORE INSTALLATION 

1.  Remove the plastic layer from the base border (if needed). Do NOT remove the plastic layer 

off the plastic platform of the base.  
 

2.  Properly apply silicone to the wall and base joints.  


  IMPORTANT


  To prevent damage to the finish, you should protect the shower 

cabin  bottom  with  a  cardboard  protector  before  beginning  the 
installation. 

  Ensure  that  there  is  sufficient  structural  support  behind  the 

shower wall to hold the weight of the shower door. If there is not 
sufficient  enough  support,  then  reinforce  the  shower  walls  with 
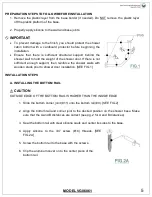
wooden studs prior to shower door installation. [SEE FIG.1] 


INSTALLATION STEPS 


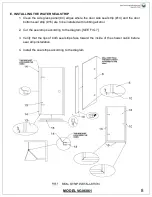
A.  INSTALLING THE BOTTOM RAIL 


CAUTION


OUTSIDE EDGE OF THE BOTTOM RAIL IS HIGHER THAN THE INSIDE EDGE 


1.  Slide the bottom corner joint (#11) onto the bottom rail (#9). [SEE FIG.2] 


2.  Align the bottom rail and corner joint to the desired position on the shower base. Make 

sure that the A and B distances are correct (see pg. 2 for A and B distances). 


3.  Seal the bottom rail with clear silicone caulk and center its sides to the base. 


4.  Apply  silicone  to  the  3/4”  screw  (#18)  threads.  [SEE 

FIG.2A] 


5.  Screw the bottom rail to the base with the screws.  


6.  Clip the aluminum cover on to the center piece of the 

bottom rail. 

Summary of Contents for VG06061

Page 1: ...death or serious personal injury caused by incorrect handling or installation of the product These instructions must be observed for safe installation CAUTION Instructions that if ignored could result in personal injury or material damage caused by improper handling or installation of the product These instructions must be observed for safe installation IMPORTANT Maintenance and other important no...

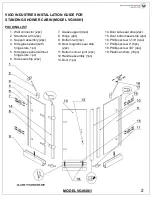
Page 2: ...with hinge slots 1pc 5 Side glass panel without hinge slots 1pc 6 Side seal strip 2pc 7 Glass support 4pc 8 Hinge 2pc 9 Bottom rail 3pc 10 Door magnetic seal strip 2pc 11 Bottom corner joint 2pc 12 Handle assembly 1pc 13 Door 1pc 14 Door side seal strip 2pc 15 Door bottom seal strip 2pc 16 Phillips screw 1 1 8 4pc 17 Phillips screw 2 8pc 18 Phillips screw 3 4 4pc 19 Plastic anchors 16pc ...

Page 3: ...MODEL VG06061 3 ...
Page 4: ...2 drill bit depending on wall o Level o Measuring Tape o Pencil non permanent HB o Clear silicone caulking o Utility knife WARNING Handle fragile items with care to prevent personal injury or material damage Glass on panels and doors is tempered glass and must never be cut to prevent personal injury IMPORTANT Fiberglass or acrylic construction might not be sufficiently strong enough to support the...

Page 5: ...icient enough support then reinforce the shower walls with wooden studs prior to shower door installation SEE FIG 1 INSTALLATION STEPS A INSTALLING THE BOTTOM RAIL CAUTION OUTSIDE EDGE OF THE BOTTOM RAIL IS HIGHER THAN THE INSIDE EDGE 1 Slide the bottom corner joint 11 onto the bottom rail 9 SEE FIG 2 2 Align the bottom rail and corner joint to the desired position on the shower base Make sure tha...

Page 6: ...he side glass panel using the hex key supplied Use a washer on each side of the side glass panel 5 Place the side glass panel on the bottom rail 9 Use the level to accurately position the panel 6 Mark holes on the wall for the mounting screws 7 Remove the side glass panel Drill holes into respective marks and insert plastic anchors 19 inside them 8 Place the side glass panel back onto the bottom r...

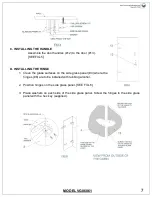
Page 7: ...ALLING THE HINGE 1 Clean the glass surfaces on the side glass panel 4 where the hinges 8 are to be installed with rubbing alcohol 2 Position hinges on the side glass panel SEE FIG 6 3 Place washers on each side of the side glass panel Screw the hinges to the side glass panel with the hex key supplied ...

Page 8: ...al strip 14 and the door bottom seal strip 15 are to be installed with rubbing alcohol 2 Cut the seal strips according to the diagram SEE FIG 7 3 Verify that the lips of both seal strips face toward the inside of the shower cabin before seal strip installation 4 Install the seal strips according to the diagram ...

Page 9: ...nstall the hinges as illustrated FIG 8 Use the hex key supplied G INSTALLING THE SIDE FRONT PANEL SUPPORT 1 Install the support assembly 3 onto the side glass panel 4 approximately two thirds away from the wall Use hex key to tighten the screws SEE FIG 9 2 Install the support assembly to the structural arm 2 and wall connector 1 3 Mark holes on the wall for the mounting screws 4 Remove the support...

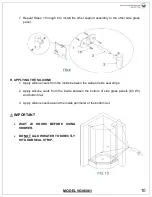
Page 10: ... Apply silicone caulk from the inside between the wall and side seal strips 2 Apply silicone caulk from the inside between the bottom of side glass panels 4 5 and bottom rail 3 Apply silicone caulk around the inside perimeter of the bottom rail IMPORTANT WAIT 24 HOURS BEFORE USING SHOWER DO NOT ALLOW WATER TO DIRECTLY HIT DOOR SEAL STRIP ...

Page 11: ...ol to clean and remove grease oil paint and ink D Accidental scratches or stains will rarely show If they do show they can be easily removed with a liquid automobile polish IMPORTANT Do NOT use abrasive cleaners scrapers metal brushes or any items products that would scratch and or dull surface Do NOT allow surface to come into contact with acetone nail polish remover dry cleaning solution lacquer...

Page 12: ... accordance with instructions supplied by VIGO and all applicable rules regulations and legislation pertaining to such installations VIGO strongly recommends that its products for example but without limitation shower doors and other items be installed by professionals with experience in bathroom products Installation of shower doors by an inexperienced person may result in glass breakage and cons...

Reviews: