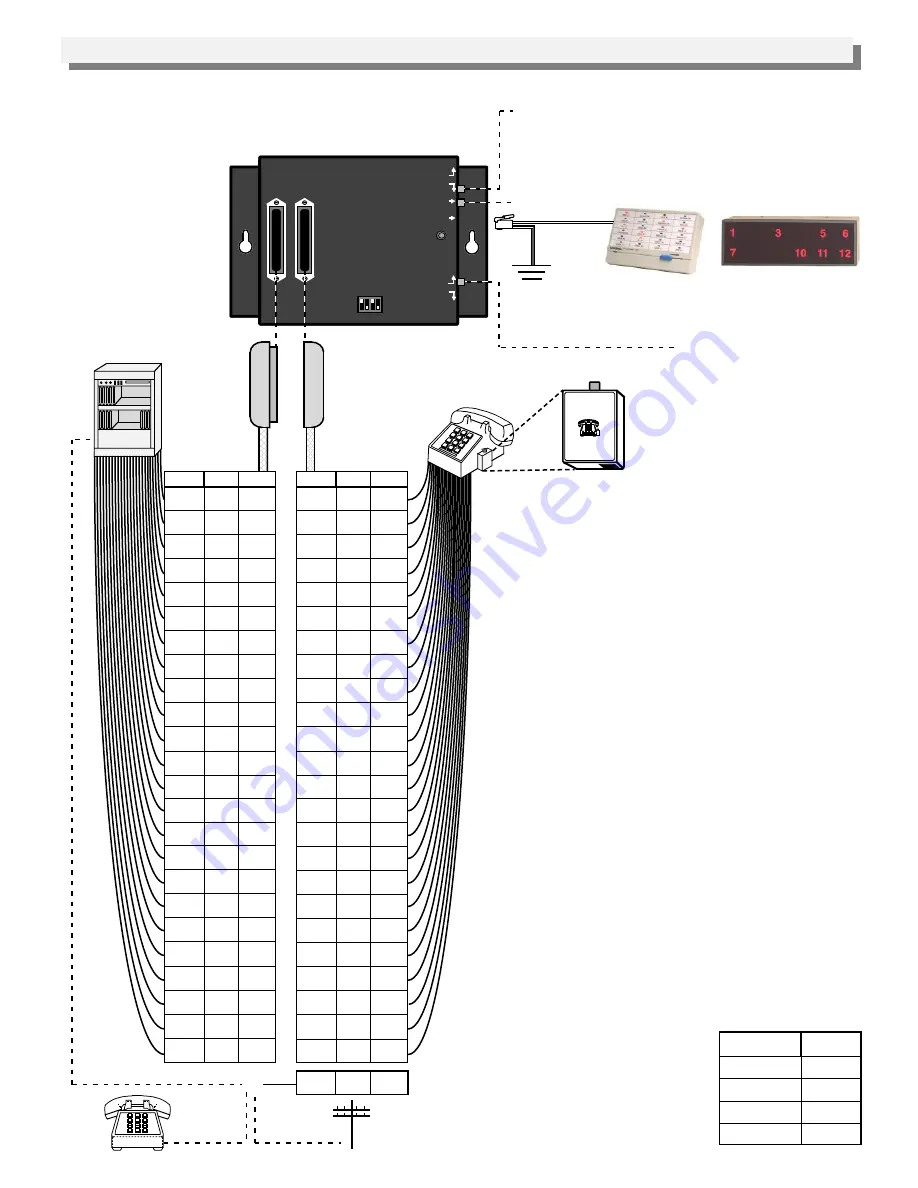
Installation
A. Centrex or PABX Installation with Standard Phones
Station/Trunk Switch - Switch to STATION when
connecting the "control line" to a C.O. line or an analog
PABX/KSU station. Switch to TRUNK when connecting
the "control line" to a dedicated phone or unused (loop
start) trunk input.
Neon/LED Switch - Switch to
NEON when using standard
90-125V message waiting
phones or Viking Model LM-1
on standard phones.
Connect the Yellow and Black to the positive of the talk
battery, normally earth ground (see
Important below).
Optional LM-24D
Yellow
Black
Green
Red
Reset Button
After wiring J1, the polarity may be tested using a
volt meter. An easier method is to use a Viking
model LM-24D display in conjunction with the
MLC-24’s built in diagnostics as follows:
1. Be sure that J2 is disconnected and that J1 is
connected and wired.
2. Make sure the BK and Y of the “COM” RJ-14
are connected to the earth ground (positive side
of the battery).
3. Connect a Viking LM-24D display to the COM
jack.
4. Set the dip switches as
shown below.
5. Momentarily press the
reset switch. If any LED’s
remain lit, reverse tip and
ring (going to J1) for that
line, and retest.
Dip Switch
1
2
3
4
Setting
OFF
ON
OFF
ON
Important: The Yellow and Black of the RJ-14
jack, “COM”, MUST be connected to the positive of
the talk battery for proper reference. This is
normally earth ground on most C.O. lines or
analog PABX/KSU stations.
Note: This application requires that the correct
polarity (tip=positive, ring=negative) be observed
on J1 for proper operation.
1-24 analog
PABX/KSU
stations
1 - 24 C.O.
lines or analog
PABX/KSU
stations
VIKING
©
MODEL MLC-24
VIKING ELECTRONICS, INC. HUDSON, WI 54016
MESSAGE WAITING
LAMP CONTROLLER
RJ21X
FEMALE
RJ21X
MALE
J1
J2
STATION
COM
RESET
TRUNK
NEON
LED
POWER
1 2 3 4
T1
R1
T2
R2
T3
R3
T4
R4
T5
R5
T6
R6
T7
R7
T8
R8
T9
R9
T10
R10
T11
R11
T12
R12
26
1
27
2
28
3
29
4
30
5
31
6
32
7
33
8
34
9
35
10
36
11
37
12
W/BL
BL/W
W/O
O/W
W/G
G/W
W/BN
BN/W
W/S
S/W
R/BL
BL/R
R/O
O/R
R/G
G/R
R/BN
BN/R
R/S
S/R
BK/BL
BL/BK
BK/O
O/BK
T13
R13
T14
R14
T15
R15
T16
R16
T17
R17
T18
R18
T19
R19
T20
R20
T21
R21
T22
R22
T23
R23
T24
R24
38
13
39
14
40
15
41
16
42
17
43
18
44
19
45
20
46
21
47
22
48
23
49
24
BK/G
G/BK
BK/BN
BN/BK
BK/S
S/BK
Y/BL
BL/Y
Y/O
O/Y
Y/GN
GN/Y
Y/BN
BN/Y
Y/S
S/Y
V/BL
BL/V
V/O
O/V
V/GN
GN/V
V/BN
BN/V
Circuit
Pins
Color
1T1
1R1
2T1
2R1
3T1
3R1
4T1
4R1
5T1
5R1
6T1
6R1
7T1
7R1
8T1
8R1
9T1
9R1
10T1
10R1
11T1
11R1
12T1
12R1
26
1
27
2
28
3
29
4
30
5
31
6
32
7
33
8
34
9
35
10
36
11
37
12
W/BL
BL/W
W/O
O/W
W/G
G/W
W/BN
BN/W
W/S
S/W
R/BL
BL/R
R/O
O/R
R/G
G/R
R/BN
BN/R
R/S
S/R
BK/BL
BL/BK
BK/O
O/BK
13T1
13R1
14T1
14R1
15T1
15R1
16T1
16R1
17T1
17R1
18T1
18R1
19T1
19R1
20T1
20R1
21T1
21R1
22T1
22R1
23T1
23R1
24T1
24R1
38
13
39
14
40
15
41
16
42
17
43
18
44
19
45
20
46
21
47
22
48
23
49
24
BK/G
G/BK
BK/BN
BN/BK
BK/S
S/BK
Y/BL
BL/Y
Y/O
O/Y
Y/GN
GN/Y
Y/BN
BN/Y
Y/S
S/Y
V/BL
BL/V
V/O
O/V
V/GN
GN/V
V/BN
BN/V
25T1
25R1
50
25
V/S
S/V
Circuit Pins
Color
RJ21 Female
Connector
(not included)
RJ21 Male
Connector
(not included)
Control Line
or
Unused
PABX Trunk
Input or Analog Station
Control
Phone
Most 48 volt C.O. line or analog PABX/KSU
stations require no station rewiring as the 90 to
125 volt signal is superimposed on the existing tip
and ring. The lamp controller is compatible with
standard 90 to 125 volt message waiting lamp
phones as well as Viking model L M - 1 retrofit
message waiting lamp kit installed on modular
analog station sets.
1000 foot
maximum run
using 26 AWG
wire
or
Optional LM-12W
VIKING ELECTRONICS
VIKING
©
MODEL LM-1
Message Waiting
Lamp
HUDSON, WI 54016
LM-1 (Fax Back Document 660)
(Fax Back Document 665)
(Fax Back Document 670)
Diagnostics
C.O. Line


