21
2. Stellen Sie die Auslässe und Abluftventile entsprechend der
Grundeinstellung ein (siehe „Auslässe/Abluftventile). Vergewissern Sie
sich, dass die Auslässe so platziert sind, dass sie nicht gegen
Hindernisse oder eine Wand blasen.
Achtung!
Nach der Installation der Anlage und der Einstellung der Ventile
entsprechend der Einstelltabelle muß die zu fördernde Luftmenge im
Gerät gespeichert werden:
Das Gerät wird in der Normal – Betriebsstufe gestartet (automatisch)
Und nach ca. 1min muß der zuvor eingestellte Volumenstrom durch
gleichzeitiges Drücken der Tasten „Pfeil nach unten“ und „Sanduhr“
bestätigt werden. Nur dann kann die Regelung den gewünschten
Volumenstrom aufrecht erhalten.
3. Stellen Sie Zulufttemp. ein (Betriebs/Wartungsanleitung „Betrieb“)
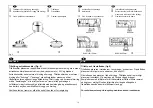
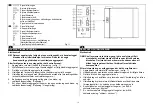
4. Stellen Sie die Standzeit der Filter (Fig. 11) ein. Werkseitig sind 9 Monate
eingestellt. Diese Einstellung ist zweckmäßig in Gegenden mit „normaler“
Außenluft. Bei verschmutzter Außenluft (Verkehr, Industrie) ist ein
Filterwechsel alle 6 Monate ratsam. Bei guter Luftqualität genügt ein
Wechsel alle 12 Monate. Spätestens beim 1. Filterwechsel können Sie
die vorh. Luftqualität einschätzen. Bei stark verschmutztem Filter ist die
Standzeit zu verkürzen, bei nur leicht verschm. Filter zu verlängern. Um
die Standzeit zu verändern drücken Sie gleichzeitig die Tasten (13) + (9)
oder (13) + (10). Die Einstellung ist gespeichert wenn die Lampe (14)
blinkt und die folgende Lampe leuchtet :
-
Lampe (6) für 6 Monate Standzeit (Wechselintervall)
-
Lampe (7) für 9 Monate Standzeit
-
Lampe (8) für 12 Monate Standzeit
2. Adjust diffusers and louvers in accordance with commissioning or basic
setting (see "Diffusers/Louvers"). Make sure that the inlet diffusers are
set so that the air stream is not lead towards visible joist, wall etc. close
to the diffuser.
NOTE! When starting the system for the first time, after duct runs have
been installed and diffusers/louvers adjusted in accordance with
commissioning instructions, the motor's rpm must be saved by
pressing the arrow down and hourglass buttons, on the control
panel, simultaneously. Name these values "Standard rpm". Let the
unit run for at least 1 minute before saving these values.
3. Choose required supply air temperature (see user and maintenance
instructions, "Operation").
4. Choose operation time for filter (fig. 11). From factory operation time is
set to 9 months. This is sufficient in areas where the outdoor air has a
satisfactory quality. If the outdoor air is polluted by exhaust from traffic,
industry etc, filter change every 6 months is recommended. Even if the
outdoor air quality is good, and the fresh air filter is not clogged, max.
recommended operation time for filters is 12 months (odours and
organic pollution will reduce the supply air quality). To increase or
reduce the operation time for filters, press buttons (13) and (9) or (13)
and (10) simultaneously. Setting is confirmed by flashing light in lamp
(14) and constant light in:
- Lamp (6) for 6 months operation time between filter change
- Lamp (7) for 9 months operation time between filter change
- Lamp (8) for 12 months operation time between filter change


