background image

villaware.com

villaware.com

villaware.com

villaware.com

9

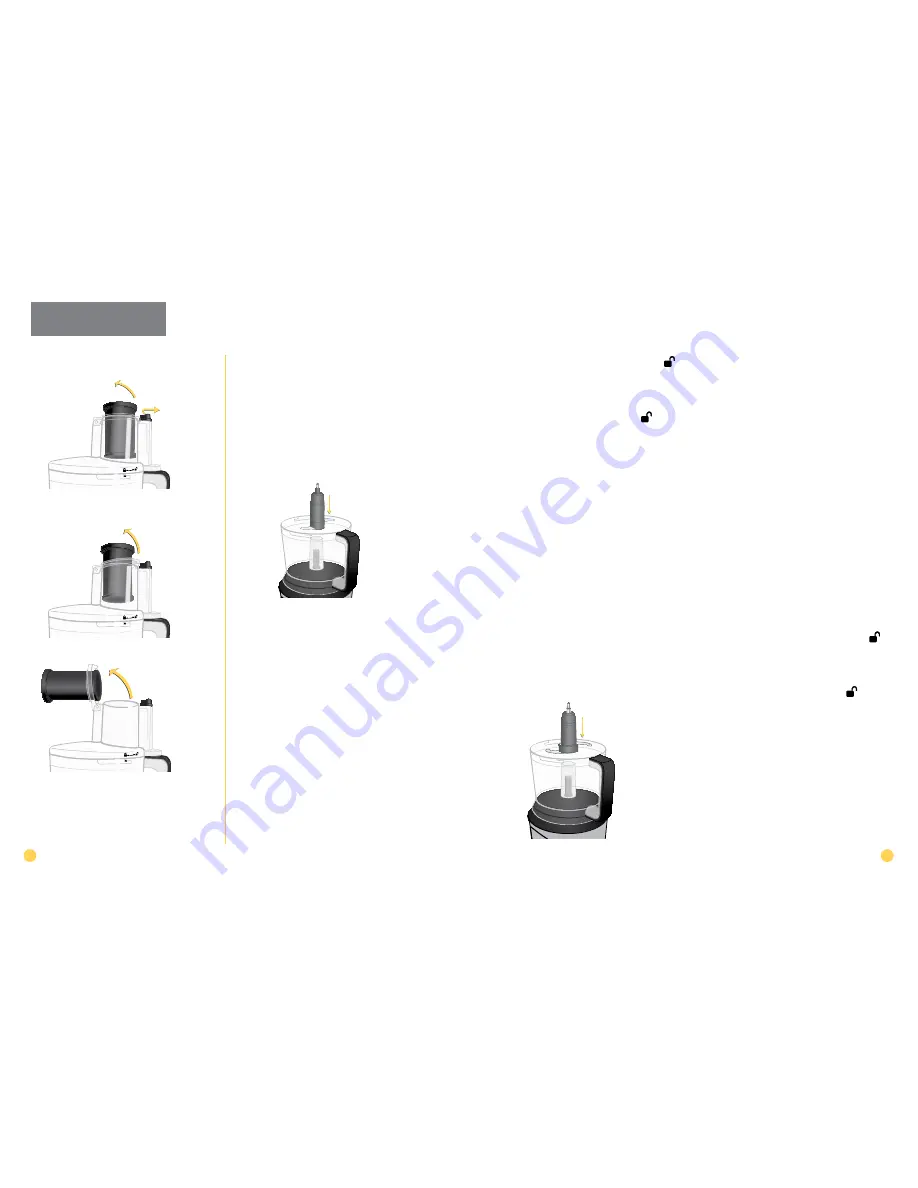
   Twist the cover towards the UNLOCk 


mark to remove lid.

10

   hold the Chopping Blade by its stem and 

remove. Unlock the bowl by turning it 
clockwise towards the UNLOCk 

 mark, 

and lift off. Empty the processed food.

nOTe:

 Chopping Blade is very sharp, use 

caution when handling.

Knead Dough

nOTe:

 NEVER TRy TO PROCESS 

DOUGh ThAT IS TOO STIFF TO kNEAD 

COmFORTABLy By hAND.

nOTe: 

make sure the unit is turned OFF 

and unplugged before use. Never use hand 

to push food into processor. Do not use 

the processor continuously for more than 3 

minutes at a time.

1

   Lock the bowl onto base.  

(See “how to assemble the bowl”).

2

   Grasp the dough blade by its stem  

and slide it onto the center post.

3

   Place all the dry ingredients into  

the bowl.

4

   Lock cover onto bowl.  

(See “how to Lock the cover”).

5

    Lock the Food Chute Lid.  

(See “how to Lock the Food Chute Lid”). 

6

    Plug the cord into an electric outlet.

7

   Turn the knob to the ON position for 

continuous processing or the PULSE 
position for short processing tasks. When 
using the PULSE setting, hold the knob in 
the PULSE position for about 2-3 seconds 
at a time, check results and repeat if 
desired.

nOTe:

 All liquid ingredients should be 

added through the food chute while unit 
is processing. Add liquid in a slow, steady 
stream for even distribution. It is important 
to add enough liquid to make the dough soft 
enough to knead. kneading dough that is too 
stiff can strain the machine.

8

    When finished processing, release the 

knob, or if you were using continuous ON, 
turn the knob to the OFF position and 
allow the dough blade to stop rotating.

9

    Twist the cover towards the UNLOCk 


mark to remove.

10

   hold the dough blade by its stem and 

remove. Unlock the bowl by turning it 
clockwise towards the UNLOCk 

mark, 

and lift off. Empty the processed food.

Open the food Chute lid

1

    Pull Side Release button out. 

2

    Pull up the Large Food Pusher. 

3

    Pull back the food chute lid and  

Large Food Pusher.

nOTe:

 Before opening Food Chute lid, turn 

the unit OFF and unplug the cord.

Chop

nOTe:

 make sure the unit is turned OFF 

and unplugged before use. Never use hand 

to push food into processor. Do not use 

the processor continuously for more than 3 

minutes at a time.

1

   Lock the bowl onto base. (See “how to 

assemble the bowl”).

2

   Grasp the chopping blade by its stem and 

slide it onto the center post.

3

  Place food into bowl.

4

   Lock cover onto bowl. (See “how to Lock 

the cover”).

5

   Lock the Food Chute Lid. (See “how to 

Lock the Food Chute Lid”). 

6

   Plug the cord into an electric outlet. Use 

the Food Guide to prepare food for 

chopping.

7

   Turn the knob to the ON position for 

continuous processing or the PULSE 

position for short processing tasks. When 

using the PULSE setting, hold the knob in 

the PULSE position for about 2-3 seconds 

at a time, check results and repeat if 

desired.

8

   When finished processing, release the 

knob, or if you were using continuous ON, 

turn the knob to the OFF position and 

allow the chopping blade to stop rotating.

how To: 

cont.

6

7

Summary of Contents for NDVLFP1000

Page 1: ...Jarden Consumer Solutions Boca Raton Florida 33431 Para preguntas sobre los productos llame EE UU 1 866 484 5529 www villaware com 2010 Sunbeam Products Inc operando bajo el nombre de Jarden Consumer...

Page 2: ...f any part is broken 9 Do not use outdoors or for commercial purposes 10 Keep hands and utensils away from moving blades or discs while processing food to reduce the risk of severe injury to persons o...

Page 3: ...com Gourmet French Fry Cutter Slice Shred Disc Additional Slice Shred Disc Features Base Bowl Large Small Food Pushers Food Chute Release Food Chute Bowl Lid Food Chute Lid Center Post Control Knob A...

Page 4: ...soft cheeses Important For your protection this unit has an interlock system The processor will not operate unless the bowl is properly locked onto the base and cover is properly locked onto the bowl...

Page 5: ...ad Kneading dough that is too stiff can strain the machine 8 When finished processing release the knob or if you were using continuous ON turn the knob to the OFF position and allow the dough blade to...

Page 6: ...Food Processing Tips Liquids 1 Hot liquids less than 176 F and hot foods can be processed in the bowl 2 Be sure to process small amounts of liquids 2 cups or less at a time Larger amounts may leak fro...

Page 7: ...r crumbing Graham Crackers Chocolate or Vanilla Wafers Break larger crackers into 1 2 inch 3 75 5cm pieces Add to bowl and process until fine Cranberries minced 3 cups 750ml Pulse to chop to desired f...

Page 8: ...red to obtain warranty performance JCS dealers service centers or retail stores selling JCS products do not have the right to alter modify or any way change the terms and conditions of this warranty T...

Page 9: ...ora de alimentos si alguna pieza est da ada 9 No utilice el electrodom stico en el exterior o para fines comerciales 10 Cuando procese alimentos mantenga las manos y los utensilios alejados de los dis...

Page 10: ...s Tronco del disco Hoja para masa Hoja para picar Disco para rodajas tiras Disco adicional para rodajas tiras 16 17 Base Taz n Empujador Grande y Peque o Seguro del Conducto para Alimentos Conducto pa...

Page 11: ...ci n esta unidad tiene un sistema de seguros interconectados El procesador no operar a no ser que el taz n este asegurado adecuadamente a la base y la tapa est adecuadamente asegurada al taz n No inte...

Page 12: ...amasar Amasar masa que es muy dura puede forzar la m quina 8 Cuando termine de procesar suelte la perilla o si estaba usando procesado continuo ENCENDIDO ON gire la perilla a la posici n de APAGADO O...

Page 13: ...quidos 1 L quidos calientes menos de 176 F y alimentos calientes pueden ser procesados en el taz n 2 Aseg rese de Procesar cantidades peque as de l quido 2 tazas o menos de l quido a la vez Cantidades...

Page 14: ...10 15 segundos Procesar otras hierbas del mismo modo albahaca cilantro menta etc Pimiento verde rojo amarillo picado Hasta 1 pimiento Cortar en trozos de 1 pulgada 2 54 cm Agregar al recipiente y puls...

Page 15: ...arant a es v lida para el comprador minorista original a partir de la fecha de compra inicial y la misma no es transferible Conserve el recibo de compra original Para solicitar servicio en garant a se...

Page 16: ...villaware com 28 Notes Notas Please visit www villaware com for more product info the VillaWare store and delicious recipes...

Reviews: