background image

   35

Interfaccia Grafica Utente (GUI) per Speed Dome IP

IT

5.6.3 Elenchi Blocca e Consenti

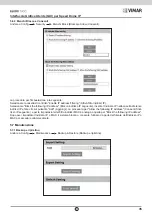
Andare a Config 

 Security 

 Elenchi Block (Blocca) e Allow (Consenti).


La procedura per l'impostazione è la seguente: 

Selezionare la casella di controllo "Enable IP address filtering" (Attiva filtro indirizzi IP). 

Selezionare "Block the following IP address" (Blocca indirizzo IP seguente), inserire l'indirizzo IP nella casella di elenco 

indirizzi IP e fare clic sul pulsante "Add" (Aggiungi). La procedura per "Allow the following IP address" (Consenti l'indi

-

rizzo IP seguente ) e per le impostazioni del filtro indirizzi MAC è analoga a quella per "Block the following IP address". 

Dopo aver impostato l'indirizzo IP o MAC, il sistema blocca o consente l'utilizzo da parte dell'utente dell'indirizzo IP o 

MAC per accedere alla telecamera.

5.7 Manutenzione

5.7.1 Backup e ripristino

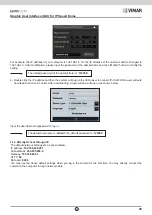
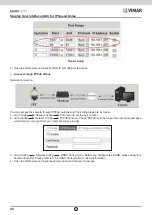
Andare a Config 

 Maintenance 

 Backup & Restore (Backup e ripristino).


Summary of Contents for 8013406295507

Page 1: ...Interfaccia Grafica Utente GUI per Speed Dome IP Graphic User Interface GUI for IP Speed Dome Manuale per l installazione e l uso Installation and operation manual ...

Page 2: ...stallare la telecamera Non rovesciare la telecamera altrimenti riceverà un immagine rovesciata Non azionarla se temperatura umidità e alimentazione non corrispondono ai limiti o valori specificati Tenere lontano da fonti di calore quali radiatori bocchette dell aria calda stufe e simili Non esporre il prodotto al flusso d aria diretto di un condizionatore dell aria Il presente documento contiene l...

Page 3: ... notte 16 4 3 5 Formato video 16 4 4 Funzioni telecamera dome 16 4 4 1 Impostazione preset 16 4 4 2 Impostazione cruise 17 4 4 3 Impostazione gruppi 18 4 4 4 Impostazione attività 18 4 4 5 Impostazione percorso 19 4 4 6 Impostazione allarme 19 4 4 7 Posizione iniziale 19 4 5 Impostazione display 20 4 6 Caricamento impostazioni predefinite 21 5 Configurazione remota 21 5 1 Configurazione del sistem...

Page 4: ...mail 32 5 5 9 FTP 33 5 6 Configurazione Sicurezza 33 5 6 1 Configurazione utente 33 5 6 2 Utente video online 34 5 6 3 Elenchi Blocca e Consenti 35 5 7 Manutenzione 35 5 7 1 Backup e ripristino 35 5 7 2 Riavvio del dispositivo 36 5 7 3 Upgrade 36 5 7 4 Log 36 6 Riproduzione 37 6 1 Ricerca video 37 6 2 Ricerca foto 38 7 FAQ 39 Appendice Descrizione preset 40 ...

Page 5: ...o dell area selezionata e funzione PTZ 2 Accesso remoto da Internet Explorer È possibile accedere alla telecamera IP tramite LAN o WAN In questo documento viene utilizzato come esempio il browser Internet Explorer 6 0 Di seguito sono indicati i dettagli 2 1 LAN In una LAN è possibile accedere alla telecamera IP in due modi 1 Accesso da IP Tool 2 Accesso diretto da Internet Explorer 2 1 1 Accesso d...

Page 6: ...li ActiveX Dopo il download si apre la finestra di accesso illustrata di seguito La password predefinita dell amministratore è 123456 Inserire il nome utente e la password per accedere Il nome utente predefinito è admin e la password 123456 2 1 2 Accesso diretto da Internet Explorer Le impostazioni di rete predefinite sono indicate di seguito Indirizzo IP 192 168 226 201 Subnet Mask 255 255 255 0 ...

Page 7: ...da a quello delle impostazioni prede finite della telecamera IP Aprire la rete e il centro di condivisione Fare clic su Connessione alla rete locale LAN per visualizzare la seguente finestra Selezionare Proprietà e quindi il protocollo Internet opportuno ad esempio IPV4 Infine fare clic sul pulsante Proprietà per impostare la rete del PC ...

Page 8: ...di premere Invio 2 2 WAN Accesso tramite router o server virtuale 1 Assicurarsi che la telecamera sia correttamente collegata tramite la LAN quindi accedere alla telecamera tramite LAN e andare al menu Config Configurazione Network Config Configurazione di rete Port Porta per impostare il numero di porta 2 Andare al menu Config Network Rete TCP IPv4 per modificare l indirizzo IP 3 Accedere all int...

Page 9: ...nu Config Network Config Port per impostare il numero di porta 2 Andare al menu Config Network Config TCP IPv4 Selezionare PPPoE e inserire il nome utente e la password comunicati dal fornitore di servizi Internet 3 Andare al menu Config Network Config DDNS Config Configurazione DDNS Prima di configurare il DDNS richiedere un nome di dominio Far riferimento al paragrafo 5 5 4 Configurazione DDNS p...

Page 10: ...fig IP Address per impostare l indirizzo IP Selezionare Use the following IP address Utilizza questo indirizzo IP quindi inserire l indirizzo IP statico e gli altri parametri 3 Aprire Internet Explorer quindi inserire l IP WAN corrispondente e la porta http per accedere Collegamento alla rete 3 Anteprima in remoto Dopo aver eseguito l accesso viene visualizzata la seguente finestra Accesso tramite...

Page 11: ...rmo intero Zoom IN Avvia arresta la visualizzazione in diretta Zoom OUT Avvia arresta comunicazione bidirezionale Controllo PTZ Spostare il cursore per visualizzare l immagine live in tutte le direzioni dopo aver fatto clic su questo pulsante Trascinare con il pulsante sinistro del mouse per eseguire lo zoom avanti sull immagine live Fare clic sul pulsante PTZ per aprire il pannello di controllo P...

Page 12: ...is Auto scan Wiper Light Radom scan Group scan Preset Cruise Track per eliminarlo Selezionare cruise e fare clic su Icon Description Icon Description Click it to rotate the dome diagonally up left Click it to rotate the dome diagonally up right Click it to rotate the dome upwards Click it to stop rotating the dome Click it to rotate the dome towards left Click it to rotate the dome towards right C...

Page 13: ...u principale è possibile selezionare il menu facendo clic sui pulsanti di dire zione seleziona il menu spostando il cursore in alto o in basso torna al menu a sinistra conferma l accesso al sottomenu o seleziona il menu a destra 4 1 Informazioni di sistema Selezionare System Information Informazioni sistema facendo clic sul pulsante o quindi fare clic sul pulsante per andare al menu mostrato di se...

Page 14: ... pulsante per spostare la telecamera speed dome verso il basso in modo che la telecamera esegua il ribaltamento automatico 4 2 2 Impostazione della lingua È possibile selezionare le lingue inglese o cinese 4 2 3 Impostazione RS485 Andare a System Setup RS485 Setup come mostrato di seguito Dome ID ID dome l intervallo di valori consentito è da 001 a 255 Protocol Protocollo è possibile scegliere PEL...

Page 15: ...rà richiesto di inserire la password Change Password Modifica password Inserire la password attuale e quindi inserire due volte la nuova password Per ulteriori dettagli fare riferimento a New Password Nuova password Se si inserisce una nuova password vuota la password attuale viene eliminata 4 2 8 Impostazione tempo per l uscita automatica dal menu Andare a System Setup Next Page Pagina successiva...

Page 16: ...neamente zone molto luminose e zone molto scure la funzione WDR consente di bilanciare il livello di luminosità dell immagine complessiva e di ottenere immagini nitide e dettagliate Gamma Impostazione per il chiaro scuro dell immagine CAM Defog migliora la qualità dell immagine in caso di nebbia 4 3 2 Impostazione immagine Selezionare Image Setup Impostazione immagine per accedere al seguente sott...

Page 17: ...ine in alto e in basso ROTA Ruota ruota l immagine in alto in basso a sinistra o a destra 4 3 3 Impostazione obiettivo Andare al menu Camera Setup Lens Setup Impostazione obiettivo come indicato di seguito Focus Limit Limite di messa a fuoco Focus Near Limit Limite prossimo di messa a fuoco imposta la distanza di messa a fuoco più vicina Zoom MAG DISP Visualizzazione ingrandimento zoom Se è selezi...

Page 18: ...attiva questa funzione i modi Day e Night vengono disattivati IR Sensitivity Sensibilità IR infrarossi Utilizzare IR Sensitivity per impostare il livello di sensibilità IR A un valore maggiore corrisponde una maggiore sen sibilità 4 3 5 Formato video È possibile scegliere tra PAL o NTSC 4 4 Funzioni telecamera dome Andare al menu Dome Function Funzioni telecamera dome illustrato di seguito 4 4 1 I...

Page 19: ...e il comando cruise in modo da ottenere un monito raggio ininterrotto tra più posizioni importanti La procedura per l impostazione è la seguente 1 Selezionare il numero di cruise 2 Modificare il cruise attuale Questa telecamera supporta 8 cruise e 16 preset per ciascun cruise Andare al menu Edit Cur Cruise Modifica cruise attuale illustrato di seguito Impostare il preset e l ora I preset vanno da ...

Page 20: ... Dome Function Task Setup Impostazione attività illustrato di seguito È possibile dividere le 24 ore in diversi periodi e assegnare comandi diversi per ciascun periodo questa funzione consente al sistema della telecamera di eseguire automaticamente i comandi in base all ora impostata se non sono selezionati altri comandi Procedura di impostazione 1 Abilitare l attività 2 Impostare l attività Forma...

Page 21: ...nte Il tempo di registrazione è correlato alla frequenza di azionamento Più è frequente l azionamento più è breve il tempo di registrazione nella memoria 3 Selezionare RUN CUR TRACK Esegui percorso corrente per eseguire il comando 4 4 6 Impostazione allarme Accedere al menu Dome Function Alarm Setup Impostazione allarme illustrato di seguito Procedura di impostazione 1 Selezionare il numero di ing...

Page 22: ...edenza 2 Selezionare il tempo di ritardo da 007s a 180s e uscire dal menu Quando il tempo di stand by della telecamera dome supera il tempo di ritardo la telecamera esegue automatica mente il comando per monitorare il preset selezionato ATTENZIONE Tutte le funzioni appena descritte possono essere configurate anche direttamente da interfaccia WEB nella schermata PTZ Function qui sotto riportata 4 5...

Page 23: ... predefiniti di fabbrica System Reboot riavvia la telecamera 5 Configurazione remota 5 1 Configurazione del sistema Il menu System Configuration Configurazione del sistema include quattro sottomenu Basic Information Informazioni di base Date and Time Data e ora Local Config Configurazione locale e SD Card Scheda SD 5 1 1 Informazioni di base Nell interfaccia Basic Information è possibile controlla...

Page 24: ...zio di archiviazione rimasto e lo stato della scheda SD La prima volta che si utilizza la scheda SD fare clic su Format SD card Formatta scheda SD per formattare la scheda Nota l utilizzo della funzione scheda SD dovrebbe essere coordinato con l allarme Quando l allarme viene attivato il sistema scatta automaticamente un istantanea e salva l immagine nella scheda SD 5 2 Configurazione immagine Il ...

Page 25: ...ne OSD Andare al menu Config Image OSD per visualizzare l interfaccia illustrata di seguito È possibile impostare l indicazione data ora il nome dispositivo e l OSD in questo punto Dopo aver attivato il display corrispondente e inserito il contenuto trascinare per modificare la posizione Premere quindi il pulsante Save Salva per salvare le impostazioni 5 3 Configurazione PTZ 5 3 1 Impostazione del...

Page 26: ...rirla ogni volta che si accede al menu del PTZ richiamando il preset n 95 Andare a Config PTZ Setting Others Altri Qui è possibile impostare la password del menu PTZ 5 3 2 Impostazione telecamera Andare a Config PTZ Camera Setup Impostazione telecamera Nel sottomenu raffigurato è possibile impostare vari parametri quali Color Colore Level Livello HLC Compensa zione luci forti Sharpness Nitidezza W...

Page 27: ...nable alarm Attiva allarme per attivare l allarme basato su movimento selezio nare il tempo di durata allarme e le opzioni di attivazione allarme Alarm Out Uscita allarme se selezionata questa opzione attiva l uscita del relè esterno quando viene rilevato un allarme basato sul movimento Trigger Snap Attiva istantanea se questa opzione è selezionata il sistema scatta un istantanea quando si verific...

Page 28: ...ella settimana La linea orizzontale corrisponde al giorno della settimana le righe verticali indicano le 24 ore Il verde indica l area selezio nata Lo spazio vuoto indica l area non selezionata Add Aggiungi aggiunge la programmazione per un determinato giorno Erase Cancella elimina la programmazione dei festivi Holiday Schedule Programmazione dei festivi Consente di impostare l orario per l allarm...

Page 29: ...n cui siano presenti più sensori è possibile utilizzare il pulsante Copy per applicare rapidamente le impo stazioni agli altri sensori 2 Impostare la programmazione dell allarme sensore La procedura di impostazione della programmazione è analoga a quella per il rilevamento movimento Fare riferimento al capitolo sul rilevamento movimento per i dettagli 5 4 3 Uscita allarme 1 Andare al menu Config A...

Page 30: ... a Config Network TCP IPv4 Sono disponibili due tipi di connessione alla rete Utilizzare l indirizzo IP Per IP setup Impostazione IP sono disponibili due opzioni Obtain an IP address automa tically Ottieni indirizzo IP automaticamente da protocollo DHCP e Use the following IP address Utilizza questo indirizzo IP Selezionare un opzione in base alle esigenze Utilizzare PPPoE inserire il nome utente ...

Page 31: ...aticamente un ID dispositivo Controllare nel server CVM Elvox 3 Inserire l indirizzo del server suddetto la porta server e l ID dispositivo nelle caselle corrispondenti Fare clic sul pulsante Save Salva per salvare le impostazioni 5 5 4 Configurazione DDNS Se la telecamera è impostata per utilizzare il PPPoE come connessione di rete predefinita utilizzare il DDNS per l accesso in rete Prima di imp...

Page 32: ...postare la funzione SNMP Prima di utilizzare l SNMP scaricare il software SNMP e impostare i parametri quali porta SNMP indirizzo trap 1 Andare a Config Network SNMP 2 Selezionare la casella corrispondente alla versione Enable SNMPv1 Enable SNMPv2 Enable SNMPv3 in base alla versione del software SNMP scaricato 3 Impostare Read SNMP Community Leggi Community SNMP Write SNMP Community Scrivi Communi...

Page 33: ...31 Interfaccia Grafica Utente GUI per Speed Dome IP IT 5 5 6 RTSP Andare a Config Network RTSP ...

Page 34: ...cessario configurare la mappatura porte quando la telecamera è connessa alla WAN tramite il router Andare a Config Network UPnP Selezionare Enable UPNP Attiva UPNP e inserire un nome facile da memorizzare Dopo aver attivato la funzione e impostato il nome UPnP è possibile vedere il nome UPnP facendo clic su Network Rete dal desktop del proprio computer situato nella stessa rete locale Fare doppio ...

Page 35: ...rificare che l account funzioni Receiver email address Indirizzo email destinatario indirizzo email del destinatario 5 5 9 FTP Dopo aver configurato il server FTP le immagini acquisite durante un allarme sono caricate sul server FTP Andare a Config Network FTP Server Name Nome server il nome dell FTP Server address indirizzo IP server indirizzo IP o nome di dominio del server FTP Port Porta la por...

Page 36: ...lenco utenti Modifica di un utente 1 Selezionare l utente di cui modificare password e indirizzo fisico nella casella di elenco di configurazione utente 2 Fare clic sul pulsante Modify Modifica per visualizzare la finestra di dialogo Edit user Modifica utente 3 Inserire la vecchia password dell utente nella casella di testo Password 4 Inserire la nuova password nelle caselle di testo New password ...

Page 37: ...seguente inserire l indirizzo IP nella casella di elenco indirizzi IP e fare clic sul pulsante Add Aggiungi La procedura per Allow the following IP address Consenti l indi rizzo IP seguente e per le impostazioni del filtro indirizzi MAC è analoga a quella per Block the following IP address Dopo aver impostato l indirizzo IP o MAC il sistema blocca o consente l utilizzo da parte dell utente dell in...

Page 38: ... possibile effettuare l upgrade del sistema e del PTZ 1 Fare clic sul pulsante Browse Sfoglia per selezionare il percorso in cui è salvato il file di upgrade 2 Fare clic sul pulsante Upgrade Esegui upgrade per avviare l upgrade del programma applicativo 3 Il dispositivo si riavvia automaticamente 4 Dopo aver aggiornato il software fare clic sul pulsante OK per chiudere Internet Explorer quindi ria...

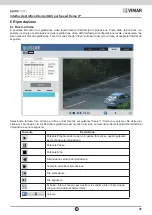
Page 39: ...ia seguente Selezionare la data l ora di inizio e di fine quindi fare clic sul pulsante Search Cerca per cercare i file delle regi strazioni Fare doppio clic sul file della registrazione per riprodurre il video Le descrizioni dei pulsanti dell interfaccia di riproduzione sono le seguenti Pulsante Descrizione Pulsante Play Quando il video è in pausa fare clic su questo pulsante per continuare la ri...

Page 40: ...a fare clic su questo pulsante per selezionare il percorso in cui salvare il file di immagine corrente sul PC 4 Save All Salva tutti fare clic su questo pulsante per selezionare il percorso in cui salvare tutti i file di immagine sul PC 5 Proper size Grandezza appropriata fare clic su questo pulsante per adattare l immagine alle dimensioni dello schermo 6 Actual size Grandezza reale fare clic su q...

Page 41: ...enti Ripristinare l impostazione predefinita da IP Tool Nota IP predefinito 192 168 226 201 mask number 255 255 255 0 3 D IP tool non trova i dispositivi Come mi comporto Potrebbe essere dovuto al software antivirus del computer Disattivare il software antivirus e provare a cercare nuova mente i dispositivi 4 D Internet Explorer non riesce a scaricare i controlli ActiveX Come mi comporto Explorer ...

Page 42: ...cruise 4 Richiamo preset n 95 Menu OSD Richiamo preset n 97 Attiva scansione casuale Richiamo preset n 99 Attiva P P SCAN Richiamo preset n 100 Tergicristallo ON se disponibile Richiamo preset n 101 Tergicristallo OFF se disponibile Impostazione preset Impostazione preset numero 91 Imposta scansione casuale richiamo automatico attività punto iniziale Impostazione preset numero 92 Imposta limite si...

Page 43: ...not reverse the camera or the reversing image will be re ceived Do not operate it incase temperature humidity and power supply are beyond the limited stipulations Keep away from heat sources such as radiators heat registers stove etc Do not expose the product to the direct airflow from an air conditioner This is product instructions not quality warranty We may reserve the rights of amending the ty...

Page 44: ... 5 Video Format 57 4 4 Dome Function 57 4 4 1 Preset Setup 57 4 4 2 Cruise Setup 58 4 4 3 Grouping Setup 59 4 4 4 Task Setup 59 4 4 5 Track Setup 60 4 4 6 Alarm Setup 60 4 4 7 Home Position 61 4 5 Display Setup 61 4 6 Load Default 62 5 Remote Configuration 62 5 1 System Configuration 62 5 1 1 Basic Information 62 5 1 2 Date and Time Configuration 62 5 1 3 Local Config 63 5 1 4 SD Card 63 5 2 Image...

Page 45: ...nP 73 5 5 8 E mail 73 5 5 9 FTP 74 5 6 Security Configuration 74 5 6 1 User Configuration 74 5 6 2 Online Video User 75 5 6 3 Block and Allow Lists 76 5 7 Maintenance 76 5 7 1 Backup Restore 76 5 7 2 Reboot Device 77 5 7 3 Upgrade 77 5 7 4 Log 77 6 Playback 78 6 1 Video Search 78 6 2 Photo Search 79 7 FAQ 80 Appendix Preset Description 81 ...

Page 46: ... storage Web GUI menu Support selected area amplification and PTZ function 2 IE Remote Access You may connect IP Cam via LAN or WAN Here only take IE browser 6 0 for example The details are as follows 2 1 LAN In LAN there are two ways to access IP Cam 1 access through IP Tool 2 directly access through IE browser 2 1 1 Access through IP Tool Network connection 1 Make sure the PC and IP Cam are conn...

Page 47: ... will auto download the Active X control After downloading a login window will pop up as shown below The default password of the administrator is 123456 Input the username and password to log in The default username is admin the default password is 123456 2 1 2 Directly Access through IE The default network settings are as shown below IP address 192 168 226 201 Subnet Mask 255 255 255 0 Gateway 19...

Page 48: ... should be as the same as the default settings of the IP camera Open the network and share center Click Local Area Connection to pop up the following window Select Properties and then select internet protocol according to the actual situation for example IPV4 Next click Properties button to set the network of the PC ...

Page 49: ...ut the default username and password and then enter to view 2 2 WAN Access through the router or virtual server 1 Make sure the camera is well connected via LAN and then log in the camera via LAN and go to Config Network Config Port menu to set the port number 2 Go to Config Network Config TCP IPv4 menu to modify the IP address 3 Go to the router s management interface through IE browser to forwar...

Page 50: ...1 Go to Config Network Config Port menu to set the port number 2 Go to Config Network Config TCP IPv4 menu Check PPPoE and then input the user name and pass word which you can get from your internet service provider 3 Go to Config Network Config DDNS Config menu Before you configure the DDNS please apply for a domain name first Please refer to 5 5 4 DDNS Configuration for detail information 4 Open...

Page 51: ...ber 2 Go to Config Network Config IP Address menu to set the IP address Check Use the following IP ad dress and then input the static IP address and other parameters 3 Open the IE browser and input its WAN IP and http port to access Network connection 3 Remote Preview After you log in you will see the following window Access through static IP ...

Page 52: ...ropriate size Snap Auto Start stop record Full screen Zoom IN Start stop live view Zoom OUT Start stop two way talk PTZ control Move the cursor to view the live image in all directions after tou click this button Additionally hold and drag the left mouse button to zoom in the live image Click PTZ extended button to unfold PTZ control panel In remote preview interface you can view the image from ev...

Page 53: ...o save the position of the preset Select the set preset and click Description Icon Description k it to rotate the dome onally up left Click it to rotate the dome diagonally up right k it to rotate the dome ards Click it to stop rotating the dome k it to rotate the dome ards left Click it to rotate the dome towards right k it to rotate the dome onally down left Click it to rotate the dome diagonall...

Page 54: ...ream After you go to the main menu interface you can select the menu by clicking the direction button To select menu by moving up and down To return to the menu on the left To confirm to enter sub menu or to select the menu on the right 4 1 System Information Select System Setup by clicking or button and then click button to go to System Information menu as shown below You can check the software a...

Page 55: ...e following contents will not introduce it in details After you exit the main menu press and hold button to let the speed dome move to the bottom so that the dome will auto flip 4 2 2 Language Setup English or Chinese menu can be selected 4 2 3 RS485 Setup Go to System Setup RS485 Setup as below Dome ID The available range is from 001 to 255 Protocol PELCOD or PELCOP is selectable Baud Rate The ba...

Page 56: ...y password is invalid when you set the new password Password needs to be input when you log in next time Change Password Enter the current password and then input the new password twice Please refer to New Password for details Inputting empty new password means to delete the current password 4 2 7 Auto Exit Time Go to System Setup Next Page Auto Exit Time You may set the time to exit the menu auto...

Page 57: ...d dome provide clear images even under back light circumstances When there are both very bright and very dark areas simultaneously in the field of view WDR will balance the brightness level of the whole image and provide clear images with details Gamma Measurement of the contrast of an image CAM Defog Improves image quality 4 3 2 Image Setup Select Image Setup to go to the following sub menu AE Se...

Page 58: ...and the more the noises of the image are Image Flip MIRR Turn over the image left or right FLIP Turn over the image up or down ROTA Turn over the image up down left or right 4 3 3 Lens Setup Go to Camera Setup Lens Setup menu as shown below Focus Limit Set the nearest distance of focus Zoom MAG DISP If ON is selected you will see the zoom magnification in the live image Zoom Speed Adjust zoom spee...

Page 59: ...mode between day and night according to the set day and night time Day Night Mode will be disabled if enabling this function IR Sensitivity Set the level of the IR sensitivity The higher the value is the more the sensitivity is 4 3 5 Video Format PAL or NTSC is optional 4 4 Dome Function Go to Dome Function menu as shown below 4 4 1 Preset Setup This function is used to memorize the specific posit...

Page 60: ...ting cruise command so that non stop monitoring between multiple important positions can be achieved Setting steps are as follows 1 Select the cruise number 2 Edit the current cruise This camera supports 8 cruises and 16 presets for each cruise Go to Edit Cur Cruise menu as shown below Set the preset and time The preset ranges from 001 to 255 and the dwell time is from 05s to 240s 3 Run the curren...

Page 61: ...sk Setup Go to Dome Function Task Setup menu as shown below By dividing 24 hours into several periods and appointing different commands for each period the camera system will automatically execute the commands according to the set time if there is no operation Setting Steps 1 Enable the task 2 Set the task Time Format Start Time End Time The tasks will be automatically executed in chronological or...

Page 62: ...g 360 commands the system will automatically save the first 360 commands and then exit the current menu The recording time is related to the operating frequency The more frequent the operation is the shorter the memory time is 3 Select RUN CUR TRACK to perform the command 4 4 6 Alarm Setup Go to Dome Function Alarm Setup as shown below Setting Steps 1 Select Alarm In No 2 Go to EDIT CUR ALARM IN m...

Page 63: ...ge from 007s to 180s and exit the menu When the stand by time of the dome camera exceeds the delay time the camera will automatically execute the command to monitor the selected preset ATTENTION All the functions described above can also be configured from the WEB interface on the PTZ Function screen in the picture below 4 5 Display Setup You can enable title display and time display if you need S...

Page 64: ...ve information of the device 5 1 2 Date and Time Configuration Go to Config System Date and Time Please refer to the following interface 4 6 Load Default There are three menus including master reset master clear and system reboot Master Reset Restore the camera state and active menu to factory default but do not clear those parameters such as preset cruise Master Clear Restore the camera to factor...

Page 65: ...sed capacity remaining capacity and state of the SD card The first time you used the SD card you should click Format to format SD card Note Using of SD card function should be coordinated with alarm When alarm is triggered the system will automatically snap picture and save the picture into SD card 5 2 Image Configuration Image Configuration includes two submenus Video Audio and OSD Configuration ...

Page 66: ...t the audio tab 5 2 2 OSD Configuration Go to Config Image OSD menu to display the interface as shown below You may set time stamp device name and OSD here After enabling the corresponding display and entering the con tent drag them to change their position Then press the Save button to save the settings 5 3 PTZ Configuration 5 3 1 PTZ and Password Setting PTZ Setting Go to Config PTZ Setting This...

Page 67: ... If the password is set you must input the password every time you go to the menu of the PTZ by calling preset NO 95 Go to Config PTZ Setting Others You can set the password of the PTZ menu 5 3 2 Camera Setup Go to Config PTZ Camera Setup Many parameters of the camera can be set in above sub menu such as Color Level HLC Sharpness Wide Dynamic 3D DNR GAMMA Fog White Balance Day Night Mode Focus Zoo...

Page 68: ...larm trigger Check Enable Alarm check box to activate motion based alarm choose alarm holding time and set alarm trigger options Alarm Out If selected this would trigger the external relay output on detecting a motion based alarm Trigger Snap If selected the system will snap images on an alarm and save them in SD card Trigger Email If the email and attach picture checkbox is checked Email address ...

Page 69: ...for alarm everyday in one week The lengthwise means one day of a week the rank means 24 hours of a day Green means selected area Blank means unselected area Add Add the schedule for a special day Erase Delete holiday schedule Day schedule Set alarm time for alarm in some time of a special day such as holiday Select a date at the Date pull down list press Add button to add that date to the list box...

Page 70: ...ave the settings If there are many sensors you may use Copy button to quickly apply settings to other sensors 2 Set the schedule of the sensor alarm The setting steps of the schedule are the same with that of motion detection Please refer to motion detection chapter for details 5 4 3 Alarm Out 1 Go to Config Alarm Alarm Out menu as shown below 2 Select alarm holding time and alarm name at the Alar...

Page 71: ...P address There are two options for IP setup obtain an IP address auto by DHCP protocol and use the follow ing IP address Please choose one of options for your requirements Use PPPoE Enter the user name and password from your ISP Trigger Email when the IP address of the device is changed a new IP address will be sent to the appointed mailbox automatically Trigger FTP when the IP address of the dev...

Page 72: ...auto report in the CVM when adding a new device Next input the remaining information of the device in the CVM After that the system will auto allot a device ID Please check it in the CVM 3 Input the above mentioned server address server port and device ID in the responding boxes Click Save button to save the settings 5 5 4 DDNS Configuration If your camera is set to use PPPoE as its default networ...

Page 73: ... Before using the SNMP please download the SNMP software and set the parameters of the SNMP such as SNMP port trap address 1 Go to Config Network SNMP 2 Check the corresponding version checkbox Enable SNMP V1 Enable SNMP V2 Enable SNMP V3 according to the version of the SNMP software you download 3 Set the Read SNMP Community Write SNMP Community Trap Address Trap Port and so on Please make sure t...

Page 74: ...72 Graphic User Interface GUI for IP Speed Dome EN 5 5 6 RTSP Go to Config Network RTSP ...

Page 75: ... don t need to configure the port mapping when the camera is connected to the WAN via the router Go to Config Network UPnP Select Enable UPNP and then input friendly name After you enable it and set the UPnP name you will see the UPnP name by clicking Network on the desktop of your computer which is in the same local area network Then double click this name to access the camera quickly 5 5 8 E mai...

Page 76: ...ount Settings to test the effectiveness of the account Receiver email address receiver s e mail address 5 5 9 FTP After you set the FTP server the captured pictures on an alarm will be uploaded to the FTP server Go to Config Network FTP Server Name The name of the FTP Server Address The IP address or domain name of the FTP Port The port of the FTP Use Name and Password The username and password ar...

Page 77: ... user will display in the user list Modify user 1 Select the user you need to modify password and physical address in the user configuration list box 2 The Edit user dialog box pops up by clicking Modify button 3 Input old password of this user in the Password text box 4 Input new password in the New password and Confirm Password text box 5 Input computer s MAC address as required 6 Click OK butto...

Page 78: ...dress input IP address in the IP address list box and click Add button The opera tion step of Allow the following IP address and MAC address filter settings are the same with Block the following IP address After you set the IP address or MAC address the system will block or allow the user using the added IP address or MAC address to access the camera 5 7 Maintenance 5 7 1 Backup Restore Go to Conf...

Page 79: ...nce Upgrade In this interface you can upgrade system and PTZ 1 Click Browse button to select the save path of the upgrade file 2 Click Upgrade button to start upgrading the application program 3 The device will restart automatically 4 After you successfully update the software click OK button to close IE and then re open IE to connect IP Cam Caution You can t disconnect to PC or close the IP CAM d...

Page 80: ...enu toolbar The following interface will be seen Choose the date and the start time and end time and then click Search button to search the record files Double click the record file to play the record The descriptions of the buttons on the playback interface are as follows Button Description Play button After pausing the video click this button to continue playing Pause button Stop button Speed do...

Page 81: ...Click this button to close all pictures viewing 3 Save Click this button to select the save path of the picture file on the PC for saving the current picture 4 Save all Click this button to select the save path of the figure files on PC for saving all pictures 5 Proper size The picture will fit on screen by clicking this button 6 Actual size Click this button to display the actual size of the pict...

Page 82: ...r 4 Exclude the above reasons Restore the default setting by IP Tool Note The default IP 192 168 226 201 mask number 255 255 255 0 3 Q IP tool cannot search devices How can I do It may be caused by the anti virus software in your computer Please exit it and try to search device again 4 Q IE cannot download ActiveX control How can I do IE browser blocks ActiveX Please do setup following below 1 Ope...

Page 83: ...uise 2 Call NO 93 Preset Run cruise 3 Call NO 94 Preset Run cruise 4 Call NO 95 Preset OSD menu Call NO 97 Preset Enable random scan Call NO 99 Preset Enable P P SCAN Call NO 100 Preset Wiper ON if available Call No 101 Preset Wiper OFF if available Set Preset Set NO 91 Preset Set random scan task auto call the beginning point Set NO 92 Preset Set left border of P PSCAN Set NO 93 Preset Set right ...

Page 84: ...49401118A0 01 1901 Viale Vicenza 14 36063 Marostica VI Italy www vimar com ...

Reviews: