

Viale Vicenza, 14
36063 Marostica VI - Italy
www.vimar.com
49400575C0 01 2211
EIKON TACTIL
21122
Comando elettronico remoto, 2 pulsanti per la gestione remota di un singolo
comando elettronico o per il controllo centralizzato di più comandi, da com-
pletare con etichetta e placca Eikon Tactil.
CARATTERISTICHE.
• Tensione nominale di alimentazione: 230 V~, 50/60 Hz
• Spie luminose con simboli intercambiabili per individuazione al buio.
• Ricalibrazione dei pulsanti a sfioramento: 1 minuto
• Temperatura di funzionamento: -5 °C - +35 °C.
CARICHI COMANDABILI.
• Uscita codificata (morsetto R): 230 V~, 50 mA max
• L’apparecchio, collegato ai dispositivi 21119, 21134 e 21174 consente il comando da remoto
dei carichi ad essi collegati (distanza massima 100 m)
FUNZIONAMENTO.
• Spie frontali sempre accese
• Comandi: doppio pulsante a sfioramento sul fronte; il comando avviene appoggiando lieve-
mente il dito sul fronte del dispositivo in corrispondenza della spia illuminata
•
In fase di configurazione il buzzer è sempre abilitato
ATTENZIONE: Il circuito sul lato carico deve essere considerato sempre in tensione.
N.B: Ad ogni installazione della placca attendere almeno 1 min. per la sua ricalibra-
zione.
CONFIGURAZIONE.
A carico/lampada spento premere contemporaneamente entrambi i tasti posti sotto la placca;
il tasto superiore inzierà a lampeggiare ed entrerà nella fase di configurazione 1:
- premere brevemente il
tasto
inferiore
per modificare le impostazioni della configurazione sele-
zionata
- premere brevemente il
tasto superiore lampeggiante
per salvare la fase selezionata e passare
alla fase di configurazione successiva.
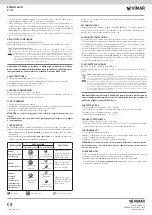
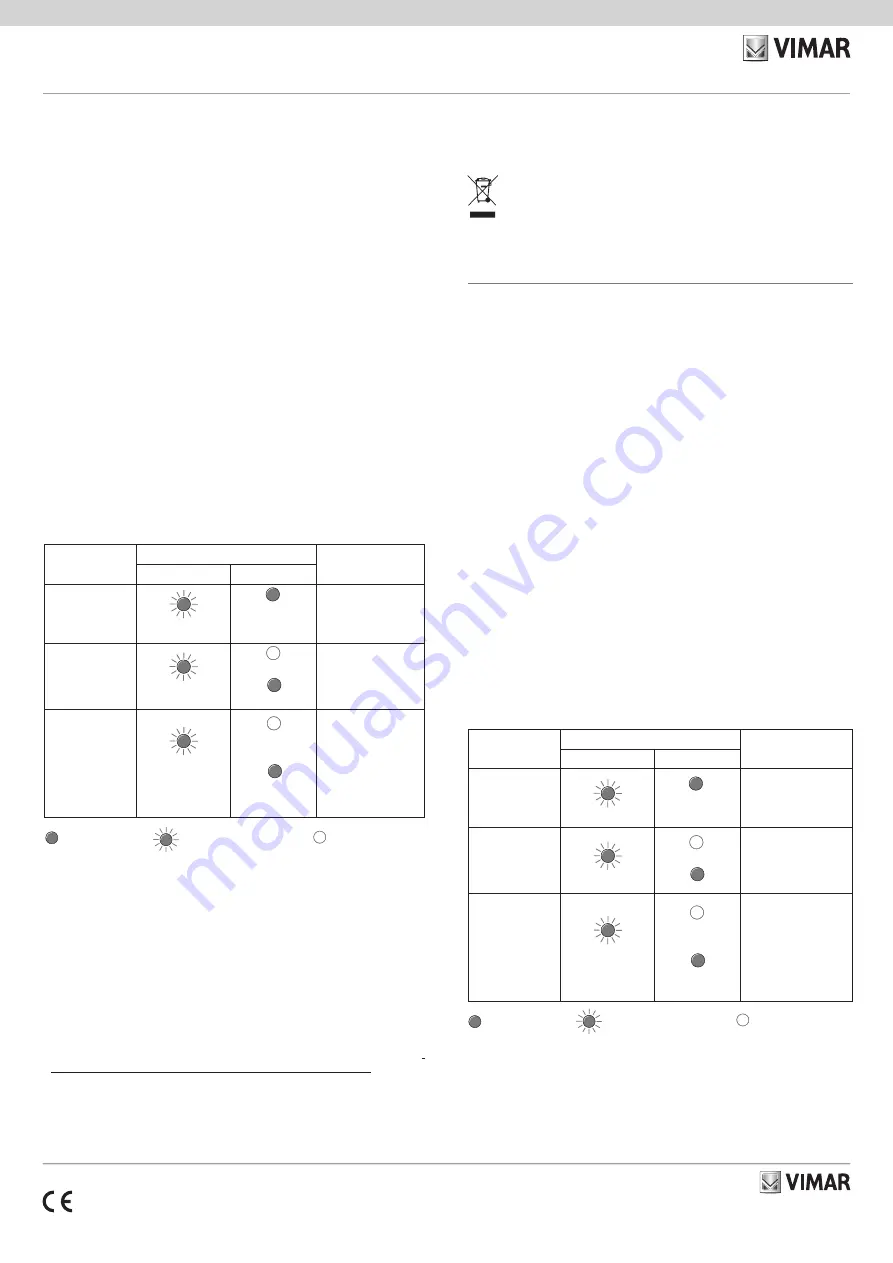
CONFIGURAZIONE
IMPOSTAZIONE
PROCEDURA
LED tasto superiore
LED tasto inferiore
FASE 1
Modifica luminosità
1 lampeggio ripetuto
Sempre acceso
alla luminosità
impostata
Premere il tasto
inferiore per modificare
ciclicamente la luminosità
(bassa, media, alta)
FASE 2
Abilitazione buzzer
2 lampeggi ripetuti
Buzzer disattivo
Buzzer attivo
Premere il tasto inferiore
per attivare/disattivare
il buzzer
FASE 3
Abilitazione
scenario
(da utilizzare quando
si devono comandare
dispositivi diversi con-
temporaneamente )
3 lampeggi ripetuti
Scenario
disabilitato (default)
Scenario solo OFF
abilitato
Premere il tasto inferiore
per abilitare o disabili-
tare il comportamento
scenario
LED acceso
LED lampeggiante
LED spento (default)
Se entro 15 s non si effettua nessuna operazione, il dispositivo esce dalla configurazione senza
salvare l’ultima fase.
AVVERTENZE.
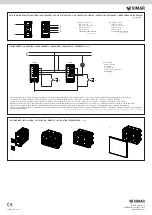
Collegare l’apparecchio come indicato nella figura “COLLEGAMENTI”. Il circuito di alimenta-
zione (L-N) deve essere protetto contro i sovraccarichi da un dispositivo, fusibile o interruttore
automatico, con corrente nominale non superiore a 10 A.
REGOLE DI INSTALLAZIONE.
• L’installazione deve essere effettuata da personale qualificato con l’osservanza delle dispo-
sizioni regolanti l’installazione del materiale elettrico in vigore nel paese dove i prodotti sono
installati.
• Il dispositivo può essere installato su placche Eikon Tactil a 2, 3 e 4 moduli; usare l’apposito
copriforo art. 21041 per chiudere i moduli non utilizzati.
• In caso di installazione con placca 5M BS (2+blank+2), quindi su supporto art. 20609, il
dispositivo non può essere installato nel modulo centrale del supporto stesso; tale modulo
va chiuso utilizzando il copriforo art. 21041 (per i dettagli si veda
SC-Scheda presente su
www.vimar.com -> Prodotti -> Catalogo prodotti
in corrispondenza del codice articolo).
• Sulla stessa placca utilizzata per l’art. 21122 non possono essere installati dispositivi Tactil
SELV (art. 21520, 21540, 21840, 21860).
RAEE - Informazione agli utilizzatori
Il simbolo del cassonetto barrato riportato sull’apparecchiatura o sulla sua confezione indica che il prodotto alla
fine della propria vita utile deve essere raccolto separatamente dagli altri rifiuti. L’utente dovrà, pertanto, confe-
rire l’apparecchiatura giunta a fine vita agli idonei centri comunali di raccolta differenziata dei rifiuti elettrotecnici
ed elettronici. In alternativa alla gestione autonoma, è possibile consegnare gratuitamente l’apparecchiatura
che si desidera smaltire al distributore, al momento dell’acquisto di una nuova apparecchiatura di tipo equiva-
lente. Presso i distributori di prodotti elettronici con superficie di vendita di almeno 400 m
2
è inoltre possibile
consegnare gratuitamente, senza obbligo di acquisto, i prodotti elettronici da smaltire con dimensioni inferiori
a 25 cm. L’adeguata raccolta differenziata per l’avvio successivo dell’apparecchiatura dismessa al riciclaggio,
al trattamento e allo smaltimento ambientalmente compatibile contribuisce ad evitare possibili effetti negativi
sull’ambiente e sulla salute e favorisce il reimpiego e/o riciclo dei materiali di cui è composta l’apparecchiatura.
CONFORMITÀ NORMATIVA.
Direttiva BT. Direttiva EMC. Norma EN 60669-2-1.
Regolamento REACh (UE) n. 1907/2006 – art.33. Il prodotto potrebbe contenere tracce di
piombo.
Electronic remote control, 2 buttons for remote management of a single elec-
tronic control or for central control of multiple commands, to be completed
with Eikon Tactil cover plate and label.
FEATURES.
• Rated supply voltage: 230 V~, 50/60 Hz
• Indicator lights with interchangeable symbols for identification in the dark.
• Touch button recalibration: 1 minute
• Operating temperature: -5 °C - +35 °C.
CONTROLLABLE LOADS.
• Coded output (terminal R): 230 V~, 50 mA max
• When connected to devices 21119, 21134 and 21174 the appliance provides remote control
over their loads (maximum distance 100 m)
OPERATION.
• Front indicator lights always on
• Controls: double touch button on the front; controls are made by lightly placing a finger on the
front of the device over the illuminated indicator light
•
The buzzer is always enabled when configuring
CAUTION: The circuit load should be considered always powered.
N.B: Each time the cover plate is installed, wait at least 1 min. for it to be recalibrated.
CONFIGURATION.
With the load/lamp switched off, press both buttons under the cover plate simultaneously. The
top button will start blinking and enter configuration phase 1:
- tap on the
bottom
button
to change the settings of the selected configuration
- tap on the
blinking top button
to save the selected phase and move on to the next phase
of configuration.
If no operations are performed within 15 s, the device will exit the configuration without saving
the last phase.
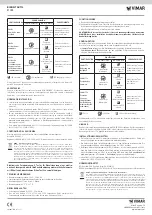
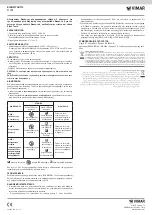
CONFIGURATION
SETTING
PROCEDURE
Top button LED
Bottom button LED
PHASE 1
Change brightness
1 repeated blink
Always on
at the set bright-
ness
Press the bottom button
to change the brightness
cyclically (low, medium,
high)
PHASE 2
Enable buzzer
2 repeated blinks
Buzzer off
Buzzer on
Press the bottom button
to switch the buzzer
on/off
PHASE 3
Enable
scenario
(to be used when
you need to control
different devices
simultaneously)
3 repeated blinks
Scenario
disabled (default)
Scenario only OFF
enabled
Press the bottom button
to enable or disable the
scenario behaviour
LED on
LED blinking
LED off (default)
INSTRUCTIONS.
Connect the appliance as indicated in the "CONNECTIONS" illustration. The power circuits
(L-N) should be protected against overloading by installing a device, fuse or circuit breaker, with
rated current not exceeding 10 A.
INSTALLATION RULES.
• Installation should be carried out by qualified staff in compliance with the current regulations
regarding the installation of electrical equipment in the country where the products are installed.


