User Manual
Espace Walk-in Cellar
11
Installing your cellar (cont'd)
Assembly procedure
NOTE: This information is for assembly of the standard
Espace 1000 kit (ESPACE1000-KIT) without any
extensions. If extension modules (ESPACE1000-EXT)
are also being added, they must be inserted between
the front and rear panels of the standard kit – see
‘Adding extension modules’ on page 16 for additional
instructions.
Although the cellar kit can be assembled by one person only,
it is strongly advisable that at least two people work together
to complete it.
Before commencing assembly of the kit, make the following
preparations:
• Arrange the cellar panels in numerical order.
• Pull back the white protective plastic wrap from the
corners/edges of the cellar panels by an inch or two to
make sure that any unsightly bits of plastic do not get
caught in the corners during assembly (the plastic should
be mostly left on until the body is completely assembled
to minimise risk of scratching.
• Read through the entire assembly procedure.
• Unwrap the various accessories and tools and
familiarise yourself with them.
• Prepare a manual Philips head screwdriver or a cordless
drill with a Philips head driver, a roll of removable adhesive
tape, and a small step ladder to enable access to the
cellar's roof once assembled.
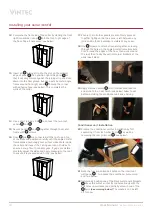
• Unscrew whichever of the door hinges will become the
upper hinge
(see warning note after step 10) and
dismount the door, which will be replaced at the very
end of assembly.
• One tube of silicone is supplied with your Espace1000
unit, but you may wish to have a second one on hand in
case the first one is exhausted during the sealing process.
Ideally it should be black in colour and suitable for a
high moisture environment.
Exterior body assembly
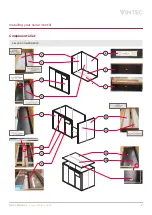
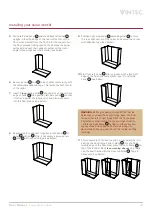
1 Arrange the two floor panels and on a flat, level
surface, leaving enough space around to be able to
assemble the walls later. Check that the surface is clean
and will not scratch the panels – consider laying down a
protective sheet first. The floor panels should initially be
laid upside down, so that the timber support slats
are facing up.
2 Insert one of the short joining strips into the slot on
the inside edge of panel
, then connect the panels by
marrying the joining strip into the corresponding slot in
panel
and pushing them firmly together.
3 Secure panels and together through the metal
frame with
screws using a Philips head manual
screwdriver or a cordless drill with a Philips head driver.
4 Once secured, turn the entire floor over so the support
slats are facing down. Ensure that the cellar floor is now
as stable, even and level as possible – this will make the
rest of the assembly much easier and more accurate.


