User Manual
Espace Walk-in Cellar
12
Installing your cellar (cont'd)
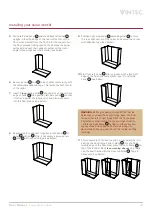
5 Stand left side panel and small back left panel
upright in their positions at the rear left corner of the
floor (when viewed from the front). Slot them down into
the floor grooves (taking care not to damage the panel
surfaces) and nest their edges together so the metal
angle frame wraps over the exterior (see below).
6 Secure panels and to each other temporarily with
the removable adhesive tape. This forms the first corner
of the cellar.
7 Insert a long joining strip into the slot on the vertical
edge of panel
then position left side panel
so that
it marrys against the joining strip and also slots down
into the floor groove (see below).
8 Repeat step 7 to connect large back right panel to
panel
with an
strip. If necessary, secure panels
and
with adhesive tape (see below).
9 Position right side panel nested against to form
the rear right corner of the cellar, and secure the corner
with adhesive tape (see below).
10 Slot front left panel into its groove on the front left
edge of the floor, and temporarily tape it to left side
panel
(see below).
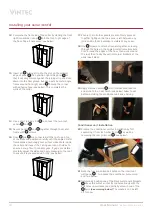
WARNING: Before proceeding to step 11, first decide
which way you need the door to hinge/open. The door
can be either left or right hinged, but the frame panel
it attaches to must match the chosen hinge direction
– rotate the door frame
by 180° in either direction
to your chosen hinge position before inserting into
place, while still paying attention to the ‘inside’/’outside’
markings.
11 Start assembly of the door section in its position by first
slotting the door frame bottom block
into the front
middle edge of the floor. Next place the door frame
on
top of the bottom block
(see warning above), and finally
cap the door frame with the door top block
. Tape if
necessary (see below).


