User Manual
Espace Walk-in Cellar
16
Installing your cellar (cont'd)
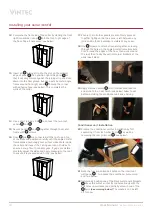
45 Repeat steps 39 to 44 to install shelving on the right
hand side of the cellar, starting at the front and working
to the back, ensuring that the shorter support frame is
positioned at the front (under the conditioner unit).
46 Insert all the sliding shelves
onto their runners.
Finishing touches
47 Attach the supplied internal lights
to the ceiling of
the cellar.
48 Lay the supplied carpet strip
onto the floor in the
centre of the cellar between the two rows of shelves
(this cushions the fall of any bottles that may be
dropped during handling).
49 Mount the cellar door back onto its lower hinge, then
screw the upper hinge back into place (this requires
either assistance from another person or support
blocks under the door to hold its weight).
50 Connect the power lead to a mains power outlet and
switch on the conditioner unit.
51 Congratulations, the installation of your Espace
cellar is now complete – raise a glass to yourself!
Adding extension modules (ESPACE1000-EXT)
The Espace range enables you to expand your wine collection
by adding extension modules that increase the capacity
of the standard cellar by 500 bottle increments up to a
maximum of 4000 bottles.
e1 At step 2, add the extra base panel(s) between
panels and , as well as adding the extra timber
joining strip(s) plus the extra angled metal frame
brackets to the outside edges.
e2 At step 7, add the extra side panel(s) and joining
strip(s) between panels
and
.
e3 At step 13, add the other extra side panel(s) and
joining strip(s) between panels
and
.
e4 At step 15, add the extra roof panel(s), joining strip(s)
between panels
and
, plus the extra angled
metal frame brackets to the outside edges.
e5 At step 19, depending on how many extension modules
are being added and how liberally silicone sealant is
applied, additional tubes of silicone may be required
(not supplied with extension).
e6 For steps 39 to 45, follow the same procedure and
sequence for shelving installation by working from
the front to the back of the cellar, but add the extra
double-sided support frames and cross-bracing bars
to the central section of the cellar.

