background image

Chapter 9: TEST MODES AND 

TROUBLESHOOTING

This chapter describes the check points and possible solu-
tions to use for troubleshooting.

Topics in this chapter

9.1  Using the Condition List Mode

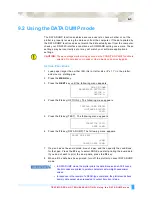
9.2  Using the DATA DUMP mode

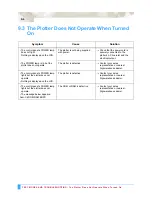
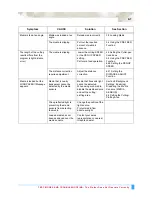
9.3  The Plotter Does Not Operate When Turned On

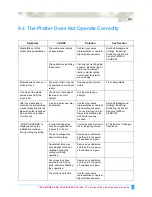
9.4  The Plotter Does Not Operate Correctly

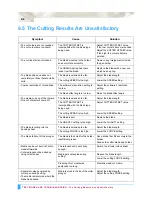
9.5  The Cutting Results Are Unsatisfactory

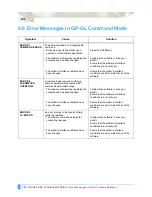
9.6  Error Messages in GP-GL Command Mode

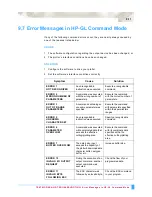
9.7  Error Messages in HP-GL Command Mode

Summary of Contents for Q100

Page 1: ...user manual MANUAL NO VEXQ06 UM 152 CUTTING PLOTTER Vinyl Express Q60 75 100 130 160 Signwarehouse com ...

Page 2: ...otter 1 5 Vinyl Express Q60 75 100 130 160 stand provided 1 5 Assembling the Stand 1 5 Mounting the stock rollers 1 8 1 4 Attaching the Vinyl Express Basket Option 1 9 1 5 Attaching a Cutter Pen 1 10 Attaching a Pen to the Two Pen Holder Option 1 11 Attaching a Plotting Pen to the Pen Station 1 12 1 6 Replacing the Cross Cutter Unit 1 13 Chapter 2 Cutter Blades and Cutter Pens 2 1 Blade Applicatio...

Page 3: ...ove weedability 4 3 4 2 Selecting Cutter Pen Condition Setting Areas 4 4 Selection method 4 4 4 3 Setting the Cutter pen Conditions 4 5 To Change the FORCE 4 5 Setting Procedure 4 5 To Change the SPEED 4 5 Setting Procedure 4 6 To Change the QUALITY 4 6 Setting Procedure 4 6 To Change the OFFSET 4 7 Setting Procedure 4 7 4 4 Running Cutting Tests 4 8 Test Cutting Procedure 4 8 4 5 Adjusting the Bl...

Page 4: ...e 6 9 6 6 Setting the PAGE LENGTH 6 11 Setting Operation 6 11 6 7 Rotating the Coordinate Axes 6 13 6 8 Setting the Mirror Mode 6 14 Setting Procedure 6 14 6 9 Enlarging or Reducing an Image 6 15 Setting Procedure 6 15 6 10 Data Sorting Settings 6 16 Setting Procedure 6 16 6 11 Auto Registration Mark Reading Function Option 6 17 The registration mark pattern 6 17 The reading area required for regi...

Page 5: ...6 48 6 25 Setting Tangential Emulation 6 50 Selecting the tangential emulation mode 6 50 Enabling Disabling Tangential Emulation 6 51 Setting Overcut 6 52 6 26 Setting the PEN UP SPEED 6 53 Setting Procedure 6 53 6 27 Adjusting the Blade OFFSET ANGLE 6 54 Setting Procedure 6 54 6 28 Setting the OFFSET FORCE 6 55 Setting Procedure 6 55 6 29 Setting the STEP PASS 6 56 Setting Procedure 6 56 6 30 Set...

Page 6: ...L Command Mode 9 10 9 7 Error Messages in HP GL Command Mode 9 11 CAUSE 9 11 SOLUTION 9 11 Chapter 10 INTERFACES 10 1 RS 232C Interface 10 2 Factory Preset Settings 10 2 10 2 USB Interface Settings 10 3 Supported Operating Systems 10 3 10 3 Interface Setting Menu 10 4 Using the INITIAL MENU to set the functions 10 4 Using the MENU MODE to set the functions 10 4 10 4 Setting the STEP SIZE 10 5 Sett...

Page 7: ...eading the Manual This category provides information that if ignored is highly likely to cause fatal or serious injury to the operator This category provides information that if ignored is likely to cause fatal or serious injury to the operator This category provides information that if ignored could cause injury to the operator or damage to the plotter Description of Safety Symbols The symbol ind...

Page 8: ...pair or remodel the plotter Such action may cause electric shock or a fire hazard due to current leakage Contact with the high voltage parts within the plotter may cause elec tric shock If the plotter requires repairs contact your sales representative or nearest Signwarehouse vendor Do not connect the plotter to a non rated power supply Use of a different supply voltage may result in electric shoc...

Page 9: ...rk by inexperi enced personnel is extremely dangerous Do not allow dust or metal scraps to adhere to the power plug A dirty power plug may result in electric shock or a fire hazard due to current leakage Do not use the power cord if it is damaged Use of a damaged cord may result in electric shock or a fire hazard due to current leakage Replace the power cord with a new one Be careful when handling...

Page 10: ...r in a location subject to excessive mechanical vibration or electrical noise Use in such locations may impair the performance of the plotter When disconnecting the power cord or interface cable do not pull on the cord cable Such action will damage the cord cable resulting in a fire hazard or electric shock If water or foreign matter enters the plotter discontinue use Turn off the power and unplug...

Page 11: ...nt or other electrical lamps provide a distance of at least one meter between the plotter and the light source Close proximity of such a light source may cause the sensor to mal function and prevent proper size detection of the media When using the cutter take care not to extend the blade more than necessary An overly extended blade will damage the cutting mat and adversely affect the cutting qual...

Page 12: ...of Signwarehouse com 2 The product specifications and other information in this manual are subject to change without notice 3 While every effort has been made to provide complete and accurate information please contact your sales repre sentative or nearest Signwarehouse vendor if you find any unclear or erroneous information or wish to make other comments or suggestions 4 Notwithstanding the stipu...

Page 13: ... sure not to extend it too far Moreover when you are not using the cutter pen make sure that the blade is fully retracted After Turning on the Plotter During the course of turning on the plotter be sure to observe the following precautions The pen carriage and loaded media may suddenly move during the cutting operation immediately afterward and when setting the plotter s functions Keep hands hair ...

Page 14: ...tral detergent diluted with water Never use thinner benzene alcohol or similar solvents to clean the casings they will damage the casing s finish 3 Clean the cutting mat using a dry cloth In case of stubborn stains use a cloth that has been moistened in alcohol or in a neutral detergent diluted with water 4 Clean the plotter s paper sensors using a cloth moistened in a neutral detergent diluted wi...

Page 15: ...otter nomenclature and how to install your plotter Topics in this chapter 1 1 Checking the Contents 1 2 Nomenclature 1 3 Assembling the plotter 1 4 Attaching the Vinyl Express Basket Option 1 5 Attaching a Cutter Pen 1 6 Replacing the Cross Cutter Unit ...

Page 16: ...nearest Signwarehouse dealer AC power cord USB cable 3 m length User Guide CD ROM Quick Start Manual Usage Precautions 1 1 each 1 Contains User s Manual pdf Windows driver Media stocker x 2 Stock roller x 2 M4 binding head screws x 8 Base assembly x 2 Stand side bar x 2 Center bar x 1 Socket head cap screw x 20 Allen wrench x 1 Stand 1 Media bracket 1 1 of each Cutter blades 1 Cutter holder PHP32 ...

Page 17: ... pen or plotting pen and moves it up or down Pen station installed on 2 pen models only option The second pen is mounted here Stand Used to make the plotter more portable and to free up counter space Grit roller position guide Stickers on the front of the Y rail and the rear side of the top cover that show the position of each grit roller Use these alignment marks as an aid in locating the pinch r...

Page 18: ... media roll is placed on these rollers Media lock Used to prevent the stock rollers from rotating when the media roll has been placed on top of them The media lock ensures that the media is pulled straight out from the roll USB interface connector Used to connect the plotter to the computer with a USB interface cable Serial interface connector Used to connect the plotter to the computer with an RS...

Page 19: ...en mount the plotter on the stand The stand and the media bracket are made up of the following parts ASSEMBLING THE STAND The mounting direction is different for the front loading and the rear loading models Base assembly x 2 Allen wrench for M5 screws x 1 Center bar x 1 Stand side bar x 2 Socket head cap screw M5 x 20 Stock roller x 2 Media stocker x 2 Front loading Rear loading ...

Page 20: ...r to the left and right stand sides with four socket head cap screws two on each side using the Allen wrench 3 Attach a media stocker to each of the left and right stand sides with two socket head cap screws using the Allen wrench Mount the media stockers so that each one protrudes directly above the longer of the two base assembly lengths Socket head cap screws Stand side bar Base assembly Stand ...

Page 21: ...for the front loading and the rear loading models 5 Tighten the socket head cap screws loosely fastened in Step 2 Check that all of the screws used for fastening have been tightened The media may not be fed correctly if even one of the screws is loose When installing the plotter make sure that there are no objects in its vicinity Leave a clear space of at least 300 mm around the plotter Socket hea...

Page 22: ...Out of the Box Assembling the plotter 1 8 Mounting the stock rollers Insert the stock rollers into the slots on the media stocker Front Stock rollers Stock rollers Front loading Rear loading ...

Page 23: ...two socket head cap screws using the Allen wrench Repeat this step with the other side 2 Drape the middle section of the cloth basket over the stand s center bar and then snap the middle section of the cloth basket around the center bar Snap the front edge of the cloth basket around the front basket tube and then snap the rear edge of the cloth basket around the rear basket tube Socket head cap sc...

Page 24: ... the cutting plotter is turned on or whenever the pen is moving 1 Loosen the pen holder screw 2 While pushing the pen holder in the upward direction push the pen all the way into the holder until its flange contacts the upper part of the holder When pushing the pen holder with your fingers the blade tip may be protruding Take care not to cut your fingers 3 Make sure that the pen bracket is engaged...

Page 25: ...ushing the pen holder in the upward direction push the pen all the way into the holder until its flange contacts the upper part of the holder When you push the pen holder with your fingers the blade tip may be protruding Take care not to cut your fingers 3 Make sure that the pen bracket is engaged on the pen s flange and then tighten the screw Flange Upper part of pen holder Bracket to hold pen Fl...

Page 26: ... 1 Open the pen hold mechanism on the pen station and then attach a pen 2 Make sure that the bracket of the pen station is engaged in the upper groove of the pen 3 Close the pen hold mechanism on the pen station to hold the pen in place Do not leave a pen attached to the pen station for a long period of time as the pen tip will dry up and make it unusable To store the pen remove it from the pen st...

Page 27: ... off the side is pressed down 2 Remove the screw holding the cross cutter unit in place and then remove the cross cutter unit 3 Remove the protective cover from the replacement cross cutter unit Be sure to remove the protective cover while holding the part of the unit shown in the figure below Cross cutter unit Protective cover ...

Page 28: ...the Cross Cutter Unit 1 14 4 Attach the replacement cross cutter unit and tighten the screw to hold it in place WARNING The cross cutter unit uses a very sharp blade Take care not to cut your self on the blade Cross cutter unit ...

Page 29: ...d Cutter Pens This chapter describes the different cutter blades and cutter pens Topics in this chapter 2 1 Blade Application and Features 2 2 Cutter Pen Nomenclature 2 3 Replacing the Cutter Blade 2 4 Adjusting the Blade Length ...

Page 30: ...cutting media up to 0 25 mm thick Maximum cut ting distance of approximately 4000 m CB15U 1 5 mm PHP32 CB15N For cutting media which is too thick for the CB09UA blade to handle Suitable for cutting media from 0 25 mm to 0 5 mm thick CB15UA 1 5 mm PHP32 CB15N For cutting high intensity reflective media CB15UB 1 5 mm PHP32 CB15N For cutting small characters on mono vinyl chloride media Suitable for ...

Page 31: ... plunger s to suit the diameter of the cutter blade to be mounted the 0 9 mm cutter pen plunger is provided as a standard accessory Be sure to mount the cutter blade in the corresponding cutter pen plunger WARNING To avoid bodily injury handle cutter blades with care Cutter blade Plunger cap Plunger Blade length adjustment knob Blue For 0 9 mm diameter blades Red For 1 5 mm diameter blades ...

Page 32: ...he plunger cap in the counter clockwise direction to remove it from the plunger 3 Remove the blade from inside the plunger cap 4 Remove a new blade from its pack Insert the new blade into the hole provided in the plunger cap 5 With the blade inserted into the plunger cap screw on the plunger from above 1 5 mm diameter cutter pen Plunger cap cross section Plunger cap 1 5 mm dia blades Blade length ...

Page 33: ...roxi mately 0 1 mm One full turn of the knob moves the blade approximately 0 5 mm 2 First align the blade tip with the tip of the cutter pen and then extend the blade from that position to suit the thickness of the media to be cut 3 Assuming that the medium thickness is t as shown in the figure below the blade length l should be equal to or slightly greater than t Make sure that l is never greater...

Page 34: ...Cutter Blades and Cutter Pens Adjusting the Blade Length 2 6 ...

Page 35: ... select and install the appropriate cutting tools and to achieve the best cutting results Topics in this chapter 3 1 Control Panel 3 2 Selecting a Function Menu 3 3 Connecting to your Computer 3 4 Turning on the Power 3 5 Loading Media 3 6 Aligning the Pinch Rollers 3 7 Selecting the Media Type ...

Page 36: ...adjust the cutting SPEED F3 QUALITY key When the Vinyl Express is in MENU mode press the F3 key to select a function When the Vinyl Express is online press F3 to select the Condition numbers 3 and 7 After pressing the CONDITIONS key use F3 to adjust the cutting QUALITY F4 OFFSET key When the Vinyl Express is in MENU mode press the F4 key to select a function When the Vinyl Express is online press ...

Page 37: ...ter s buffer HOME VIEW key Press HOME VIEW to move the pen carriage to the standby position Press it again to move the pen carriage to the origin point Press it one more time to return the pen carriage to its former position NEXT key When the Vinyl Express is in MENU mode press NEXT to move to the next menu page TEST key Press TEST to run a cutting test to check whether the cur rently selected cut...

Page 38: ...ain menu Sub menu ASSIGN PEN 2 pen model only option INTERFACE AREA PARAMETERS FUNCTION 1 FUNCTION 2 CROSS CUT PRE FEED MOVE STEP STEP SIZE GP GL only ORIGIN HP GL only ROTATE PREF LINE TYPE DATA SORTING RS 232C COMMAND AREA PAGE LENGTH EXPAND SCALE MIRROR AXIS ALIGNMENT AUTO FEED TANGENT EMULATION NEXT NEXT F1 FORCE F2 SPEED F3 QUALITY F4 OFFSET BACKGROUND SETTINGS OPTION 1 OPTION 2 PEN UP SPEED ...

Page 39: ...f the power is turned on without any media loaded in the plotter the initial menu is displayed on the LCD The initial menu configuration is as follows Main menu Sub menu Initial menu STEP SIZE GP GL only AUTO REG MARK OPTION RS 232C COMMAND AUTO PRE FEED INITIAL FEED SPEED INTERFACE F4 OFFSET F4 OFFSET ...

Page 40: ...f your application software and or which of your computer s interface ports are available for use Use a USB cable or serial cable in accordance with the connection method cho sen Obtain a Signwarehouse approved interface cable that is compatible with the interface port 1 Make sure the power switch is turned off the side is pressed down 2 Connect one end of the cable to the Vinyl Express and the ot...

Page 41: ...her end to an electrical socket of the rated supply voltage Make sure that the Vinyl Express is grounded 3 Turn on the Vinyl Express by pressing the side of the switch The control panel POWER lamp lights 4 If media has not been loaded the firmware version number is displayed fol lowed by a prompt to load media The initial feed speed setting interface settings and other parameter settings can be ma...

Page 42: ...ing or plotting at a point beyond the leading edge ROLL 2 detects only the width of roll media Press the F2 key to select ROLL 2 REAR SET or ROLL 2 FRONT SET When to select SHEET Select SHEET when a cut sheet has been loaded in the plotter SHEET detects the leading edge the trailing edge and the width of the sheet Press the F3 key to select SHEET When to select CONTINUE The CONTINUE function enabl...

Page 43: ...four pinch rollers whereas the Vinyl Express Q60 75 model has only two pinch rollers Loading Roll Media Rear Loading 1 Lower the media set lever to raise the pinch rollers 2 Place the media roll on the roll media stocker Load the media in the plotter as shown Pass the leading edge o from the back of the plotter so it emerges from the front 3 Press the media lock to engage it and then pull the lead...

Page 44: ...a set lever to lower the pinch rollers Release the media lock Loading Roll Media Front Loading 1 Lower the media set lever to raise the pinch rollers 2 Place the media roll on the roll media stocker Load the media in the plotter as shown Pass the leading edge from the front of the plotter so it emerges from the back Media lock Pinch roller ...

Page 45: ... so that it completely covers the media sensor 4 Pull the media taut to make sure that there is no slack in the conveyance path and then raise the media set lever to lower the pinch rollers Release the media lock Loading Sheet Media 1 Lower the media set lever to raise the pinch rollers Media sensor Media lock Media lock Pinch roller ...

Page 46: ...e that is completely covers the media sen sor 3 Pull the media taut to make sure that there is no slack in the conveyance path and then raise the media set lever to lower the pinch rollers If you align the right edge of the sheet with the guides on the platen the sheet can be loaded so that it is straight Media sensor Media Align with these holes ...

Page 47: ... potition stickers ensures that they are above the grit rollers CAUTION To move the pinch rollers the media set lever must be in the lowered position Standby Position With the Vinyl Express Q100 130 160 models the number of pinch rollers required to hold down the media varies according to the width of the loaded media Be sure to move a pinch roller that is not used to the standby position so that ...

Page 48: ...over both edges Move any pinch rollers that are not used to the standby position CAUTION The media must be at least 125 mm in length The media must always be positioned over the media sensor When the Media Width is 160 to 540 mm Position the two right hand pinch rollers when the plotter is viewed from the front so that they are at the edges of the media Make sure that the pinch rollers are both po...

Page 49: ...he media and the other two pinch rollers in between making sure that the pinch rollers are all spaced equally and that each pinch roller is positioned over a grit roller CAUTION The media must always be positioned over the media sensor Changing the Hold down Force The pinch roller hold down force must be set to suit the width and type of the loaded media SWITCHING BETWEEN THE STRONG AND WEAK SETTI...

Page 50: ...r s between the two outside rollers When two pinch rollers are used When three pinch rollers are used When four pinch rollers are used OK NG Weak Strong Strong Weak Strong Strong Weak Weak OK NG Strong Weak Strong Strong Strong Strong Weak Weak Weak Weak Strong Weak Weak Strong Strong Strong Strong Weak Weak Weak Strong Weak Weak Strong OK NG Strong Weak Weak Strong Weak Weak Weak Weak All other c...

Page 51: ... wish to start cutting or plotting from a point beyond the leading edge Only the width of the roll media is detected If the F1 or F2 key is pressed the following prompt appears Confirm that the media lock has been released and then press the ENTER key When to press the F3 key to select SHEET Press the F3 key when a cut sheet has been loaded The leading edge trailing edge and width of the sheet are...

Page 52: ...or plotting If the interface or command settings have not been made make these settings before sending the data If the settings have been made pen adjustment is performed When the pen adjustments have been made the plotter is ready to start cutting Send the cutting or plotting data from the application software ROTATE OFF MIRROR ON CUT AREA X mm Y mm CONDITION 1 12 20 READY 4 Pen ...

Page 53: ... FORCE SPEED OFFSET and QUALITY settings to ensure the optimal pen conditions before performing cutting or plotting Topics in this chapter 4 1 Pen Conditions 4 2 Selecting Cutter Pen Condition Setting Areas 4 3 Setting the Cutter pen Conditions 4 4 Running Cutting Tests 4 5 Adjusting the Blade Length ...

Page 54: ... media Select PEN when a plotting pen has been mounted in the plotter Select POUNCE when a pouncing tool has been mounted in the plotter Media type Thickness mm Blade used Force Speed QUALITY Film for outdoor use 0 05 0 08 CB09UA 10 14 less than 30 3 4 Film for decorative use 0 08 0 1 CB09UA 14 17 less than 30 3 4 Film for outdoor use 0 05 0 08 CB15UB 10 14 less than 20 1 Transparent or semi trans...

Page 55: ... you use for reinforcement are the cutting sheets supplied by Nakagawa Chemical Inc or similar HOW TO IMPROVE WEEDABILITY We recommend that you observe the following points to improve the weedability of color marking film Select the correct blade for the application CB09UA Use this blade for general color marking film applications CB15B Use this blade for cutting small text with a height that is l...

Page 56: ...types to be selected easily SELECTION METHOD 1 Press one of the F1 to F4 keys to select a group of previously stored condition settings 2 If the F1 key is pressed when CONDITION 1 has been selected the display changes to CONDITION 5 If a condition number other than 1 was selected CONDITION 1 will be displayed when the F1 key is pressed In the same way press F2 to select condition numbers 2 and 6 F...

Page 57: ...ess the CONDITIONS key to display a conditions setting mode menu as follows Note The conditions that are actually displayed will vary according to the selected cutter pen condition setting area 3 Press the F1 key to change the FORCE setting The location of the blinking cursor indicates that you can change the F1 setting 4 Use the POSITION keys to increase or decrease the value in the range from 1 ...

Page 58: ...ENTER key to register your setting To exit the conditions setting mode press the NEXT key before pressing the ENTER key To Change the QUALITY The QUALITY parameter sets the acceleration used for a cutting or a plotting operation Set the QUALITY value based on the guidelines in the table entitled Optimal Cutting Conditions for Each Media Type and the table entitled Reference Pen Conditions for Plot...

Page 59: ...e appropriate OFFSET value to be selected Fine adjustment within the range of 5 can also be performed for each blade type SETTING PROCEDURE 1 Press the F1 to F4 key that corresponds to the number of the setting area the condition number that you wish to change 2 Press the CONDITIONS key to display a conditions setting mode menu as follows Note The conditions that are actually displayed will vary a...

Page 60: ... carriage to the position for test cutting 5 Press the F2 key TEST 1 to cut a single test pattern consisting of a triangle within a square Move the pen carriage to the standby position at the left side of the plotter The following prompt appears CAUTION The cutter pen starts moving as soon as a cutting test is selected Keep your hands face and other objects out of the vicinity of any moving parts ...

Page 61: ... has been cut through either the FORCE setting is too high or the cutter blade tip is extended too far If the backing sheet shows only a few traces of the cutter blade either the FORCE setting is too low or the cutter blade tip is not sufficiently extended 10 Press the CONDITIONS key to display the menu for specifying the cutting conditions and then adjust the FORCE and OFFSET settings 11 Repeat s...

Page 62: ...pears 4 Use the POSITION keys to move the pen carriage to the position for test cutting 5 Press the F1 key BLADE ADJUST The following menu appears 6 As instructed turn the blade length adjustment knob to the left to fully retract the blade and then press the ENTER key The pen holder moves up and down three times and then the cutter blade is detected while it is at the zero point the Down position ...

Page 63: ...e once again The current extended blade length is displayed Continue to adjust the blade length until it is extended sufficiently to enable cutting of thick media 8 Press the F2 key to start test cutting Check the cut results when test cutting has been completed BLADE ADJUST TEST 1 TEST 2 The blade is extended or retracted approximately 0 5 mm with each turn The value is decreased The value is inc...

Page 64: ...Pen Setting Conditions Adjusting the Blade Length 4 12 ...

Page 65: ... 5 1 Using the HOLD Function 5 2 Withdrawing the Pen Carriage 5 3 Moving the Pen Carriage to the Origin Point 5 4 Using the PRE FEED Function 5 5 Moving the Origin Point 5 6 Using the COPY Function 5 7 Pen Up Down 5 8 Using the CROSS CUT Function 5 9 Using the MOVE STEP Function 5 10 Upon detection of no medium during roll media cutting ...

Page 66: ... following menu appears 2 Press the F3 key CONTINUE to continue the suspended plotting or cutting operation If the F4 key QUIT is pressed the CLEAR BUFFER MEMORY menu shown below appears 3 Press the F3 key CLEAR to clear the buffer memory If you don t wish to clear the buffer memory press the F4 key CANCEL to return to the menu displayed in Step 1 4 If the F3 key CLEAR is pressed the display chang...

Page 67: ...arriage 100 mm in both the X and Y axes Repeat this process as required to further withdraw the pen carriage in 100 mm steps in both the X and Y axes For the front loading model rotate the above figure 180 degrees 5 3 Moving the Pen Carriage to the Origin Point This function moves the pen carriage from its current position to the origin point SETTING PROCEDURE While holding down the ENTER key pres...

Page 68: ...e value in the range from 1 to 50 m 5 Press the ENTER key to register your setting The plotter will start the feed operation 6 Press the MENU key to return the plotter to Ready status If the NEXT key is pressed during a PRE FEED operation the operation will be suspended at that point and the media returned to its original position CAUTION The PRE FEED operation starts immediately once the feed len...

Page 69: ...point 2 Press the ORIGIN key The beeper sounds the LCD displays the NEW ORIGIN POINT SET message for several seconds and the new origin point is set When the origin is moved after the coordinate axes were rotated Moving the origin after the coordinate axes were rotated gives the following results For the front loading model rotate the above figure 180 degrees New origin point Original origin point...

Page 70: ...e b is reset For the front loading model rotate the above figure 180 degrees When it is necessary to both move the origin and rotate the coordinate axes be sure to rotate the coordinate axes first After a new origin point is set the displayed coordinate values represent the respective distances from the new origin Original origin point New origin point b a Before the settings were made After the s...

Page 71: ...n when copying large amounts of data When using the COPY function make sure that the data does not extend past the specified cutting or plotting area If the initial cutting plotting position was moved from the original origin the new origin will also apply during the copying operation To prevent wasteful use of the media the initial cutting plotting position for the data should be as close as poss...

Page 72: ... increase or decrease the number of copies The number can be increased up to the maximum number of copies that can be cut out of the currently loaded media 7 Press the ENTER key to register your settings COPY is displayed on the LCD and the specified number of copies cut Since the copy data is retained in the buffer even when the media is replaced copying can be performed as many times as required...

Page 73: ... the copies are cut in this sequence For the front loading model rotate the above figure 180 degrees Origin Copy origin Original cut 3rd copy 1st copy 2nd copy 4th copy Copy space Copy space When a cut sheet is loaded in the rear loading model Origin Copy origin 1st copy Original cut 2nd copy 3rd copy 4th copy Copy space Copy space 5th copy 6th copy When a cut sheet is loaded in the rear loading m...

Page 74: ...Press the MENU key 2 Press the NEXT key until the following menu appears 3 Press the F1 key PEN UP DOWN to lower the pen and then press it again to raise the pen Pressing the F1 key toggles between PEN UP and PEN DOWN 4 Press the MENU key to return the plotter to Ready status PEN UP DOWN BACKGROUND SETTINGS OPTION 1 OPTION 2 ...

Page 75: ... the left pinch roller to the point that is 32 mm outside the right pinch roller Make sure that the media is loaded within this range GUIDELINES FOR REPLACING THE CROSS CUTTING UNIT Film with a paper backing sheet 1000 mm media width Approx 3000 sheets CT01H Film with plastic backing sheet 1000 mm media width Approx 3000 sheets CT01H Auto Cross cutting The media is cut automatically after the cutt...

Page 76: ...cutting is not performed and the display returns to the one shown in Step 2 If the media that has been cross cut is resting on the media sensor the plotter will judge that it hasn t been cut and the cross cut operation will be repeated To prevent this happening always remove media that has been cross cut from the plotter The pinch roller sensors are used for the cross cutting operation If Disabled...

Page 77: ...N PEN is only displayed for 2 pen models 3 Press the F4 key MOVE STEP The following menu appears 4 The asterisk indicates the currently selected setting Press the F3 key 0 1 mm or the F4 key 1 mm to move the asterisk to your desired setting 5 Press the ENTER key to register your setting 6 Press the MENU key to return the plotter to Ready status This setting is retained in the plotter s memory even...

Page 78: ...ects no medium while the roll media is being cut cutting stops and the display appears as shown below 2 If the amount of medium remaining is sufficient for the cutting data press the F3 key CONTINUE JOB Note that allowing the medium to run out entirely may result in damage to the cutting mat If the amount of medium remaining is insufficient for the cutting data press the F4 key QUIT JOB The CLEAR ...

Page 79: ... Mark Reading Area Option 6 14 Selecting the Registration MARK TYPE Option 6 15 Specifying the Registration MARK SIZE Option 6 16 Setting the DISTANCE ADJUSTMENT Option 6 17 Setting the AXIS ORIGIN OFFSET Option 6 18 Setting the PAPER WEIGHT Function Option 6 19 Setting the SENSOR ADJUSTMENT Function 6 20 Setting the SENSOR OFFSET ADJUSTMENT Method 1 Option 6 21 Setting the AXIS OFFSET ADJUSTMENT ...

Page 80: ... change the setting to SLOW SETTING PROCEDURE 1 Lower the media set lever The following menu appears 2 Press the F4 key INITIAL MENU The initial menu shown below appears Option 3 Press the F3 key INITIAL FEED SPEED The following menu appears 4 The asterisk indicates the currently selected setting Press the F4 key SLOW to select the slow feed speed and the F3 key NORMAL to select the normal feed sp...

Page 81: ...he F4 key INITIAL MENU The following INITIAL MENU screen appears Option 3 Press the F2 key AUTO PRE FEED The following menu appears 4 The asterisk indicates the currently selected setting Press the F3 key ENABLED to select AUTO PRE FEED Press the F4 key DISABLED if you do not wish to use the AUTO PRE FEED function 5 Press the ENTER key to register your settings 6 If ON was selected the following F...

Page 82: ...Press the F4 key FUNCTION 2 The following menu appears 4 Press the F3 key AUTO PRE FEED The following menu appears 5 The asterisk indicates the currently selected setting Press the F3 key ENABLED to select AUTO PRE FEED Press the F4 key DISABLED if you do not wish to use the AUTO PRE FEED function 6 Press the ENTER key to register your settings 7 If ON was selected the following FEED LENGTH settin...

Page 83: ...etting is HP GL 4 Press the F1 key ORIGIN The following menu appears 5 The asterisk indicates the currently selected setting Press the F3 key to select LOWER LEFT Press the F4 key to select CENTER 6 Press the ENTER key to register your settings 7 Press the MENU key to return the plotter to Ready status This setting is retained in the plotter s internal memory even when the power is turned off When...

Page 84: ...ure 180 degrees SETTING PROCEDURE 1 Press the MENU key 2 Press the NEXT key until the following menu appears 3 Press the F2 key AREA PARAMETERS The following menu appears Note ORIGIN is only displayed when the COMMAND setting is HP GL 4 Press the F2 key AREA The following menu appears 5 Use the POSITION keys to move the pen carriage to the desired lower left setting position Previously cut design ...

Page 85: ...n You do not need to press the ENTER key if the DEFAULT UR position was selected 10 Press the MENU key to return the plotter to Ready status After the LL and UR settings have been made the origin is moved to the lower left point Neither the LL nor the UR setting can be set to a position outside of the actual dimensions of the media to be cut The AREA function specifies the Lower Left and Upper Rig...

Page 86: ... below the shaded area represents the effective cutting plotting area defined by the LL and UR points For the front loading model rotate the above figure 180 degrees Upper right point Lower left point Origin When a cut sheet is loaded in the rear loading model X Y X Upper right point Origin Y Lower left point When a cut sheet is loaded in the rear loading model ...

Page 87: ...se depending on the type of media used media feed may not be performed correctly if the pinch rollers move on the cut or plotted areas If a value of 8 mm or higher is speccified blade control may be performed outside the loaded media regardless of whether the Initial Blade Control Posi tion a Background Settings parameter is set to 2 mm BELOW or to OUT SIDE Please note that the blade tip may be da...

Page 88: ...utting Plotting Area 6 10 6 Press the ENTER key to register your setting The following menu will appear 7 Press the F3 key CONTINUE to reset the plotter To cancel the operation press the F4 key CANCEL THIS OPERATION RESETS THE PLOTTER CONTINUE CANCEL ...

Page 89: ...long axis cutting or plotting exercise special caution when loading color adhesive film or plotting paper Make sure that the left and right edges are uni formly taut If the media is loaded incorrectly the media may come loose from the pinch rollers during cutting or plotting When using roll media either extend and load the length to be used before hand or use the media feed procedure 5 4 Using the...

Page 90: ...h to change Next use the POSITION keys to increase or decrease the value This setting is retained in the plotter s internal memory even when the power is turned off The PAGE LENGTH can be set in the range from 0 to 5000 mm 6 Press the ENTER key to register your setting 7 Press the MENU key to return the plotter to Ready status ...

Page 91: ...cates the currently selected setting Press the F3 key ON to enable rotation To disable rotation press the F4 key OFF 6 Press the ENTER key to register your setting 7 Press the MENU key to return the plotter to Ready status This setting is retained in the plotter s internal memory even when the power is turned off Coordinates when OFF was selected for ROTATE Coordinates when ON was selected for ROT...

Page 92: ...lowing menu appears 5 The asterisk indicates the currently selected setting Press the F3 key ON to enable the MIRROR mode To disable the MIRROR mode press the F4 OFF key 6 Press the ENTER key to register your setting 7 Press the MENU key to return the plotter to Ready status This setting is retained in the plotter s internal memory even when the power is turned off INTERFACE AREA PARAMETERS FUNCTI...

Page 93: ...key FUNCTION 1 The following menu appears 4 Press the F4 key SCALE The following menu appears 5 Use the POSITION keys to select the desired scale factor within the range of 1 8 1 4 1 2 1 2 3 4 5 6 7 and 8 6 Press the ENTER key to register your setting 7 Press the MENU key to return the plotter to Ready status This setting is retained in the plotter s internal memory even when the power is turned o...

Page 94: ...eived has been sorted using the application software sorting the data using the plotter may require additional time Turning this function off may speed up the process Note Pen 1 is the pen mounted in the pen holder SETTING PROCEDURE 1 Press the MENU key 2 Press the NEXT key until the following menu appears 3 Press the F4 key FUNCTION 2 The following menu appears 4 Press the F1 key DATA SORTING The...

Page 95: ...he registration mark pattern The reading area required for registration mark detection The registration mark locations The position of the origin point Media on which registration marks cannot be detected The registration mark pattern The plotter can read recognize the following registration mark patterns For instructions on how to change the registration mark pattern see Section 6 14 Selecting th...

Page 96: ...xtends into the registration mark read ing area see Section 6 13 Setting the Registration Mark Reading Area Option If dirt dust or other foreign matter adheres to the media the plotter may rec ognize it as a registration mark Be sure to use only black ink for plotting registration marks The registration mark locations Blank margins must be left between the edges of the media and the registration m...

Page 97: ...ffset between the axis origin and the registration mark using one of two methods Read the numeric values representing the distance from the axis origin to the first registration mark on the screen display of the software application Plot the registration mark and then measure the distance from the origin point 22 15 22 15 Registration mark pattern 1 Media feed direction Registration mark pattern 2...

Page 98: ...that is not white or ink that is not black Use of a colored medium or registration marks of any color other than black prevents the accurate recognition of registration marks Coarsely textured drawings or media A medium with a stained or wrinkled surface or with faintly plotted registra tion marks prevents the accurate recognition of registration marks Improperly secured media If the media thickne...

Page 99: ...se the axis alignment function to perform manual recognition Use the POSITION keys to move the pen carriage within the registration mark reading mark area before performing auto registration mark recognition When the media is loaded in the plotter the lower left registration mark when viewed from the front of the plotter must be positioned at a distance of at least 22 mm from the left edge If the ...

Page 100: ...The plotter reads two registration marks in the X axis direction corrects the tilt in the X axis and then performs distance adjustment If Custom or Standard has been selected for the registration mark distance adjustment setting see Section 6 16 Setting the DISTANCE ADJUSTMENT Option the screen for inputting corrective values is not displayed 1 Select 2POINTS for MARK SCAN MODE load media in the p...

Page 101: ...e or decrease the value 6 Press ENTER key to register your setting 7 When adjustment has been completed the plotter returns to Ready status 3 point reading 3POINTS This procedure explains how to align the coordinate axes based on three points The plotter reads the orthogonal points of three registration marks corrects the tilt in both coordinate axes and then performs distance adjustment If Custom...

Page 102: ...ed move the pen tip to MARK 2 within the Point 2 area and then to MARK 3 within the Point 3 area and perform the same operation as for Point 1 5 When all three points have been scanned automatically or manually the display changes to the following only displayed if OFF has been selected for DISTANCE ADJUST The measured value for the distance between points 1 and 2 is shown in the 3rd row Set the a...

Page 103: ...ing the DISTANCE ADJUSTMENT Option the screen for inputting corrective values is not displayed 1 Select 4POINTS for MARK SCAN MODE load media in the plotter and then press the AXIS R M S key The following menu appears 2 If you wish to skip the registration mark sensing function press the F2 key SKIP to return the plotter to Ready status 3 If you press the F3 key AUTO sensing begins from the curren...

Page 104: ...4th row Use the POSITION keys to increase or decrease the value 6 Press the ENTER key to register your setting The display changes to the following only displayed if OFF has been selected for DISTANCE ADJUST The measured value for the distance between points 1 and 3 is shown in the 3rd row Set the actual distance in the 4th row Use the POSITION keys to increase or decrease the value 7 Press the EN...

Page 105: ...ion in which the pen carriage moves for the Y axis see the diagrams below CAUTION If you specify a value longer than the media the media can not be detected SETTING PROCEDURE 1 Press the AXIS R M S key 2 If the registration mark mode has been enabled the following menu appears Note If the registration mark mode has not been set the axis alignment menu screen appears If you wish to use the registra...

Page 106: ...the registration mark reading area reduces the mark sensing time Moreover sensing of the marks is not affected even if there is a drawing or dirt between the marks Up to three registration mark spacing settings can be stored 6 Press the F3 or the F4 key to select the X or Y axis for setting the distance Use the POSITION keys to move the blinking cursor to the left or right and the POSITION keys to...

Page 107: ...gs 3 Press the F1 key AUTO REG MARK The following menu appears Note The following display can also be accessed from the INITIAL menu screen that is displayed when the media set lever is not engaged Note DISTANCE ADJUST is not displayed if media has not been loaded in the plotter 4 Press the F2 key MARK TYPE The following menu appears 5 The asterisk indicates the currently selected setting Press th...

Page 108: ...de settings 3 Press the F1 key AUTO REG MARK The following menu appears Note The following display can also be accessed from the INITIAL menu screen that is displayed when the media set lever is not engaged Note DISTANCE ADJUST is not displayed if media has not been loaded in the plotter 4 Press the F3 key OTHER SETUPS The following menu appears 5 Press the F1 key MARK SIZE The following menu appe...

Page 109: ...E 1 Load a medium with pre printed registration marks 2 Press the AXIS R M S key 3 If the registration mark mode has been enabled the following menu appears Note If the registration mark mode has not been set the axis alignment menu screen appears If you wish to use the registration mark functions press the NEXT key to cancel the operation and then refer to Section 6 12 Setting the Registration Ma...

Page 110: ...the following screen is displayed for selecting the distance adjustment divisor value When LENGTH UNIT is set to INCH To select the 5 mm distance adjustment divisor value distances are automatically rounded up or down to the nearest 5 mm press the F2 key 5 mm RESOLUTION To select the 10 mm distance adjustment divisor value distances are automatically rounded up or down to the nearest 10 mm press t...

Page 111: ... press the NEXT key to cancel the operation and then refer to Section 6 12 Setting the Registration Mark Mode Option for details on how to make the registration mark mode settings 3 Press the F1 key AUTO REG MARK The following menu appears Note The following display can also be accessed from the INITIAL menu screen that is displayed when the media set lever is not engaged Note DISTANCE ADJUST is n...

Page 112: ...nking cursor to the left or right and the POSITION keys to increase or decrease the value in the range from 200 0 to 200 0 mm Press the F2 key to toggle the polarity 7 Press the ENTER key to register your setting 8 Press the NEXT key to return the plotter to Ready status This setting is retained in the plotter s internal memory even when the power is turned off AXIS ORIGIN OFFSET X 00 0mm X 000 0m...

Page 113: ...SETTING PROCEDURE 1 Press the AXIS R M S key 2 If the registration mark mode has been enabled the following menu appears Note If the registration mark mode has not been set the axis alignment menu screen appears If you wish to use the registration mark functions press the NEXT key to cancel the operation and then refer to Section 6 12 Setting the Registration Mark Mode for details on how to make t...

Page 114: ... the currently selected setting To enable the PAPER WEIGHT function press the F3 key ON To disable the PAPER WEIGHT function press the F4 key OFF 7 Press the ENTER key to register your setting 8 Press the NEXT key to return the plotter to Ready status This setting is retained in the plotter s internal memory even when the power is turned off MARK SIZE SENSOR OFFSET ADJ AXIS ORIGIN OFFSET PAPER WEI...

Page 115: ...f the registration mark mode has not been set the axis alignment menu screen appears If you wish to use the registration mark functions press the NEXT key to cancel the operation and then refer to Section 6 12 Setting the Registration Mark Mode Option for details on how to make the registration mark mode settings 4 Press the F1 key AUTO REG MARK The following menu appears Note DISTANCE ADJUST is n...

Page 116: ...r unit to a blank area of the medium 9 Press the F3 key DEFAULT or the F4 key ADJUST to perform sensor level adjustment When adjustment has been completed the display returns to the menu shown in Step 7 10 Press the NEXT key to return the plotter to Ready status This setting is retained in the plotter s internal memory even when the power is turned off DEFAULT ADJUST F1 F2 F3 F4 ...

Page 117: ...been enabled the following menu appears Note If the registration mark mode has not been set the axis alignment menu screen appears If you wish to use the registration mark functions press the NEXT key to cancel the operation and then refer to Section 6 12 Setting the Registration Mark Mode Option for details on how to make the registration mark mode settings 4 Press the F1 key AUTO REG MARK The fo...

Page 118: ... between the first and second cross marks In the above figure for example there is a shift in both the X and Y direction and so X mm and Y mm need to be input Press the F3 or F4 key to select the X or Y axis Use the POSITION keys to increase or decrease the value If there is no shift simply press the ENTER key 11 Press the ENTER key to register your setting 12 Press the NEXT key to return the plot...

Page 119: ...ration mark mode has been enabled the following menu appears Note If the registration mark mode has not been set the axis alignment menu screen appears If you wish to use the registration mark functions press the NEXT key to cancel the operation and then refer to Section 6 12 Setting the Registration Mark Mode Option for details on how to make the registration mark mode settings 4 Press the F1 key...

Page 120: ... that need to be input depend on the actual shift in position between the first and second cross marks In the above figure for example there is a shift in both the X and Y direction and so X mm and Y mm need to be input Press the F3 or F4 key to select the X or Y axis Use the POSITION keys to increase or decrease the value If there is no shift simply press the ENTER key 12 Press the ENTER key to r...

Page 121: ...key FUNCTION 2 The following menu appears 4 Press the F2 key AXIS ALIGNMENT The following menu appears 5 Press the F3 key METHOD The following menu appears 6 The asterisk indicates the currently selected setting Press the F2 key 2POINTS to perform 2 point alignment the F3 key 3POINTS to perform 3 point alignment or the F4 key 4POINTS to perform 4 point alignment 7 Press the ENTER key to register y...

Page 122: ... menu appears 5 Press the F4 key TOOL The following menu appears 6 The asterisk indicates the currently selected setting If you are going to use the light pointer press the F3 key LIGHT POINT If you are going to use the loupe press the F4 key LOUPE 7 Press the ENTER key to register your setting 8 Press the MENU key to return the plotter to Ready status This setting is retained in the plotter s int...

Page 123: ...determined Selecting an Axis Alignment Method There are three methods 2 point alignment 3 point alignment and 4 point alignment If 3 point or 4 point alignment is selected distance correction can be performed at the same time if distances are input at each point Use the optional loupe see Section 7 1 Loupe PHP61 LOUPE or the light pointer to align the points Moreover when performing axis alignment...

Page 124: ...ng 11 The plotter returns to Ready status and the axis alignment operation is completed After the axes are aligned the settings will be reset if any of the following is performed Specification of a new origin Loading of a new medium ROTATE and or MIRROR settings are made make these settings before performing axis alignment If the axis is slanted too much between points 1 and 2 the AXIS SETTING ERR...

Page 125: ...istance correction use the POSITION keys to input the corrective value for the distance between points 1 and 2 The measured value for the distance between points 1 and 2 is shown in the 3rd row Set the actual distance in the 4th row Use the POSITION keys to change the value Press the ENTER key to register your setting If the value does not need to be corrected simply press the ENTER key The follow...

Page 126: ...e media is loaded at an angle make sure that it does not come loose from the pinch rollers while it is being moved 4 POINT METHOD 1 Load a medium with a pre printed image 2 Specify Off for the registration mark mode see Section 6 12 Setting the Registration Mark Mode Option 3 Select 4POINT for the axis alignment method see Section 6 22 Selecting the Axis Alignment Method 4 Press the AXIS R M S key...

Page 127: ...ance correction use the POSITION keys to input the corrective value for the distance between points 1 and 3 Use the POSITION keys to change the value Press the ENTER key to register your setting 15 The plotter returns to Ready status and the axis alignment operation is completed After the axes are aligned the settings will be reset if any of the following is performed Specification of a new origin...

Page 128: ...is rotated on the medium surface for the start cutting position only Mode 2 uses simpler cutter control than Mode 1 and provides a shorter cutting time Moreover this function can be specified as on or off for each of the eight cutter pen setting areas The overcut amount setting screen is displayed for cutter pen setting areas for which the TANGENTIAL EMULATION mode is enabled SELECTING THE TANGENT...

Page 129: ...the POSITION keys to specify ENABLE or DISABLE for each number A mark appears under the number when ENABLE has been selected for that number and tangential control will be performed for each of the specified condition numbers 7 Press the ENTER key to register your setting 8 Press the MENU key to return the plotter to Ready status This setting is retained in the plotter s internal memory even when ...

Page 130: ...explanations in this section 2 Press the CONDITIONS key A menu similar to the following appears 3 Press the ENTER key 4 To change the overcut amount for the start point press the F3 key to move the blinking cursor to that position To change the overcut amount for the end point press the F4 key to move the blinking cursor to that position Use the POSITION keys to increase or lower the value at the ...

Page 131: ... the following menu appears 3 Press the F3 key OPTION 1 The following menu appears 4 Press the F1 key PEN UP SPEED The following menu appears 5 Use the POSITION keys to change the pen up speed The pen up speed can be set to AUTO 10 20 30 40 50 or 60 If AUTO is selected the pen up speed is the same as the current pen down speed 6 Press the ENTER key to register your setting 7 Press the MENU key to ...

Page 132: ... However setting an extremely large angle may produce cutting results that fail to reproduce the intended image SETTING PROCEDURE 1 Press the MENU key 2 Press the NEXT key until the following menu appears 3 Press the F3 key OPTION 1 The following menu appears 4 Press the F2 key OFFSET ANGLE The following menu appears 5 Use the POSITION keys to increase or decrease the value in the range from 0 to ...

Page 133: ...fied here is also used as the cutting force for tangential control of the cutter blade s rotation SETTING PROCEDURE 1 Press the MENU key 2 Press the NEXT key until the following menu appears 3 Press the F3 key OPTION 1 The following menu appears 4 Press the F3 key OFFSET FORCE The following menu appears 5 Use the POSITION keys to increase or decrease the value in the range from 1 to 31 6 Press the...

Page 134: ...menu appears 3 Press the F3 key OPTION 1 The following menu appears 4 Press the F4 key STEP PASS The following menu appears 5 Use the POSITION keys to increase or decrease the value in the range from 0 to 20 6 Press the ENTER key to register your setting 7 Press the MENU key to return the plotter to Ready status This setting is retained in the plotter s internal memory even when the power is turne...

Page 135: ...he cutter blade to penetrate the media rapidly If the cutting force is 25 and the initial down force is 4 for example the cutting force applied immediately after the pen is lowered will be 29 SETTING PROCEDURE 1 Press the MENU key 2 Press the NEXT key until the following menu appears 3 Press the F4 key OPTION 2 The following menu appears Note PEN OFFSET ADJ is only displayed for 2 pen models 4 Pre...

Page 136: ...e following menu appears Note PEN OFFSET ADJ is only displayed for 2 pen models 4 Press the F3 key DISTANCE ADJUST The following menu appears 5 The numbers at the right of CONDITION are the condition setting numbers 1 to 8 Use the POSITION keys to move the cursor to the number that you wish to change the setting for Use the POSITION keys to specify ENABLE or DISABLE for each number A mark appears ...

Page 137: ...in If you wish to adjust the distance in the X axis direction press the F2 key to select X If you wish to adjust the distance in the Y axis direction press the F3 key to select X Use the POSITION keys to increase or lower the value at the cursor position in the range from 2 00 to 2 00 To reset the values to the default value 0 00 press the F4 key RESET 4 Press the ENTER key to register your settin...

Page 138: ...utting The uncut segment lengths left are as shown below for 8 mm cut line lengths Pattern 1 0 20 mm Pattern 3 0 30 mm Pattern 5 0 40 mm Pattern 7 0 50 mm Pattern 2 0 25 mm Pattern 4 0 35 mm Pattern 6 0 45 mm The perforated line type PERF LINE TYPE can be specified for each cutter pen condition setting area SETTING OPERATION 1 Press the MENU key 2 Press the NEXT key until the following menu appear...

Page 139: ...e not covered by the guarant Cutting should normally be used with the default OFF pattern Unlike normal film cutting half cutting cutting out die cutting using the CUT LINE PAT may damage the cutting mat and also affect the quality of normal cutting Cutting mat replacement due to damage caused by perforation cutting is a chargeable item ...

Page 140: ...ADVANCED FUNCTIONS AND OPERATIONS Selecting the Type of Perforated Line 6 62 ...

Page 141: ...TIONS This chapter describes the options available for the Vinyl Express Topics in this chapter 7 1 Loupe PHP61 LOUPE 7 2 Pouncing Tool 7 3 Pen Assignment for 2 pen models only 7 4 Pen Offset for 2 pen models only ...

Page 142: ...older screw See Section 1 5 Attaching a Cutter Pen 2 While holding the pen holder upward push the loupe all the way into the holder until the flange contacts the upper part of the pen holder Note Use the same procedure to attach the loupe to the pen holder of the 2 pen model option Holder for auto registration mark sensor 3 Make sure that the pen bracket is mounted firmly over the flange and then ...

Page 143: ...If you look through the loupe at an angle the center point will be shifted and you will not get a correct reading When aligning the loupe with a point use the POSITION keys to move the loupe so that the crosshairs are aligned with the center of the target point Pen down status Look directly down into the loupe Example of good alignment Loupe Center of target point Example of poor alignment ...

Page 144: ...ng tool all the way into the holder until the flange contacts the upper part of the pen holder The flat edge must be parallel to the pen holder Note Use the same procedure to attach the pouncing tool to the pen holder of the 2 pen model option Holder for auto registration mark sensor 3 Make sure that the pen bracket is mounted firmly over the flange and then tighten the screw Note Use the same pro...

Page 145: ...splay a conditions setting mode menu as follows Note The conditions that are actually displayed will vary according to the selected cutter pen condition setting area 3 Press the F4 key to display the blinking cursor at the position shown in the following menu Use the POSITION keys to select POUNCE 4 Use the POSITION keys to increase the value in the range from 1 to 99 mm 5 Press the ENTER key to r...

Page 146: ...ght of CONDITION are the condition setting numbers 1 to 8 The numbers in the last row are the physical pen numbers In the above display PEN 1 has been assigned to condition number 1 and condition numbers 3 to 8 PEN 2 has been assigned to condition number 2 Use the POSITION keys to move the cursor to the left or right Use the POSITION keys to toggle between PEN 1 and 2 Press the ENTER key to regist...

Page 147: ...ing Measure the distance between the two plotted cross marks 7 Press the F4 key PARAMETER SET in the menu displayed in Step 6 The following menu appears 8 Add the values measured in Step 6 to the displayed values The corrective values that need to be input depend on the actual shift in position between the PEN 1 and PEN 2 cross marks In the above figure for example there is a shift in both the X a...

Page 148: ...OPTIONS Pen Offset for 2 pen models only 7 8 ...

Page 149: ...Chapter 8 BACK GROUND SETTINGS This chapter describes your plotter s background settings Topics in this chapter 8 1 Description of the Background Settings 8 2 Setting the Background Settings ...

Page 150: ...When PEN DOWN is selected the pen is moved to the starting position for the drawing of arcs in the pen status raised or lowered that was in effect immediately prior to receipt of the W command When PEN UP is selected the pen is moved to the starting position for the drawing of arcs in the raised status This setting is only effective if a cutter blade has been selected in the cutter pen settings Mo...

Page 151: ...fied point to the last specified point when consecutive commands are received specifying pen movement while it is raised When ENABLED is selected the pen travels consecutively to each coordinate specified by the data received When DISABLED is selected the pen travels directly from the initially specified point to the last specified point Enabling Disabling the Media Sensors MEDIA SENSOR This funct...

Page 152: ...n Suction Setting FAN POWER This function sets the suction force used to affix media to the plotter Thin media Weak Normal media Normal Enabling Disabling the Beep Setting BEEP FOR KEY OPERATION This function selects whether to enable or disable the beep that is emitted whenever a control panel key is pressed ON The beep sounds OFF The beep does not sound Enabling Disabling Auto Registration Mark ...

Page 153: ...W COMMAND PEN UP PEN DOWN CONDITION PRIORITY MANUAL PROGRAM INITIAL BLADE CONTROL POSITION 2mm BELOW OUTSIDE LENGTH UNIT INCH METRIC PEN UP MOVE ENABLED DISABLED MEDIA SENSOR ENABLED DISABLED PINCH ROLLER SENSOR ENABLED DISABLED CROSS CUT PRESSURE 30 CHECK PEN ENABLED DISABLED FAN POWER WEAK NORMAL BEEP FOR KEY OPERATION OFF ON MARK AUTO SCAN ON OFF LANGUAGE SELECTION JAPANESE MODEL EMULATED 7550 ...

Page 154: ...e and then press the ENTER key For all other displays press the F3 or the F4 key to move the asterisk to your desired choice and then press the ENTER key The asterisk indicates the currently selected setting If you do not wish to change the currently displayed setting press the NEXT key to move to the next menu 4 Turn off the power off when all the settings are completed These settings are retaine...

Page 155: ...troubleshooting Topics in this chapter 9 1 Using the Condition List Mode 9 2 Using the DATA DUMP mode 9 3 The Plotter Does Not Operate When Turned On 9 4 The Plotter Does Not Operate Correctly 9 5 The Cutting Results Are Unsatisfactory 9 6 Error Messages in GP GL Command Mode 9 7 Error Messages in HP GL Command Mode ...

Page 156: ... plotting pen 2 Press the MENU key 3 Press the NEXT key until the following menu appears 4 Press the F4 key OPTION 2 The following menu appears 5 Press the F4 key TEST The following menu appears 6 Press the F2 key CONDITION LIST The following menu appears 7 If a pen has not been mounted mount a pen and then specify the conditions for that pen Press the F3 key to select DONE and start printing the ...

Page 157: ...ss the MENU key 3 Press the NEXT key until the following menu appears 4 Press the F4 key OPTION 2 The following menu appears 5 Press the F4 key TEST The following menu appears 6 Press the F4 key DATA DUMP The following menu appears 7 If a pen has not been mounted mount a pen and then specify the conditions for that pen Press the F3 key to select DONE and start printing the dump data If you do not ...

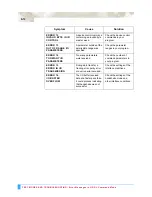
Page 158: ...ctrical output The POWER lamp is lit but the plotter does not operate The plotter is defective Contact your sales representative or nearest Signwarehouse dealer The control panel s POWER lamp lights but the plotter does not operate Nothing is displayed on the LCD The plotter is defective Contact your sales representative or nearest Signwarehouse dealer The control panel s POWER lamp lights but the...

Page 159: ...oves slowly and hits the side wall on the right hand side and then a position error occurs A pinch roller sensor may be defective Contact your sales representative or nearest Signwarehouse dealer You can start your job by temporarily disabling the pinch roller sensing function Section 8 Background Settings Enabling Disabling the Media Sensors MEDIA SENSOR POSITION ERROR is displayed during the ini...

Page 160: ... of the plotter An incorrect media type was specified Check that media type specified is Sheet Roll 1 Rear Set or Roll 2 Rear Set 3 7 Selecting the Media Type A command error is displayed The data sent to the plotter was not correct Check the data 9 6 Error Messages in GP GL Command Mode 9 7 Error Messages in HP GL Command Mode Plotter does not cut beyond a certain length PAGE LENGTH is not set co...

Page 161: ...n requires adjustment Adjust the distance correction 6 31 Setting the DISTANCE ADJUST Function Media is loaded but the LOAD PAPER Message appears Media that is nearly transparent cannot be detected by the media sensors Media that transmits light cannot be detected When using such media disable the media sensors and set the cutting plotting area Section 8 Background Settings Enabling Disabling the ...

Page 162: ...ls up at the corners Fine cut characters come off The blade is extended too far Adjust the blade length The CUTTER OFFSET is incompatible with the blade type being used Adjust CUTTER OFFSET value The cutting SPEED is too high Lower the SPEED setting The blade is dull Replace the blade The QUALITY setting is too high Lower the QUALITY setting The blade is cutting into the backing sheet The blade is...

Page 163: ...rea Switch to a larger media or change the coordinate data Currently selected cutting conditions are disregarded or cannot be changed The parameter priority setting is set to program mode Change the parameter from priority setting to manual mode The ENTER key was not pressed after changing settings Verify setting the conditions Characters or lines are deformed during pen plotting The plotter is in...

Page 164: ...ROR 4 PARAMETER OVERFLOW A command was received containing numeric parameters that exceed that command s permissible range The software configuration regarding the output device has been changed Configure the software to drive your plotter Ensure that the software s interface conditions are correctly set The plotter s interface conditions have been changed Ensure that the plotter s interface condi...

Page 165: ... parameters ERROR 3 OUT OF RANGE PARAMETERS A command containing an unusable parameter was specified Execute the command with parameters specified within their permissible ranges ERROR 5 UNKNOWN CHARACTER SET An unrecognizable instruction was executed Specify a recognizable command ERROR 6 PARAMETER OVERFLOW A command was executed with coordinated data that exceeds the effective cutting plotting a...

Page 166: ...r ranges in your program ERROR 14 TOO MANY I O PARAMETERS Too many parameters were received Check the number of command parameters in your program ERROR 15 ERROR IN I O TRANSMISSION During data transfer a framing error parity error or overrun error occurred Check the settings of the interface conditions ERROR 16 I O BUFFER OVERFLOW The I O buffer received data at a faster pace than it could proces...

Page 167: ... using the RS 232C or USB interface These inter faces are switched automatically Topics in this chapter 10 1 RS 232C Interface 10 2 USB Interface Settings 10 3 Interface Setting Menu 10 4 Setting the STEP SIZE 10 5 Setting the RS 232C Interface Transmission Conditions 10 6 COMMAND Settings ...

Page 168: ... control panel Set the interface conditions to the same settings for your software application and for the plotter If they are incorrectly set the plotter may display an error message fail to properly receive all of the data transmitted from the computer or malfunction In such cases check your interface conditions once more For instructions on setting the required parameters see 6 3 Setting the OR...

Page 169: ...e not supported Operation cannot be guaranteed in the following cases When the plotter is connected to a USB hub or extension port When the plotter is connected to a hand built or modified computer When a driver other than the one provided as a standard accessory is used Do not perform the followings Do not connect or disconnect the USB cable while installing the USB driver on the computer Do not ...

Page 170: ...pears 4 Press the F2 key to select STEP SIZE the F3 key to select RS 232C and the F4 key to select COMMAND USING THE MENU MODE TO SET THE FUNCTIONS 1 Press the MENU key 2 Press the NEXT key until the following menu appears 3 Press the F1 key INTERFACE The following menu appears 4 Press the F2 key to select STEP SIZE the F3 key to select RS 232C and the F4 key to select COMMAND LOAD MEDIA INITIAL M...

Page 171: ...DURE 1 Use either the INITIAL MENU or the MENU mode setting procedure described in Section 10 3 to display the following menu 2 Press the F2 key STEP SIZE The following menu appears 3 The asterisk indicates the currently selected setting Press the F1 to F4 key corresponding to the resolution you wish to set to move the asterisk to that setting and then press the ENTER key If you do not wish to cha...

Page 172: ...IT Press the F4 key to change the HANDSHAKING mode The blinking cursor moves to the selected setting 4 Use the POSITION keys to change the value for each of the settings Transmission speed selection 19200 9600 4800 2400 1200 600 300 baud Data length selection 7 BIT 8 BIT Parity bit selection NONE PARITY EVEN PARITY ODD PARITY Handshaking mode selection Hardwire Xon Xoff Enq Ack when the command se...

Page 173: ...NU or the MENU mode setting procedure described in Section 10 3 Interface Setting Menu to display the following menu 2 Press the F4 key The following menu appears 3 The asterisk represents the currently selected setting Press the F3 key GP GL or the F4 key HP GL to select the desired mode The asterisk appears next to the selected mode Press the ENTER key to register your setting and perform a rese...

Page 174: ...INTERFACES COMMAND Settings 10 8 ...

Page 175: ...Chapter 11 Specifications This chapter describes the plotter s main specifications Topics in this chapter 11 1 Main Specifications 11 2 Options 11 3 Supplies 11 4 Menu Tree 11 5 External Dimensions ...

Page 176: ...1 mm in unit of 2 m excluding media shrinkage Number of cutters pens 1 2 for the optional 2 pen models 3 3 The 2 pen unit is a factory installed option It cannot be retrofitted Pen types Water based fiber tip and oil based ballpoint pens Pouncing tool type Pouncing tool PPA33 TP12 1 2 mm pin diameter 4 4 The PPA32 TP12 pouncing pen cannot be used Compatible media Mono vinyl chloride media fluoresc...

Page 177: ... mm diameter cutter blades CB09UA 5 PPA31 CB15 Used with 1 5 mm diameter cutter blades comes with one tube of grease1 PPA31 CB15B Used with 1 5 mm diameter cutter blades CB15U 5SP CB15U K30 5SP Cutter blade CB09UA 5 0 9 mm diameter supersteel blade comes with a spring for cutting general film CB15U 5 1 5 mm diameter supersteel blade for cutting slightly thick film CB15U 5SP 1 5 mm diameter superst...

Page 178: ...MAL F1 F2 F3 F4 BEEP FOR KEY OPERATION OFF ON F1 F2 F3 F4 MARK AUTO SCAN ON OFF F1 F2 F3 F4 INITIAL BLADE CONTROL POSITION 2 mm BELOW OUTSIDE F1 F2 F3 F4 PEN SELECT ENABLED DISABLED F1 F2 F3 F4 CONDITION PRIORITY MANUAL PROGRAM F1 F2 F3 F4 MODEL EMULATED 7550 7586 F1 F2 F3 F4 LANGUAGE SELECTION Japanese F1 F2 F3 F4 LENGTH UNIT INCH METRIC F1 F2 F3 F4 PEN UP MOVE ENABLED DISABLED F1 F2 F3 F4 MEDIA ...

Page 179: ... 11 5 11 5 External Dimensions Vinyl Express Q60 75 100 130 160 1110 Vinyl Express Q60 1260 Vinyl Express Q75 1560 Vinyl Express Q100 1860 Vinyl Express Q130 2120 Vinyl Express Q160 209 715 90 1190 20 1014 unit mm dimensional error 5 mm ...

Page 180: ...The specifications etc in this manual are subject to change without notice Vinyl Express Q60 75 100 130 160 Dec 1 2006 1st edition 01 Signwarehouse com ...

Reviews: