TEST MODES AND TROUBLESHOOTING: The Plotter Does Not Operate Correctly
9-5
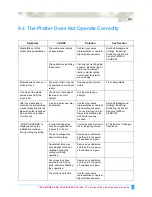
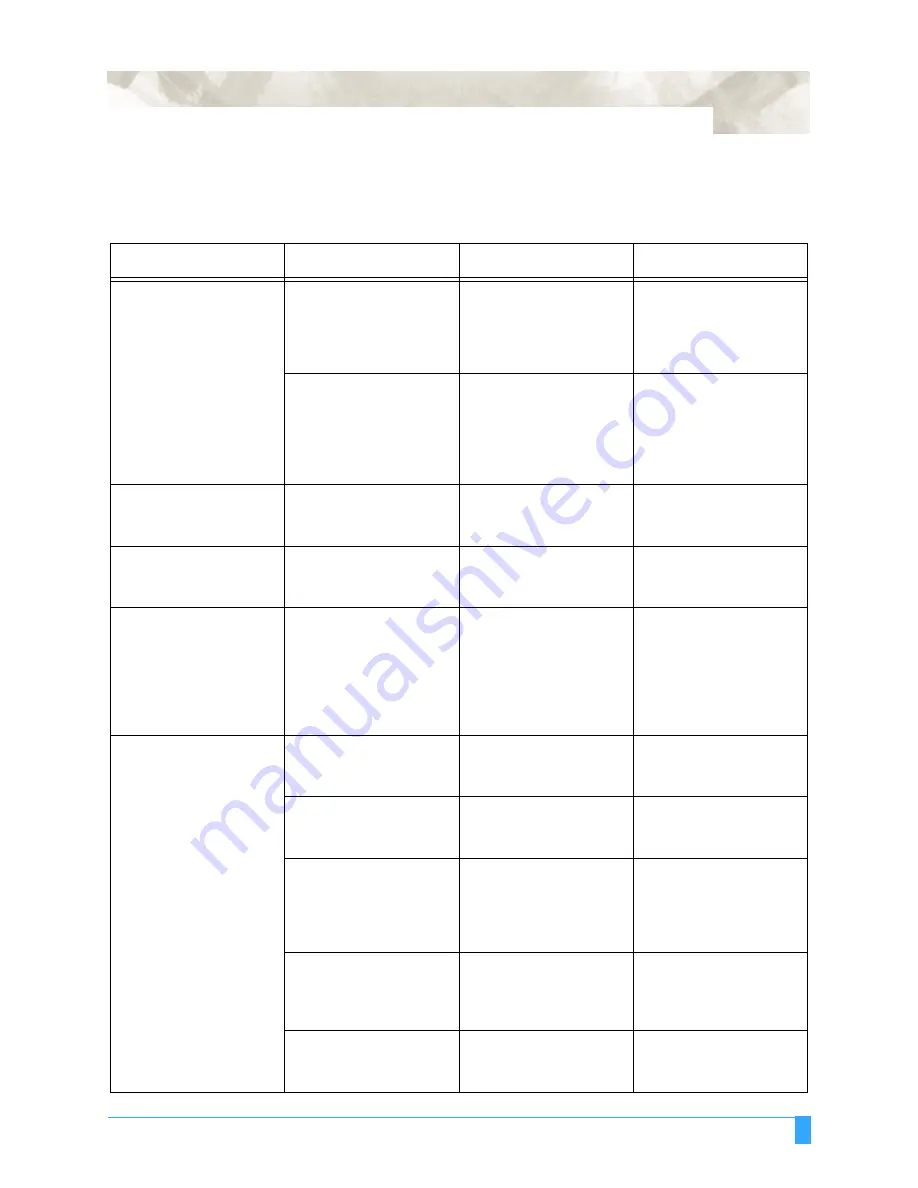
9.4 The Plotter Does Not Operate Correctly
Symptom
CAUSE
Solution
See Section
Media falls out of the
plotter during initialization.
The media sensors may
be deactivated.
Contact your sales
representative or nearest
Signwarehouse dealer.
Section 8 Background
Settings, Enabling/
Disabling the Media
Sensors (MEDIA
SENSOR)
Strong light may be hitting
the sensors.
If strong light is hitting the
sensors, block the light. If
there is a fluorescent
lamp or similar lighting
device near the plotter,
move it away.
Media skews as soon as it
starts to move.
The pinch rollers may not
be positioned over the grit
rollers.
Check position of pinch
rollers.
3.5 Loading Media
One side of the media
comes loose from the
pinch roller.
The front or rear edge of
the media is not cut
straight.
Cut the media edge
straight.
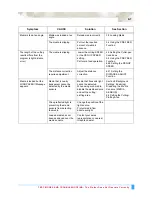
After the media type is
selected, the pen carriage
moves slowly and hits the
side wall on the right-hand
side, and then a position
error occurs.
A pinch roller sensor may
be defective.
Contact your sales
representative or nearest
Signwarehouse dealer.
You can start your job by
temporarily disabling the
pinch roller sensing
function.
Section 8 Background
Settings, Enabling/
Disabling the Media
Sensors (MEDIA
SENSOR)
“POSITION ERROR” is
displayed during the
initialization routine or
during cutting or plotting.
Incorrect settings may
have been specified for
the media to be cut.
Lower the speed, or lower
the cutting or pen force.
4.3 Setting the Cutter-pen
Conditions
The pen carriage may
have hit something.
Remove any obstacles,
and then turn the power
off and back on again.
An external force may
have applied to the pen
carriadge during the
cutting or plotting
operation.
Remove any obstacles,
and then turn the power
off and back on again.
Cut scraps may have
entered in the moving
parts, adrersely affecting
their operation.
Remove any obstacles,
and then turn the power
off and back on again.
The plotter is defective.
Contact your sales
representative or nearest
Signwarehouse dealer.
Summary of Contents for Q100
Page 34: ...Cutter Blades and Cutter Pens Adjusting the Blade Length 2 6 ...
Page 64: ...Pen Setting Conditions Adjusting the Blade Length 4 12 ...
Page 140: ...ADVANCED FUNCTIONS AND OPERATIONS Selecting the Type of Perforated Line 6 62 ...
Page 148: ...OPTIONS Pen Offset for 2 pen models only 7 8 ...
Page 174: ...INTERFACES COMMAND Settings 10 8 ...


