background image

6.  NOTE

NOTE

NOTE

NOTE: This side of ladder will be adjusted for 

: This side of ladder will be adjusted for 

: This side of ladder will be adjusted for 

: This side of ladder will be adjusted for OUTSIDE

OUTSIDE

OUTSIDE

OUTSIDE of the pool

 of the pool

 of the pool

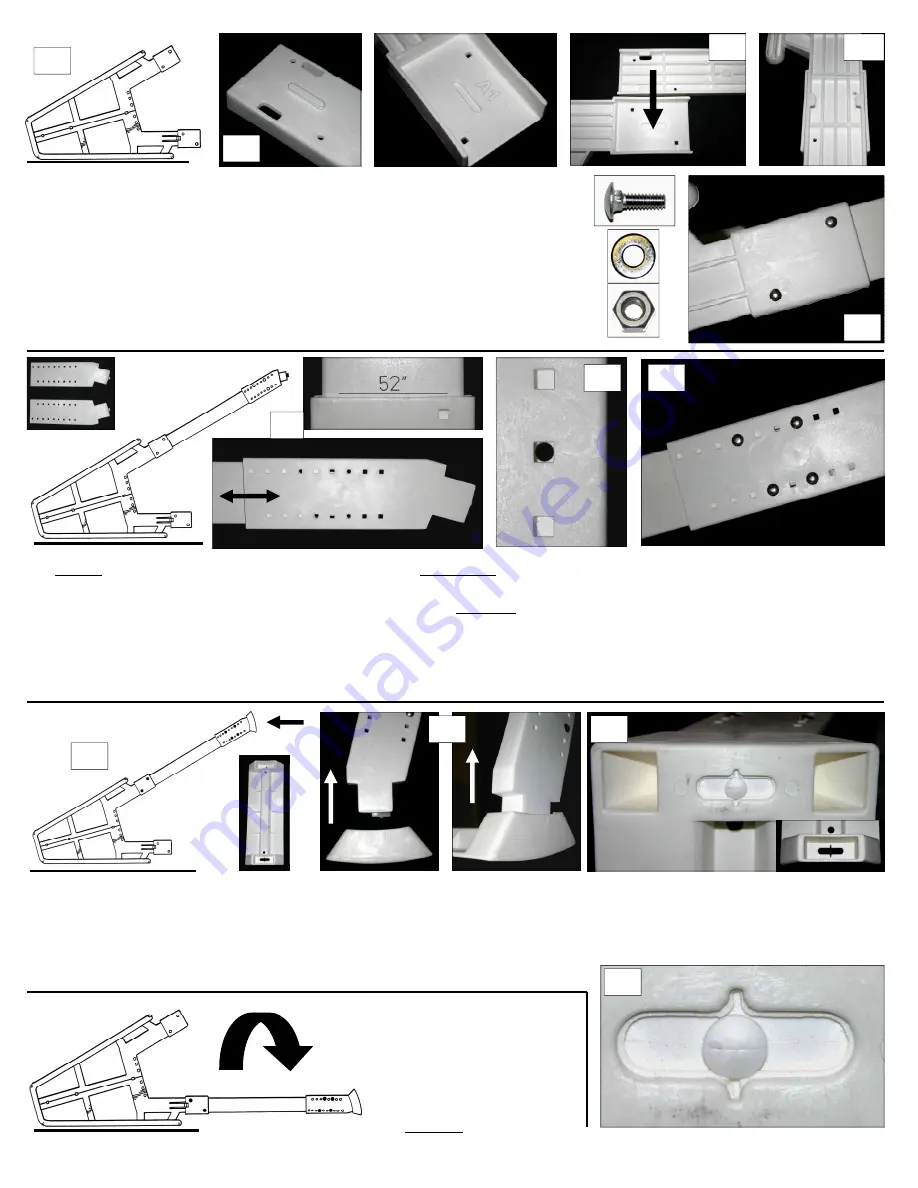
 of the pool. The adjustable base supports (C1 & 

C2) fit over the support legs (B1 & B2) at the bottom. Snap the adjustable base supports over the bottom 
of  the  support  legs  and  slide  them  up  / down  to the  outside

outside

outside

outside  measurement  using  the  measurement guide        

markings (6.1). Don’t forget to add approximately 1 inch for clearance above the pool (from step 3). Align 
square bolt holes in base supports with round bolt holes in support legs (6.2). Make certain the measure-
ment settings of the two support legs match, the two that are assembled currently. Secure both adjustable 
base supports using four 3/4 carriage bolts with washers & nuts on the inside face (6.3).  

6.2 

A1 

B1 

5.    Lay  the  assembled  handrails  and  platform  on  edge  (5.1).  Start 
with  the  top  support  leg  positions  (5.1).  Identify  the  raised  ribs  on 
the B1 & B2 support legs (5.2). The ribs on the B1 & B2 support legs 
fit into a channel in the A1 & A2 handrails (5.3).  Fit the B1 & B2 into 
the  A1  &  A2  handrails  respectively  (A1  +  B1  &  A2  +  B2  -  see  5.4  & 
5.5).  The  bolt  holes  will  align  when  the  support  legs  are  fitted  into 
the handrails properly. Secure both “top” support legs using two 3/4 
carriage bolts with washers & nuts on the inside face. 

Top 

5.1 

5.2 

5.3 

5.4 

5.5 

Bottom 

6.1 

6.3 

7.    With  the  sub-assembled  ladder  on  edge  (7.1),  fit  a  base  tread  D  onto  the  C1  &  C2  adjustable  base     
supports (7.2). The base tread has a pocket at both ends that fits over the C1 & C2 base supports. The C1 
& C2 base supports have a locking tab on the ends; press the base tread onto the base supports until the 
button-lock tab snaps through the bottom channels of the base tread (see 7.3). Position the locking tab in 
the center of the channel and snap firmly in place (7.4). 

7.3 

7.4 

7.1 

7.2 

8.    Gently,  flip  sub-
assembled  ladder  over 
onto  opposite  handrails 
so  the  remaining  half 
can  be  completed.  The 
remaining half will be for 
the INSIDE

INSIDE

INSIDE

INSIDE of the pool. 

Summary of Contents for SLIDE & LOCK SLA001-3

Page 1: ...dder section a safety feature to assist in preventing access to the This ladder is designed with a Slide Lock exterior ladder section a safety feature to assist in preventing access to the swimming pool When pool is not in use make certain exterior section is locked securely swimming pool When pool is not in use make certain exterior section is locked securely swimming pool When pool is not in use...

Page 2: ... ladder Detail 3 1 Measure at the point you plan to position the ladder as the measurements may vary Detail 3 1 Detail 3 1 Detail 3 1 Detail 3 1 Measure Outside Pool Measure Inside Pool around the pool Make certain to choose a location that has a solid base and is free from high traffic Be advised when the ladder is installed in the pool the top platform of the ladder should be just above the top ...

Page 3: ... and platform on edge 5 1 Start with the top support leg positions 5 1 Identify the raised ribs on the B1 B2 support legs 5 2 The ribs on the B1 B2 support legs fit into a channel in the A1 A2 handrails 5 3 Fit the B1 B2 into the A1 A2 handrails respectively A1 B1 A2 B2 see 5 4 5 5 The bolt holes will align when the support legs are fitted into the handrails properly Secure both top support legs u...

Page 4: ...ort legs the same Align bolt holes secure each base support at ONLY ONLY ONLY ONLY three locations 10 2 10 3 leaving indicated bolt hole open until step 13 Similar to step 7 fit remaining base tread D 10 4 10 1 10 2 10 4 11 1 10 3 NO NO NO NO BOLT BOLT BOLT BOLT BOLT BOLTS LEAVE OPEN INSIDE TOP BOLT HOLE Both sides 11 Stand ladder in upright position on a flat surface Base treads are pivotal they ...

Page 5: ...n 15 1 making certain the anti entrapment barrier is away from the pool liner Position ladder above an up right support post of pool for greater stability 15 2 You MUST MUST MUST MUST secure the ladder to the pool top rail for strength stability The top platform of the ladder has 4 possible bolt holes choose 2 that best suit your positioning pool top rail Mark bolt locations on pool top rail drill...

Page 6: ... tabs on Part BC fit on the outside of the strengthening ribs of the tread rung Slide to top of ribs and secure in place using a 1 2 screw on both left right sides 3 Similar to step 2 above fit sub assembled BB BD to back of in pool ladder section F behind bottom ladder tread rung The extended screw tabs on Part BD fit on the outside of the strengthening ribs of the tread rung Slide to top of ribs...

Reviews: