STREAM User Manual
79
interest to ensure that it is recorded optimally, allowing peripheral areas to possibly be somewhat over or
under exposed.
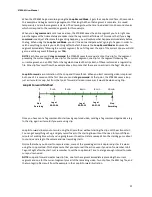
Spot Exposure Zone
uses just the area in the center area of the frame for measuring the light level. Under
conditions where the light levels in various parts of the frame vary greatly over time, this ensures that the
area in the center of the frame which is normally the area of greatest interest, will be optimally exposed
and balanced.
For example, on a ride through dark woods on a bright day, you will move in and out of shadow, and
bright patches of sunlit sky will appear at various places on the frame at random times, possibly even
when most of the scene is in dark shadow. Using the
Spot
exposure window will prevent these peripheral
bright areas and very deep shadows from having any unwanted influence on the exposure control applied
to the camera’s view of trail immediately ahead of you.
Exposure Time
Exposure Time allows you to shift the exposure level up or down from the level determined by the
dynamic exposure control logic. Exposure time settings provide exposure flexibility similar to manual
adjustment of the f-stop settings on a DSLR camera.
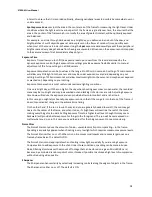
Exposure Compensation can be to values in the range 5 to 120 micro seconds. A setting of 5 microseconds
will allow very little light into the sensor and may be under exposed or very dark, depending on your
setting. A setting of 120 microseconds will allow maximum light into the sensor and may be over exposed
or washed out, depending on your setting.
Exposure Compensation is most useful under extreme lighting conditions.
On a very bright day, with the sun high in the sky, when shooting over snow or open water, the recorded
scene may be too bright and may look washed out and lacking rich colors as a result. Adjusting Exposure
time down will reduce the exposure and can provide better color contrast and a richer look.
In this case, you might also choose Spot exposure zone so that if the sun gets into the top of the frame, it
doesn’t cause radical changes in the automatic metering.
On the other hand, if the sun is low in the sky and you are generally headed toward it, the sun may get
nearer to the center of the frame, and when it does, it’s brightness will override the rest of the scene,
making everything else too dark. Setting Exposure Time to a higher level (even though this may seem
backward) will provide better exposure for things in the foreground. The sun will be overexposed no
matter what you do, so in this case you need to adjust for the things you want to see more clearly.
Noise Filter
The Noise Filter can reduce the amount of noise—unwanted small spots or speckling—in the frame.
Speckling is especially apparent when shooting in very low light which requires maximum exposure levels.
The Noise Filter is either on or off. When it is on it removes small specks and reduces larger ones on a
frame by frame basis. The default is ON.
The Noise Filter is most appropriate when shooting in low light, especially if you are using Exposure
Compensation to add exposure to the shot. Under those conditions, speckling can become intrusive.
Noise Filtering also increases the amount of footage that can be stored on a given Micro SDHC card,
because, by eliminated random spots of color, it makes it possible to achieve a high level of compression
without reducing video quality.
Sharpener
The Sharpener enhances clarity by selectively increasing contrast along the edges of objects in the frame.
The Sharpener is either on or off. The default is ON.

