background image

FCC Statement
This equipment has been tested and found to comply with the limits 
for a Class B digital device, pursuant to part 15 of the FCC Rules. These 
limits are designed to provide reasonable protection against harmful 
interference in a residential installation. This equipment generates, 
uses and can radiate radio frequency energy and, if not installed and 
used in accordance with the instructions, may cause harmful 
interference to radio communications. However, there is no 
guarantee that interference will not occur in a particular installation. If 
this equipment does cause harmful interference to radio or television 
reception, which can be determined by turning the equipment o

ff


and on, the user is encouraged to try to correct the interference by 
one or more of the following measures: 
• Reorient or relocate the receiving antenna.
• Increase the separation between the equipment and receiver. 
• Connect the equipment into an outlet on a circuit di

ff

erent from that 

to which the receiver is connected. 
• Consult the dealer or an experienced radio / TV technician for help.

Notice

Notice

25

Caution:

Any changes or modifications to this device not explicitly approved 
by manufacturer could void your authority to operate this equipment.

This device complies with part 15 of the FCC Rules. Operation is 
subject to the following two conditions: 
(1) This device may not cause harmful interference.
(2) this device must accept any interference received, including 
interference that may cause undesired operation.

Shenzhen VIOFO Technology Co.,Ltd, declares that this Radio 
Frequency peripheral is in compliance with the essential 
requirements and other relevant provisions of Directive 1999/5/EC.

Notice

26

Summary of Contents for A229

Page 1: ...Copyright 2022 VIOFO Ltd All Rights Reserved The user manual is available on https viofo com en content 42 help and support ...

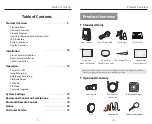
Page 2: ...ER BLACK GND YELLOW ACC Input 12 24V Output 5V2A Max External Microphone Car Charger Trim Removal Tool GPS Module Spare Front Mount Sticky Pads Spare Rear Mount Sticky Pads Product Overview Installation Operation System Settings Review and Control on Smartphone Bluetooth Remote Control Notice Customer Service Standard Items Optional Accessory Product Diagram Inserting Removing the Memory Card LED ...

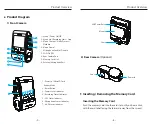
Page 3: ...e screen 1 Menu Power On Off 2 Menu Up Recording Start Stop 3 Menu Confirm Video Protect Playback 4 Menu Down Microphone Enable Disable 5 Wi Fi On Off 6 Rear Camera Port 7 Memory Card Slot 8 External Microphone Port 1 Power In MicroSD Card Reader Mode 2 Reset Button 3 Power Status Indicator 4 Recording Status Indicator 5 GPS Status Indicator 6 Microphone Status Indicator 7 Wi Fi Status Indicator 7...

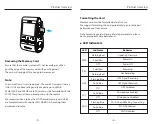
Page 4: ...the edge of the memory card with your fingernail The card will spring out far enough to be removed LED Indicators LED Led Status Flashing Red Solid Red Off Solid Red Flashing Red Flashing Blue Solid Blue Off Solid Blue Off Flashing Blue Solid Blue Off Behavior Updating Firmware Power On Power Off Recording Not Recording GPS Signal Receiving GPS Signal Received GPS Disabled Microphone Enabled Micro...

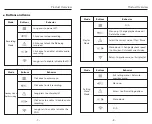
Page 5: ...once to start recording Click once to enter menu Long press to enter playlist Click once to enable disable audio recording Long press to enable disable the Wi Fi Buttons Mode Setting Menu Mode Behavior Exit setting menu Return to previous menu Menu up Enter Confirm setting options Menu down N A Buttons Mode Playlist Mode Behavior N A Menu up Change playback speed Delete the video Menu down Change ...

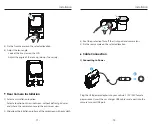
Page 6: ...ree for the sticky pad to stick firmly 4 Peel the protection film off the sticky pad and camera lens Connect to car cigarette lighter socket Best mounting location Product Overview Installation 9 10 Display Overview Recording Status Parking Mode Recording Mode Loop Recording Status Parking Motion Detection G sensor Status SD Card Status GPS Status Recording Time Video Resolution Microphone Emergen...

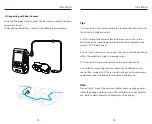
Page 7: ...into the camera s mount USB port Installation Installation 11 12 Rear Camera Installation 5 Fix the front camera on the selected location 6 Adjust the lens angle Look at the live view on the LCD Adjust the angle of the lens up down if necessary 1 Select an installation location 2 Wipeclean the installation surface of the windscreen with a dry cloth Select a location on the windscreen without defro...

Page 8: ... camera on or near airbag panels 5 Installation mounting location should not be affected by sun control film window tint There should not be any other electronic equipment close to the camera for optimal performance Note Do not install mount the camera or cables near an airbag panel or within the airbag s working range The manufacturer is not liable for any injury or death caused by deployment of ...

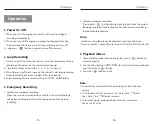
Page 9: ... space on the microSD card loop recording will automatically overwrite the oldest files one by one Loop recording files are saved to SD card DCIM MOVIE folder 1 1 2 3 2 3 4 Operation Power On Off When you start the engine the camera will turn on and begin recording automatically When you turn off the engine or unplug the charging cable from the power adapter the camera will stop recording and turn...

Page 10: ...tached Note Before using a microSD card to upgrade the firmware formatting the card in camera is necessary to ensure stable read and write operation Do not unplug or power off the camera during a firmware upgrade it may cause the camera to subsequently fail to boot Follow the instructions on this website to upgrade the firmware https viofo com en content 42 help and support Firmware Upgrade Operat...

Page 11: ...on G Sensor The G sensor measures shock forces and locks the video recorded at the time The settings from low to high determine the amount of force needed to lock the file from being overwritten We recommend that you set it at low Wi Fi Set it On Off Press the button for 3 or 5 seconds to enable Wi Fi quickly We recommend to choose 5GHz Wi Fi mode Parking Recording There are 3 options under parkin...

Page 12: ...S Stamp Imprint the GPS information on the recorded video Date Stamp Imprint the time and date on the recorded video Brand Model Stamp Imprint the camera model on the recorded video License Plate Number Imprint the car number on the recorded video Custom Text Stamp Imprint the customize text on the recorded video Beep Sound Off Only Keytone Only Boot Sound All You can enable disable the button and...

Page 13: ...ess the button When the Wi Fi is on a Wi Fi status icon and the password appear on the camera LCD screen Review and Control on Smartphone Bluetooth Remote Control 23 24 With the Bluetooth remote control Optional mounted in a convenient location on your dashboard you can safely protect important videos from being overwritten without needing to take your eyes off the road When you press the bluetoot...

Page 14: ...terference by one or more of the following measures Reorient or relocate the receiving antenna Increase the separation between the equipment and receiver Connect the equipment into an outlet on a circuit different from that to which the receiver is connected Consult the dealer or an experienced radio TV technician for help Notice Notice 25 Caution Any changes or modifications to this device not ex...

Page 15: ... Fri 9am 6pm Product Registration Program Your Opinion Matters Video Sharing If you have any thoughts on how we can do even better connect with us today at support viofo com Share videos caught on VIOFO camera with us Let s enjoy your new found together Gain a chance to get a mysterious gift at marketing viofo com Thanks for choosing VIOFO From the date of purchase on all products are warranted fo...

Reviews: