background image

OPERATION

-11-

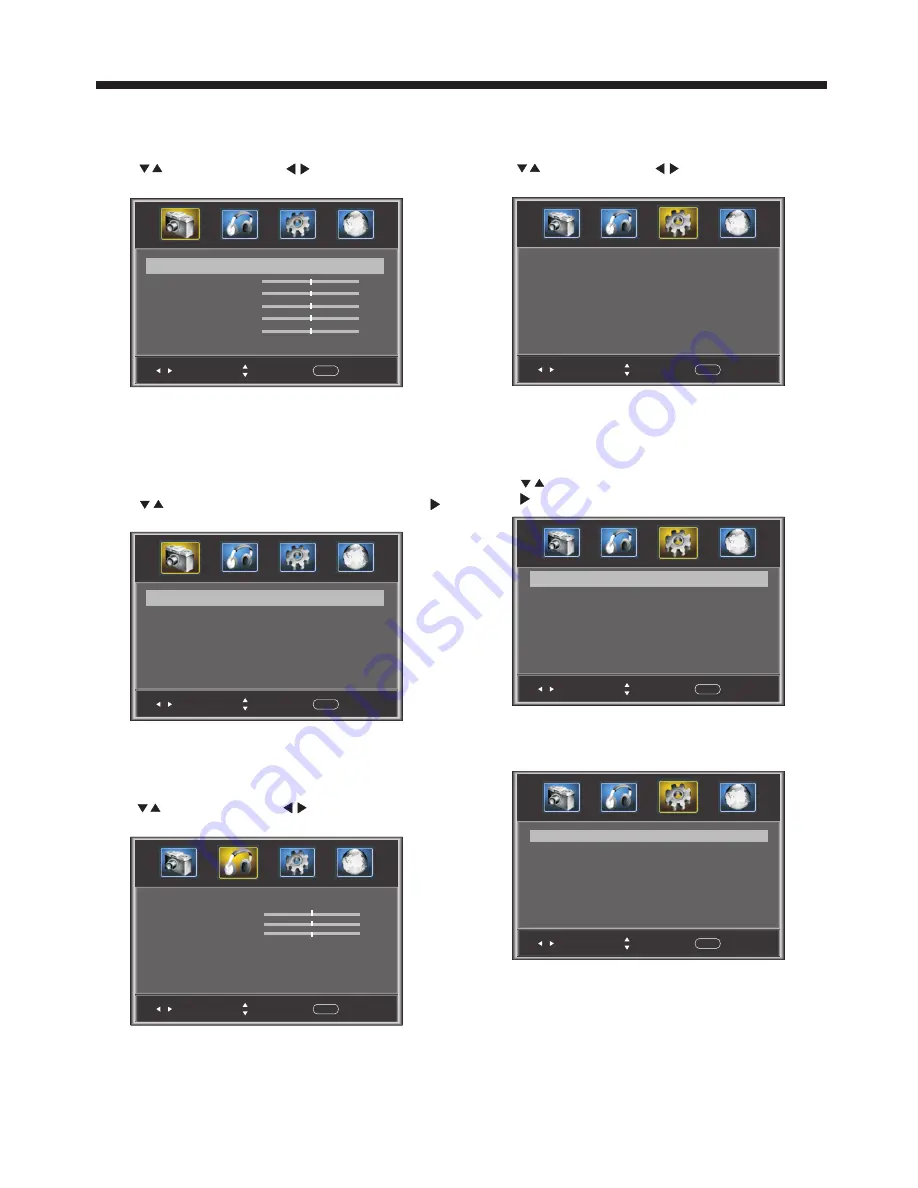
      The  first  item  of  the  MENU  is  PICTURE  MENU.
      You  can  adjust  picture  effect  here,  such  as  contrast, 
       brightness,  etc.
       Press           to  select  and  press           to  adjust.  Press 
       MENU  to  exit.
      

1. PICTURE MENU


2.AUDIO  menu

The  second  item  of  the  MENU  is AUDIO  MENU.
You  can  adjust  sound  here.
Press          to  select  and  press           to  adjust.  Press 
MENU  to  exit.

3.  SETUP   MENU

The  third  item  of  the  MENU  is  SETUP  MENU.
You  can  setup  system  here.
Press         to  select  and  press          to  adjust.  Press  MENU 
to  exit.

Note: 
   Restore Default: Reset all the settings to default 
 value.

Note:
The  item  of Audio  language  is  available  in ATSC 
program.

Picture Mode

Standard

Contrast

50

Brightness

50

Color

50

Tint

0

Sharpness

Advanced Video

50

Select

Adjust

Menu

Exit

<                                   >

                                   >

Color Temp.                                                      Normal

Select

Adjust

Menu

Exit

<                                   >

Aspect                                                                Wide

Noise Reduction                                               Middle

<                                   >
<                                   >

 Press         button to select  Advanced Video and press        
 button.  The screen will  display as follows: 

Advanced Video:     

Select

Adjust

Menu

Exit

Parental Controls

Timer

Closed Caption 

Menu Settings

VGA Settings 

Restore Default

                                   >
                                   >
                                   >
                                   >
                                   >
                                   >

3.1. Parental Controls:     

 Press         button to select  

 and 

 press     button. The screen will  display as follows: 

Parental Controls

Select

Adjust

Menu

Exit

Enter Password                                    ----

Input the password so that the screen shows the 

menu. Factory default password is 6666.

Parental 

Control 

Select

Adjust

Menu

Exit

Change password

P.G  switch

Off

US

Canada

RRT setting

Reset  RRT

<                                   >
<                                   >
<                                   >
<                                   >
<                                   >

                                   >

Note:
   If  you  want  to  adjust  contrast,  brightness,  color, 
   or  sharpness,  the  picture  mode  must  return  to
 

Custom

status.


Select

Adjust

Menu

Exit

Sound  Mode

Standard

Bass

50

Treble

50

Balance

0

Surround

AVL

Digital Output

PCM

Off

Off

<                                   >

<                                   >

<                                   >

<                                   >

Audio Language

English

<                                   >

Summary of Contents for LED26VF50

Page 1: ...LED26VF50 26 1080P ...

Page 2: ...Contents 1 Safety and warnings 2 3 Introduction 4 Installation 5 8 9 Remote Control 10 Operation 11 14 Trouble Shooting 15 Wall Mount ...

Page 3: ...el Servicing is required when the apparatus has been damaged in any way such as power supply cord or plug is damaged liquid has been spilled or objects have fallen into the apparatus the apparatus has been exposed to rain or moisture does not operate normally or has been dropped 14 Mains plug is used as the disconnect device the disconnect device shall remain readily operable 15 The ventilation sh...

Page 4: ... should pay special attention to children Serious injury may result if it falls Do not place your television on an unstable cart stand shelf or table Serious injury to an individual and damage to the television may result if it falls When the television receiver is not used for an extended period of time it is advisable to disconnect the AC power cord from the AC outlet Avoid exposing the televisi...

Page 5: ...RGB VGA Input x 1 Side High Definition Multimedia Interface HDMI Input x 2 Audio Input x 2 Composite Video Input 350 x 1 YCb Pb Cr Pr 400 Video Input 400 26 inch Rear Composte Video Input x 1 ATSC Digital system and NTSC Analog system Headphone Output x 1 x 1 Coaxial Output Input Power Voltage AC 100V 240V 50 60Hz HDMI the HDMI Logo and High Definition Multimedia Interface are trademarks or regist...

Page 6: ... HDMI2 port get DVI signal the audio signal receives from the YPbPr AV Audio channel 1 SOURCE Display the input source menu In MENU mode press SOURCE to confirm the selected item 2 MENU Display main MENU 3 CH CH In TV mode press CH or CH to change the channel up and down In MENU mode press CH or CH to select items 4 VOL VOL Adjust sound level In MENU mode press VOL or VOL to adjust the item that y...

Page 7: ...ce 75 unbalanced 6 STEPS PC Be sure both the TV and computer are set to Power off 1 Connect VGA and audio cable 2 Connect the power cord 3 Power on the TV switch to PC mode 4 Power on the PC This sequence is very important HDMI1 HDMI2 USB VGA HEADPHONE RF PC AUDIO COAXIAL ...

Page 8: ...TALLATION PRESET MODE 1 2 3 4 5 6 7 8 9 10 720 400 640 480 640 480 800 600 800 600 1024 768 1024 768 1024 768 1280 1024 1280 1024 70 60 75 60 75 60 70 75 60 75 31 47 31 47 37 50 37 88 46 88 48 36 56 48 60 02 63 98 80 00 RESOLUTION V Freq Hz H Freq KHz ...

Page 9: ...p 720p 1080i You can use the input terminals on TV set rear as follows You can use the input terminals on TV set rear as follows HDMI HDMI1 HDMI2 USB VGA HEADPHONE RF PC AUDIO COAXIAL Yellow video White audio L Red audio R or Pr Y W R W R G B R Blue Pb Green Y B G VIDEO EQUIPMENT with YPbPr W R G B R W R W R TO AUDIO OUTPUTS VIDEO EQUIPMIENT TO VIDEO OUTPUTS Y Pb Pr AV L R AC INPUT 100 240V 50 60H...

Page 10: ...s VIORE TV is compatible with a 200mm x 100mm mounting hole pattern Do not mount your VIORE TV at more than a 15 degree tilt Always use two people to mount the TV to a wall Do not install your Wall Mount Kit while your TV is turned on It may result in personal injury due to electric shock 4 pcs of type M4 screws are required for installing the wall mount bracket to your VIORE TV Do not use screws ...

Page 11: ... directly go to HDMI source 20 AV Hot key directly go to AV source 21 DTV STRENGTH Used to display the DTV signal strength menu 22 TV Hot key directly go to TV source 23 YPbPr Hot key directly go to YPbPr source 24 CC Enable or disable the CC function 25 VGA Hot key directly go to VGA source 26 MTS Switch the sound stereo 27 COLOR KEYS Reserved keys 9 14 13 10 12 11 15 18 20 19 25 26 1 2 4 5 6 7 2...

Page 12: ...st Menu Exit Color Temp Normal Select Adjust Menu Exit Aspect Wide Noise Reduction Middle Press button to select Advanced Video and press button The screen will display as follows Advanced Video Select Adjust Menu Exit Parental Controls Timer Closed Caption Menu Settings VGA Settings Restore Default 3 1 Parental Controls Press button to select and press button The screen will display as follows Pa...

Page 13: ...D Sexually suggestive dialog Suggested age TV Y All children TV Y7 Direct to order children TV G General audience TV PG Parental Guidance suggested TV 14 Parents strongly cautioned TV MA Mature audience only X X X X X X X X X X X X Content 2 MPAA switch the movie rating control level N A G PG PG 13 R NC 17 X Rating Description Age G General audiences All Ages admitted PG Parental Guidance suggeste...

Page 14: ...l All ages and children contains minimal direct violence but may be integrated into the plot in a humorous or unrealistic manner 8ans General but inadvisable for young children May be viewed by a wide public audience but could contain scenes disturbing to children under 8 who cannot distinguish between imaginary and real situations Recommended for viewing with paren 13ans Over 13 years Could conta...

Page 15: ...in normal case 5 Auto Auto adjust to fit the screen Press button to select VGA Settings and press button The screen will display as follows Select Adjust Menu Exit H pos V pos Clock Phase 50 Auto 50 50 50 4 Channel MENU The fourth item of the MENU is Channel MENU You can adjust digital and analoge TV Channel Press to select and press to adjust Select Adjust Menu Exit Air cable Auto Scan Air Favori...

Page 16: ... Press standby key on the remote control for inspecting No colour Normal audio Colour control Picture breaking up Normal audio or weak retune channel No colour Noise TVsystem Normal audio antenna position direction or connection TROUBLE SHOOTING Trouble phenomenon Symptom Ghost 15 The LED TV panel is built with very high precision technology giving you fine picture details in vibrant color Occasio...

Page 17: ...Printed in China Viore Inc 7801 Hayvenhurst Avenue Van Nuys CA 91406 Ver 110513 1 ...

Reviews: