background image

5

Section 3:  Product Overview

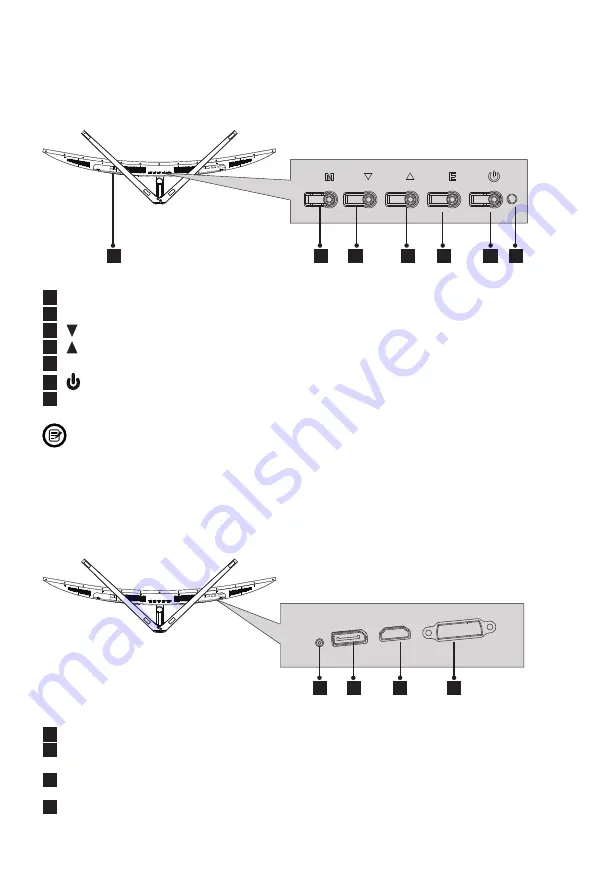
3.1 – Monitor Buttons

 8


Audio Connector

: Plug in your earphones to receive sound.

 9


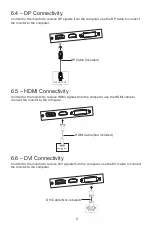
DP Connector

: Insert one end of the DP cable into the computer’s DP output and 

connect the other end to the monitor’s DP port.

10


HDMI Connector

: Insert one end of the HDMI cable into the computer’s HDMI output 

and connect the other end to the monitor’s HDMI port.

11

  DVI Connector:

 Insert one end of the DVI cable into the computer’s DVI output and 

connect the other end to the monitor’s DVI port.

 8

 9

11

10

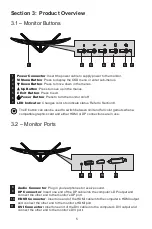
 1

 3

 4

 5

 6

 7

 2

 1


Power Connector

: Insert the power cable to supply power to the monitor.

 2

   M Menu Button

: Press to display the OSD menu or enter sub-menus.

 3


Down Button

: Press to move down in the menus. 

 4


Up Button

: Press to move up in the menus. 

 5


E Exit Button

:


Press to exit.

 6


Power Button

: Press to turn the monitor on/off.

 7


LED Indicator

Changes colors to indicate status. Refer to Section 8.

  The E button can also be used to switch between limit and full color gamuts when a 

compatible graphics card and either HDMI or DP connections are in use.

3.2 – Monitor Ports

Summary of Contents for GN34CB

Page 1: ...nue serving our customers and providing the best products our product information including our user manuals may receive updates from time to time Please check our website for the latest user manuals...

Page 2: ...r Earphones 8 6 4 DP Connectivity 9 6 5 HDMI Connectivity 9 6 6 DVI Connectivity 9 Section 7 Basic Operation 10 Section 8 Indicator Light 10 Section 9 OSD 11 9 1 OSD Menu Functions 12 Section 10 ECO M...

Page 3: ...nitor 5 Do not spray cleaner and or any kind of liquid directly onto the monitor s screen or any part of the monitor 6 Do not insert anything into any part of the monitor especially the ventilation op...

Page 4: ...Stem x 1 Stand Base x 1 Power Cable x 1 AC 100 240V 50 60Hz NO 1 Screws x 4 for Stand Installation DP Cable x 1 Screwdriver x 1 User Manual x 1 12mm NO 2 Screws x 4 for Mounting 31mm 14mm The NO 1 Scr...

Page 5: ...er s DVI output and connect the other end to the monitor s DVI port 8 9 11 10 1 3 4 5 6 7 2 1 Power Connector Insert the power cable to supply power to the monitor 2 M Menu Button Press to display the...

Page 6: ...stand plate to the stem Next use the remaining NO 1 screws to fasten the base to the stem NO 1 Screw 14mm x 2 Stand Stem NO 1 Screws 12mm x 2 4 Insert the stand s plate into the opening on the back of...

Page 7: ...ve the stand If the stand was not installed press the button to remove the stand plate Button Stand Plate 2 Remove the original screws x 4 1 from the opening in the back of the monitor Follow the dire...

Page 8: ...power cable to the power connector and then plug the other end into an wall outlet Power Cable 6 3 Connecting Your Earphones Connect your earphones to the audio connector When your earphones are plug...

Page 9: ...uded 6 5 HDMI Connectivity In order for the monitor to receive HDMI signals from the computer use the HDMI cable to connect the monitor to the computer HDMI OUTPUT PC HDMI Cable Not included 6 6 DVI C...

Page 10: ...tly 4 Locate the power button on the monitor and press it to turn the monitor on FreeSync The feature itself is off by default In order to use this feature please note you must have hardware with Free...

Page 11: ...indow eco 2 Press M button to enter the OSD menu DP Resolution 3440x1440 100Hz Input Source Brightness Contrast Color Setting Picture Quality Setting Display Audio Multi Window Other DVI HDMI DP Windo...

Page 12: ...ation Hue Saturation Set hue and saturation levels Picture Quality Setting Bypass On Off Turn the bypass function on off Sharpness 0 100 Adjust image sharpness Response Time Off High Middle Low Adjust...

Page 13: ...verall transparency OSD Time Out 5 100 Set how long the OSD s remains open after non use OSD Rotation Normal 90 180 270 When the user ips the display this function can also flip the OSD to achieve the...

Page 14: ...ensure your video cable is secure The monitor needs cleaning Make sure the monitor has been powered off before cleaning Always use soft non abrasive cloth when cleaning Use dry non abrasive cloth to...

Page 15: ...is supported while X means it is not supported 11 3 PBP Picture by Picture Resolution Information While using this feature and in order to obtain an optimal viewing experience it is recommended to set...

Page 16: ...ge English Espa ol Usage Temp 32 F 95 F Operating 4 F 140 F Storage 10 90 RH Non Condensing Tilt Angle Forward 5 Backward 15 Dimension With Stand 32 1 x 17 2 x 11 2 in 815 x 437 4 x 285 7 mm Weight Ne...

Page 17: ...the original product This Warranty is for one replacement only of like items and does not cover items out of production if the product is no longer made or stocked This Warranty is not assignable or...

Page 18: ...suant to Part 15 of the FCC Rules These limits are designed to provide reasonable protection against harmful interference in a residential installation This equipment generates uses and can radiate ra...

Page 19: ...19...

Page 20: ...COPYRIGHT 2018 VIOTEK ALL RIGHTS RESERVED...

Reviews: