background image

Troubleshooting

61

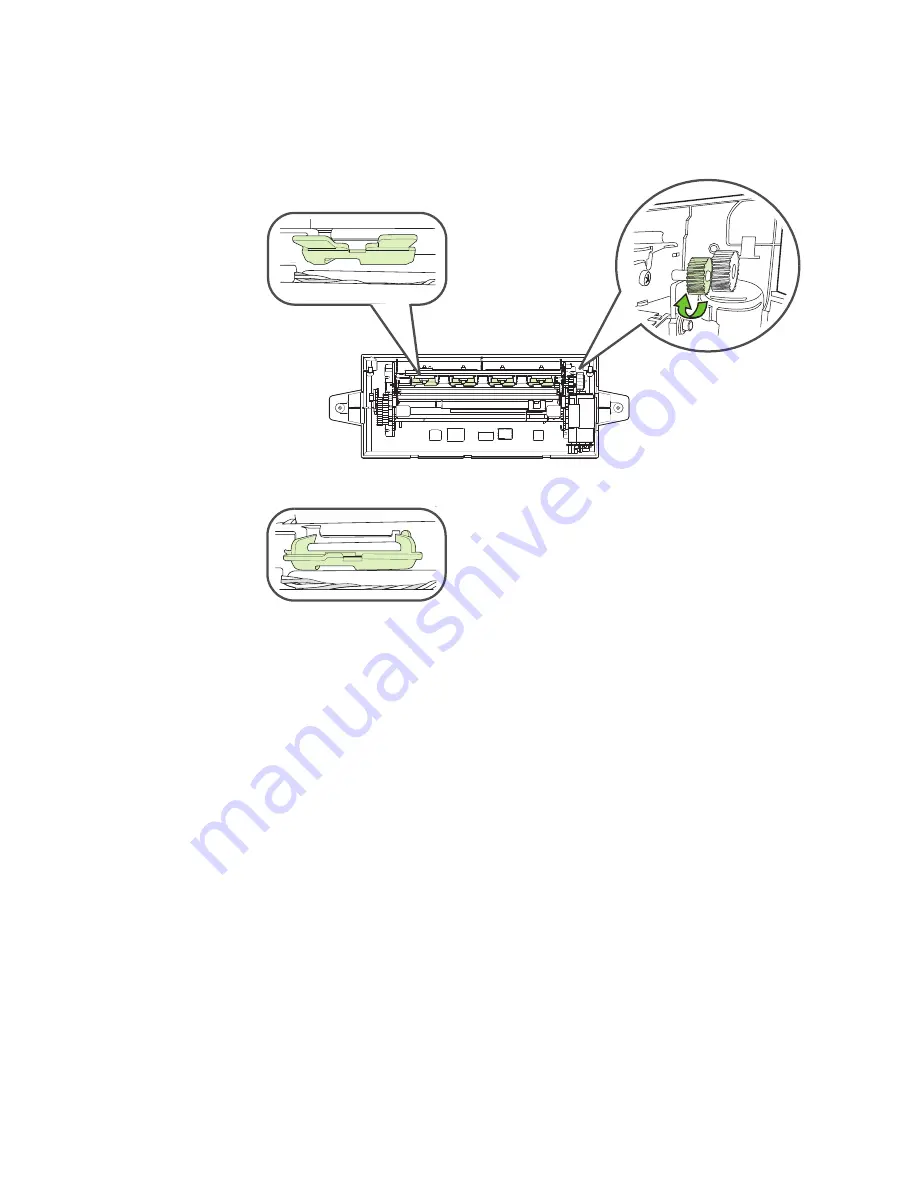
6. Before reinstalling the rear module, ensure the pinch plates are in the up position.

Pinch plate up

Pinch plate down

Turn gear to rotate pinch 

plates up, if needed.

Summary of Contents for VP485

Page 1: ...U s e r G u i d e Printer VP485 VP485e VP495 ...

Page 2: ... material including but not limited to the implied warranties of merchantability and fitness for a particular purpose VIPColor Technologies Pte Ltd shall not be liable for errors contained herein or for incidental or consequential damages in connection with furnishing performance or use of this material Trademarks Microsoft Windows Windows Vista and Windows Server are registered trademarks of Micr...

Page 3: ... indicates a potentially hazardous situation that could result in injury or damage to the printer if you ignore the safety precautions WARNING A WARNING indicates a potentially hazardous situation that could result in an electric shock fire and serious injury if you ignore the safety precautions ...

Page 4: ...otted Do not place heavy objects on the power cord If you detect smoke unusual smells or strange noises around the printer immediately unplug the printer at the power supply and call for service Periodically unplug the power cable from the printer and use a dry cloth to wipe off any dust or dirt collected on the plug and the power outlet If the printer is exposed to a lot of dust smoke or high hum...

Page 5: ...etup 25 If the Printer Is Already Installed 27 Choose Display Language 28 Using the Printer 29 Select Print Media 30 Label Threshold Setting 31 Select Print Settings 32 Cancel a Print Job 33 Create Full Bleed Labels 34 Using BarTender UltraLite 35 Using Other Graphics Software 37 Adjust Alignment for Printing 38 Adjust for Media Thickness 40 Upgrade or Remove Printer Driver 42 Monitor Printer thro...

Page 6: ...her Printer Problems 51 If Error Messages Appear 53 If Printouts are Incorrect or Print Quality is Poor 56 BarTender Problems 58 If There Is a Media Jam 59 Cleaning the Rear Module 63 Appendix 67 Options on Printer Menu 68 Regulatory Information 70 Index 73 ...

Page 7: ...7 Chapter 1 Printer Parts and Functions Front View 8 Control Panel 9 Rear View 12 ...

Page 8: ...8 Printer Parts and Functions Front View Status lights Control panel Manual cutter Top cover Ink cartridge compartment cover ...

Page 9: ... Power indicator Power button CAUTION Do not turn off the printer using the Power switch at the rear of the printer Always turn it off using the Power button on the control panel to ensure that the printhead carriage is returned to its proper position at the right side of the printer ...

Page 10: ...atus Lights Status Light Description Green On Printer is online and ready to print Flashing Printer is receiving data from the computer Amber Flashing One of the ink cartridges is running low On One of the ink cartridges is almost empty and needs replacement soon Red Flashing One of the ink cartridges is empty and needs to be replaced On An error has occurred Amber Red Green ...

Page 11: ...see Options on Printer Menu on page 68 When the printer is online press MENU to display the main menu Press and to move through the menu options Press enter to select an option or esc to cancel Press FEED to feed a single label Press clear to cancel the current print job Power button MENU FEED esc down clear up x enter x x FEED MENU ONLINE B Y M C 0 Test Eject Media Maintenance Printer Setup x ...

Page 12: ...eed to power off the printer using the Power switch at the rear of the printer make sure you wait about 8 seconds before you turn it on again Rear module Media feed slot Media width guide Power socket Power switch GPIO port Network port USB port Media sensor ...

Page 13: ...pack the Printer 14 Install the Ink Cartridges 16 Install the Printheads 17 Connect the Power Cable 19 Align the Printheads 20 Load Label Media 22 Install the Printer Driver 24 Install the Printer on a Network 25 Choose Display Language 28 ...

Page 14: ... abrupt changes in temperature and humidity To avoid the risk of fire or electric shock choose a location that has a constant temperature range of 5 C to 35 C 41 F to 95 F and humidity of 10 to 90 condensation free Select a surface that is stable and sturdy enough to take the weight of the printer Do not place the printer on a thick rug or carpet CAUTION Be careful when lifting the printer as it i...

Page 15: ...ter out from the box and set it on a level and sturdy surface at the selected location 3 Remove the tape and open the top cover of the printer 4 Remove the packing material inside the printer 5 Close the printer cover NOTE Do not throw away the printer box and packing materials in case you need to use them for transporting the printer in the future ...

Page 16: ...e slots indicate where each ink cartridge should be installed The ink cartridges have to be correctly installed for the printer to function properly 1 Open the ink cartridge compartment cover 2 Remove an ink cartridge from its packaging 3 Push the ink cartridge firmly into the correct slot as indicated by the colored label The ink cartridge will not sit properly if it is in the wrong slot 4 Repeat...

Page 17: ... Colored labels over the printhead slots indicate where each printhead should be installed The printheads have to be correctly installed before the printer can function properly 1 Open the top cover The printhead carriage is on the left of the printer 2 Lift up the printhead latch ...

Page 18: ...work area Once the protective cap and tape are removed do not touch the electrical contacts or ink nozzles on the printhead The printer may not print properly if you touch them 5 Push the printhead firmly into the correct slot as indicated by the colored label The printhead will not sit properly if it is in the wrong slot 6 Repeat the steps to install the second printhead 7 Lower the printhead lat...

Page 19: ... printer Always turn it off using the Power button on the control panel at the front of the printer This ensures that the printhead carriage is returned to its proper position at the right side of the printer which protects the printheads 1 Attach the power cable securely to the printer 2 Plug the other end into a power outlet Do not use an extension lead or cord 3 Use the Power switch at the rear...

Page 20: ...rformed whenever new printheads are installed in the printer The printhead alignment procedure requires two Letter A4 sized sheets of paper You can use plain paper but inkjet stock is recommended 1 On the control panel press the MENU button 2 Press enter to select Printer Setup 3 Press enter to select Align Printheads FEED MENU ONLINE B Y M C 0 Test Eject Media Maintenance Printer Setup TOF Alignm...

Page 21: ... slot at the rear of the printer Make sure the media width guide is correctly positioned against the right side of the paper 5 Press enter to start alignment 6 Insert the second sheet of paper when prompted The procedure will take about two minutes to complete and the printer will restart ...

Page 22: ...model Type 1 or Type 2 that you are using Type 1 Type 2 Printer Unwinder Rear rubber feet of printer fit into the holes marked U on the base of the unwinder Make sure the printer sits firmly on the base Inner disk Left edge Inner disk on unwinder aligned with left edge of media feed slot a b 25 mm a Distance of 25 mm 0 1 between left edge of unwinder and rear left edge of printer b 0 1 ...

Page 23: ... Connect power to the unwinder and turn it on 3 Insert the media along the left edge of the media feed slot The printer will automatically pull in the media and position it correctly for printing 4 Move the media width guide gently against the right edge of the media 5 Slide the media sensor under the media Media width g Media sensor Media width guide Media sensor ...

Page 24: ...If you are setting up the VP4X5 printer Advanced model on a network see Install the Printer on a Network Install Printer Driver 1 Connect the USB cable to the printer and computer 2 If the Windows Add Hardware Wizard appears click Cancel Do not install the printer driver using the Add Hardware Wizard 3 Insert the VIPColor BarTender UltraLite CD into the disk drive 4 Select Seagull Printer Drivers ...

Page 25: ...etwork Configure 3 Select IP ADDR a Press Edit and use the up and down buttons to enter the IP address b Press enter when done 4 Select Subnet Mask a Press Edit and use the up and down buttons to enter the subnet mask b Press enter when done Install Printer Driver and Add TCP IP Printer Port 1 Connect a network cable to the printer and computer 2 If the Windows Add Hardware Wizard appears click Ca...

Page 26: ...New Port to run the Add Printer Port Wizard a Enter the IP address for the printer and a port name Wait for Windows to detect the TCP IP port b For Device Type select Generic Network Card c Click Finish to add the printer port 8 Follow the remaining instructions to share the printer and complete the installation ...

Page 27: ...the TCP IP port from Windows 1 From the Windows Start menu Select Devices and Printers1 2 Right click VIPColor VP4X5 and select Printer Properties 3 On the Ports tab select the Standard TCP IP Port for the printer and click Configure Port 4 Enter the following Printer s IP Address Port Number 9100 5 Click OK 1 For Windows 7 The steps will differ slightly for other Windows versions ...

Page 28: ... in the printer control panel The supported languages are English German Italian Spanish and French 1 On the control panel press the MENU button 2 Press enter to select Printer Setup 3 Press to scroll to Display Language and press enter 4 Scroll to your preferred language and press enter ...

Page 29: ... for Printing 380 Adjust for Media Thickness 40 Upgrade or Remove Printer Driver 42 Monitor Printer through Web Interface 42 CAUTION Never attempt to pull media out from the back of the printer Doing so will cause ink mixing in the printer Always use FEED or Eject Media from the printer control panel to eject media from the front of the printer ...

Page 30: ...slot See Load Label Media on page 22 To prevent jams poor print quality and other printing problems avoid the following media Media that is damaged curled or wrinkled Media with perforations Media that is heavily textured embossed or does not accept ink well Media that is too lightweight or stretches easily Table 2 Media specifications Media Dimensions Maximum label tag roll width 8 5 Label roll o...

Page 31: ...ing ON or OFF When OFF the printer will simply feed media to the linefeed roller Auto calibration can be set to OFF when The new media roll to be loaded is the same as the previous roll Calibration has already been done and need not be repeated The new media is continuous media Set Label Threshold Manually The label threshold value may have to be set manually when Auto calibration fails at least t...

Page 32: ...nu select Print 2 Click the Setup Properties or similar button 3 Make the changes and print the document Change Default Settings in Printer Driver To change and keep the default print settings for future print jobs 1 From the Windows Start menu select Devices and Printers1 2 Right click the VIPColor VP4X5 printer and select Printing preferences 3 Make the changes and click OK to save Define Custom...

Page 33: ...l a Print Job Cancel Printing from Printer Control Panel Press clear to cancel the current print job Cancel Printing from Windows 1 Double click the printer icon in the taskbar 2 Right click the document name and select Cancel x ...

Page 34: ...y To overcome this problem you should define a size that is 3 mm 0 12 larger than the actual media size For example define 63 43 mm media size to print on 60 40 mm labels Then center the design on the label leaving margins of 1 5 mm 0 06 all around as shown in Figure 2 This label will now print correctly edge to edge Figure 2 Design on larger label to print full bleed Design on 60 x 40 mm label Ac...

Page 35: ...s a Predefined Media Size otherwise follow the instructions for Custom Media Size Predefined Media Size When creating a new label using the New Document Wizard you can select from a variety of Predefined Stock sizes If the correct size is available simply make sure that you select the Full Bleed option Figure 3 New Document Wizard Predefined stock selection Then lay out the full bleed label as sho...

Page 36: ...ize define custom media in the New Document Wizard Select Specify Custom Settings which allows you to define various settings for the media including the size 1 Add 3 mm 0 12 to both the actual width and height of the label when defining the size Figure 4 New Document Wizard Custom media setup ...

Page 37: ... Lay out the label as shown in Figure 2 avoiding the margins Using Other Graphics Software To design and print full bleed labels using other graphics software follow the same workflow 1 Define a custom size that is 3 mm 0 12 longer and wider than the actual label 2 Set margins of 1 5 mm 0 06 and lay out the design within the margins 3 When printing select the correct media size ...

Page 38: ...nter control panel Once aligned you can continue printing the same labels without further adjustment Right Edge Adjustment 1 On the printer control panel select Menu Printer Setup Right Edge Adjust 2 The current TOF value in mm is displayed Press enter to begin 3 Estimate how much the image needs to be moved A positive number moves the image left a negative number moves the image right Figure 6 4 ...

Page 39: ...s to check the alignment TOF Adjustment from the Printer Driver An alternative to adjusting TOF from the printer control panel is to change the setting in the printer driver This method does not require the printing of rulers on the labels you just estimate how much the image needs to be moved up or down 1 From the File menu of the graphics software select Print 2 Select VIPColor VP4X5 and select ...

Page 40: ...with each roll of media The difference in media thickness and or flexibility can result in overprinting or underprinting between swaths in Draft or Fast quality mode Figure 7 Media thickness adjustment 0 875 22 mm single pass underprinting overprinting 0 875 22 mm single pass ...

Page 41: ...election matches the media loaded in the printer The printer is not able to detect the media type if you select Matt when the media is actually Semi Gloss the printer will apply values for Matt media 3 Set the thickness using the arrow keys A positive value will move the swaths further apart a negative value will move them closer together Press enter 4 Reprint a few labels to check the alignment ...

Page 42: ...ter through Web Interface If your printer is connected to a network Advanced model only you can check the printer status and usage metrics from a remote PC You can also set up the printer to send out email messages when problems occur prompting the recipients to take action For example when an ink cartridge needs to be replace or a new media roll has to be loaded 1 Enter the printer s IP address i...

Page 43: ... the Printer 48 Do not attempt to disassemble or modify the printer There are no user serviceable parts inside the printer Never attempt any maintenance procedure which is not described in this guide Do not place any objects on the printer Should any foreign object metal or liquid fall into the printer unplug the power cord and call for service ...

Page 44: ...timates and actual ink volumes may vary After removing an ink cartridge from its package install it right away Do not leave a cartridge outside the printer for long periods of time 1 Open the ink cartridge compartment cover 2 Hold the ink cartridge between your thumb and forefinger and pull it firmly towards you 3 Remove the new ink cartridge from its package 4 Insert it into the slot 5 Close the ...

Page 45: ...lly Cleaning uses ink so clean the printheads only when necessary The cleaning process takes 3 to 5 minutes 1 On the printer control panel press the MENU button 2 Select Maintenance 3 Select Clean Printheads 4 Press enter to start cleaning If the quality problem persists after cleaning replace the printheads See Replacing Printheads CAUTION VIPColor is not responsible for damage to the printer tha...

Page 46: ...on a Select Maintenance b Select Change Printhead 2 Open the top cover 3 Lift up the printhead latch 4 Lift the printhead out of the carriage by pulling the handle on its top esc Firmware Version Clean Printheads Set label threshold Test esc Printer Setup Eject Media Maintenance Change Printhead ...

Page 47: ...othes or surrounding work area Once the protective cap and tape are removed do not touch the electrical contacts or ink nozzles on the printhead The printer may not print properly if you touch them 7 Push the printhead firmly into the slot 8 Lower the printhead latch to secure the printheads 9 Close the top cover Whenever you install a new printhead run the printhead alignment procedure See Align ...

Page 48: ...r for extended periods of time If you remove the printheads from the printer place the original protective caps back on the printheads Otherwise the print quality may degrade quickly Do not touch the electrical contacts or nozzle plate Cleaning the Printer Use a dry cloth to clean the printer CAUTION Always unplug the printer from the power outlet before cleaning the printer If you accidentally sw...

Page 49: ...If Error Messages Appear 53 If Printouts are Incorrect or Print Quality is Poor 56 BarTender Problems 58 If There Is a Media Jam 59 Cleaning the Rear Module 63 NOTE Whenever you need to turn off the printer using the rear Power switch always wait about 8 seconds before you turn it on again ...

Page 50: ...s contact your VIPColor reseller Printer does not print If the green light was flashing 1 Restart the printer 2 Try printing a different document There may be a problem with the document you were printing If the green light did not flash 1 Check that the USB cable is properly connected between the printer and PC 2 Double click the VP4X5 printer icon in Devices and Printers and check that the title...

Page 51: ...rinter be used in an air conditioned room FEED button does not work after printing is completed Although the printer is online it is not ready to accept the Feed command Note the firmware version of your printer and contact your VIPColor reseller to find out if an upgrade is available to resolve this issue Media does not load properly it feeds a few inches into the printer and stops 1 On the contr...

Page 52: ...ftware Try printing again 2 Remove the media from the printer 3 Restart the printer 4 On the control panel select Menu Maintenance Setup Label Threshold Auto Calibration and ensure this option is ON 5 Reload the media and make sure the media sensor is positioned under the media Try printing again 6 If the error persists on the printer control panel select Menu Maintenance Reset Default Settings No...

Page 53: ...the error still appears continue with Clearing Media from the Rear Module on page 60 to check the rear module Paper Motor Stall Check Paper Path and Restart 4 The service station has stalled 1 Restart the printer using the rear Power switch 2 If the error still appears contact your VIPColor reseller Service Station Stall Door open The top cover or ink cartridge compartment door is open 1 Make sure...

Page 54: ...ia 3 On the control panel select Menu Maintenance Reset Default Settings to the settings to the defaults Note that if you reset the settings you will lose any changes you made Media is loaded but the printer only feeds a few labels and does not print 1 Press clear on the printer control panel 2 Remove the media from the printer 3 On the control panel select Menu Maintenance Setup Label Threshold A...

Page 55: ...ink cartridges were detected Install the ink cartridges If ink cartridges are already installed remove them and reinstall Cartridge Failure color Reconnect Rear Module The rear module could not be detected 1 Turn the printer off 2 Remove and reinstall the rear module Make sure the screws are tightened 3 Turn the printer on Message on Control Panel Cause Solution ...

Page 56: ...he selected Sensor type is correct Make sure the media sensor is positioned under the media If the problem persists it may be due to the application s failure to interpret print settings correctly Check for known issues or conflicts Text or graphics are shifted to the left 1 Restart the printer using the rear Power switch 2 Print again and see if the text graphics are now in the correct position 3...

Page 57: ... Make sure the ink cartridge have not been tampered with Always use genuine VIPColor ink cartridges Refilling and incompatible inks can damage the printer or printheads and result in reduced print quality Check the media quality the media may not be designed for inkjet printing Colors do not line up properly Run the printhead alignment procedure See Align the Printheads on page 20 Ink is smearing ...

Page 58: ...les If the problem persists contact Seagull Scientific Technical Support via email at techsupport seagullscientific com Unable to get image centered on the label See Adjust Alignment for Printing on page 38 to adjust the TOF and Right Edge Unable to print full bleed label printed image is smaller and does not print edge to edge Create the label in BarTender and be sure to select a Full Bleed label...

Page 59: ...the Rear Module on page 60 If the Printhead Carriage Cannot Move If the media is crushed under the printhead carriage and it is unable to move follow these steps 1 Press the Power button on the control panel to turn off the printer 2 Turn off the Power switch at the rear of the printer 3 Open the top cover of the printer 4 Carefully remove the jammed media from the path of the carriage If the carr...

Page 60: ...l to turn off the printer 2 Turn off the Power switch at the rear of the printer 3 Disconnect all the cables 4 Remove the rear module and clear any jammed media 5 Check that the rollers between the plates can move freely 3 3 a b c Disconnect cable from printer board Press latches down to release lifters d Gently remove any jammed media between the plates Release rear module ...

Page 61: ...Troubleshooting 61 6 Before reinstalling the rear module ensure the pinch plates are in the up position Pinch plate up Pinch plate down Turn gear to rotate pinch plates up if needed ...

Page 62: ...7 Reinstall the rear module a Lock the lifters b Reconnect cable to printer board 3 3 c Replace and secure the rear module Tuck the cable beside the printer board so it does not get caught when the rear module is replaced ...

Page 63: ...the Rear Module 1 Press the Power button on the control panel to turn off the printer 2 Turn off the Power switch at the rear of the printer 3 Remove the rear module 3 3 a b Disconnect cable from printer board Release rear module ...

Page 64: ... module a Press latches down to release lifters b Use a lint free cloth to clean You can lift the upper plate gently to reach the LED row on the upper plate c Use a lint free cloth to clean the clear plastic area on the lower plate the areas between the plates ...

Page 65: ...5 Reinstall the rear module a Lock the lifters b Reconnect cable to printer board 3 3 c Replace and secure the rear module Tuck the cable beside the printer board so it does not get caught when the rear module is replaced ...

Page 66: ...66 Troubleshooting ...

Page 67: ...67 Appendix Options on Printer Menu 68 Regulatory Information 70 ...

Page 68: ...rop Count Display ink drop count for each ink cartridge Maintenance Clean Printheads Run a cleaning cycle on the printheads Change Printhead Move printhead carriage to left side of printer so that a printhead can be replaced Firmware Version Display firmware version Set Label Threshold Make fine adjustments in line feed accuracy to compensate for differences in media and line opacity Read Metrics ...

Page 69: ...vanced Ink Limit Increase or decrease amount of ink used for printing Pass Through Mode Disable or enable pass through mode Label Counter Display number of labels printed and provide the option to reset the counter Set Password Set a password that will be required to reset the label counter Table 3 Menu options continued Menu Option Description ...

Page 70: ...d to comply with the limits for a Class A digital device pursuant to part 15 of the FCC Rules These limits are designed to provide reasonable protection against harmful interference when the equipment is operated in a commercial environment This equipment generates uses and can radiate radio frequency energy and if not installed and used in accordance with the instruction manual may cause harmful ...

Page 71: ...out where you can drop off equipment for recycling refer to the VIPColor website at www vipcolor com Material Safety Data Sheets Material Safety Data Sheets MSDSs can be obtained from the VIPcolor website at www vipcolor com VIPColor Environmental Policy Product VP4X5 is in compliance with the requirements of VIPColor Environmental Policy and has been assessed to ensure that the rate of recovery r...

Page 72: ...r materials have been designed to separate easily Fasteners and other connections are easy to locate access and remove using common tools The packaging materials for this device are selected to provide maximum protection for the least cost possible while attempting to minimize environmental impact and facilitate recycling The rugged design of the product assists in minimizing both packaging materi...

Page 73: ... button 11 error message 53 esc button 11 estimated ink levels 44 F FEED button 11 not working 51 flashing lights 50 full bleed labels 34 G gap media setting 31 I ink cartridge compartment cover 8 ink cartridges 16 failure 53 handling replace ink cartridges 44 storage 48 ink levels estimated 44 ink nozzles on printhead 18 install ink cartridges 16 install printer on network 25 install printheads 1...

Page 74: ...thead alignment 20 failure 53 printhead carriage 59 printhead latch 17 printheads 17 alignment 20 cleaning 45 replacing 46 storage 48 R rear module cleaning 63 error 55 removing media 60 Reflective Black Mark setting 31 regulatory information 70 remove ink cartridge 44 remove printer driver 42 remove printhead 46 replace ink cartridge 44 replace printhead 46 right edge adjustment 38 S Seagull Driv...

Reviews: