


Troubleshooting
67
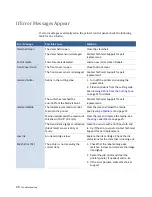
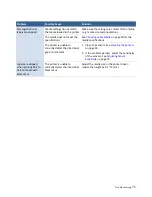
Mech Error [code]
where [code] <> 01
Printer mechanical fault.
Note the error code and contact Technical
Support.
If
Mech Error 2
or
Mech Error 3
appears
Do not attempt to restart the printer more
than 3 times if the same Mech Error
appears. Contact Technical Support.
Media Cover Open
The media cover is open.
Close media cover.
The cover sensor is damaged
Contact Technical Support for part
replacement.
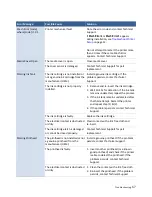
Missing Ink Tank
The ink cartridge is not installed or
not a genuine ink cartridge from the
manufacturer (OEM).
Install a genuine ink cartridge. If the
problem persists, contact Technical
Support.
The Ink cartridge is not properly
installed.
1. Remove and re‐insert the ink cartridge.
2. Wait 10‐15s for detection. If the ink tank
remains undetected, repeat the process.
3. If the ink tank remains undetected after
the third attempt. Restart the printer
and repeat step (1) & (2).
4. If the problem persists, contact Technical
Support.
The ink cartridge is faulty.
Replace the ink cartridge.
The electrical contact is obstructed
or dirty.
Clean contact with a lint free cloth and
re‐insert.
The ink cartridge latch is damaged
or cannot be closed properly.
Contact Technical Support for part
replacement.
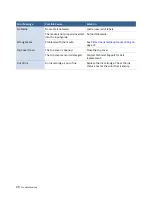
Missing Printhead
The printhead is not installed or not
a genuine printhead from the
manufacturer (OEM).
Install a genuine printhead. If the problem
persists, contact Technical Support.
The printhead is faulty.
1. Insert another printhead (or a known
good printhead) and check if the printer
is able to detect the printhead. If the
problem persists, contact Technical
Support.
The electrical contact is obstructed
or dirty
1. Clean the contact with a lint‐free cloth.
2. Re‐insert the printhead. If the problem
persists, contact Technical Support.
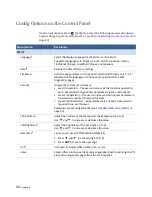
Error Message
Possible Cause
Solution
Summary of Contents for VP7 Series
Page 1: ...VIPColor U s e r G u i d e VP7xx Printer Series ...
Page 8: ......
Page 9: ......
Page 10: ......
Page 11: ......
Page 12: ......
Page 16: ......
Page 17: ......
Page 18: ......
Page 19: ......
Page 20: ......
Page 21: ......
Page 22: ......
Page 24: ......
Page 26: ......
Page 27: ......
Page 28: ......
Page 29: ......
Page 45: ......
Page 46: ......
Page 47: ......
Page 48: ......
Page 49: ......
Page 50: ......
Page 52: ......
Page 53: ......
Page 54: ......
Page 55: ......
Page 56: ......
Page 57: ......
Page 58: ......
Page 59: ......
Page 60: ......
Page 61: ......
Page 62: ......
Page 63: ......
Page 64: ......
Page 70: ......
Page 73: ......
Page 75: ......
Page 76: ...76 Troubleshooting ...
Page 78: ......
Page 83: ......


