background image

©  2008  Directed  Electronics-  All  rights  reserved.

21

System Features menus

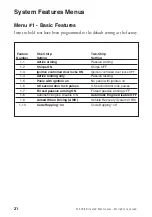
menu #1 - Basic Features

Items in bold text have been programmed to the default setting at the factory.


Feature  

One Chirp   

Two-Chirp   


 Number 

Setting 

Setting


1-1 

Active arming


Passive arming


1-2 

Chirps ON


Chirps OFF


1-3 

Ignition controlled door locks ON


Ignition controlled door locks OFF


1-4 

Active locking only 


Passive locking


1-5 

Panic with ignition on


No panic with ignition on


1-6 

0.8 second door lock pulses


3.5 second door lock pulses


1-7 

Forced passive arming ON


Forced passive arming OFF


1-8 

Automatic Engine Disable ON 

Automatic Engine Disable OFF


1-9 

Armed When Driving (AWD) 


Vehicle Recovery System (VRS)

  1-10 

Code Hopping

 on


Code Hopping

 off

Summary of Contents for 350 Plus

Page 1: ...sional installer only Any attempt to install this product by any person other than a trained professional may result in severe damage to a vehicle s electrical system and components 350 Plus Installation Guide 2008 Directed Electronics Vista Ca N3105V 2008 12 ...

Page 2: ...ite Lite Nuisance Prevention Circuitry NPC Revenger Silent Mode Soft Chirp Stinger Valet Vehicle Recovery System VRS and Warn Away are all Trademarks or Registered Trademarks of Directed Electronics Inc The Bitwriter p n 998T requires chip version 2 4 or newer to program this unit ...

Page 3: ... Flash Jumper 16 Bypassing Sensor Inputs 17 System Features Learn Routine 18 System Features Menus 21 Menu 1 Basic Features 21 Menu 2 Advanced Features 22 Feature Descriptions 22 Menu 1 Basic Features 22 Menu 2 Advanced Features 24 Transmitter Receiver Learn Routine 27 Transmitter Configurations 30 Standard Configuration 30 Three button configuration Optional not included 30 Diagnostics 31 Arm Dis...

Page 4: ...tput Primary Harness Wiring Instructions This guide describes in detail the connection of each wire Also included are possible applications of each wire This system was designed with the ultimate in flexibility and security in mind Many of the wires have more than one possible function Please read carefully to ensure a thorough understanding of this unit H1 1 ORANGE ground when armed output This w...

Page 5: ...tion of this installation guide this wire supplies a 200 mA output Note For parking light systems that draw 10 amps or more the jumper must be switched to a light flash output see the Programming Jumpers section of this guide P N 8617 or a standard automotive SPDT relay must be used on the H1 2 light flash output wire IMPORTANT DO NOT connect this wire to a negative vehicle light flash wire before...

Page 6: ...nnel three button s is pressed and released The signal will continue until channel three is pressed again A latched reset with ignition output works similar to the latched output but will also reset output will stop when the ignition is turned on and then off A 30 second timed output will send a signal for 30 seconds when channel three is pressed This output can be shut off during the 30 second pe...

Page 7: ...ANT This output is only intended to drive a relay It cannot be connected directly to the domelight circuit as the output cannot support the current draw of one or more bulbs H1 5 GREEN door trigger input Most vehicles use negative door trigger circuits Connect the green wire to a wire showing ground when any door is opened When connecting to newer model vehicles there is generally a need to use in...

Page 8: ...me circuit is used in many Ford products Connect the violet wire to a wire that shows 12V when any door is opened This wire will report Zone 3 NOTE If using a door trigger wire that has a delay Advanced Menu 2 feature 6 or the 998T Bitwriter can be used to turn Bypass Notification off H1 8 BLACK chassis ground connection Connect this wire to a clean paint free sheet metal location driver kick pane...

Page 9: ...the starter kill relay and must show 12 volts with the key in RUN position and during cranking Take great care that this wire cannot be shorted to the chassis at any point H1 10 BROWN siren output Connect this to the RED wire of the Revenger siren Connect the BLACK wire of the siren to chassis ground preferably at the same point you connect the control module s BLACK ground wire ...

Page 10: ...se This fuse protects the module itself H1 12 RED WHITE 200 mA channel 2 output When the system receives the code controlling channel 2 for longer than 1 5 seconds the RED WHITE will supply an output as long as the transmission continues This is often used to operate a trunk hatch release or other relay driven function IMPORTANT Never use this wire to drive anything but a relay or a low current in...

Page 11: ...mportant The door lock outputs are low current and should not be attached directly to any high current device they are only to be used to activate relays For detailed instructions about connecting to the vehicle s power door lock systems refer to the Door Lock Wiring guide Document No 1041 available to authorized dealers only from the technical resources listed at the front of this guide ...

Page 12: ...can be substituted with an optional outboard LED P N 8634 for Blue LED and 8633 for red LED The LED fits into a 9 32 inch mounting hole Be sure to check for clearance prior to drilling the mounting hole You can also substitute an external valet switch for the Control Center valet switch P N 8631 is a 5 pack of these switches Valet switch LED Important With the Control Center more customers will wa...

Page 13: ...r is centered high on either the front or rear windshield For optimal range the antenna should be mounted verti cally It can be mounted horizontally in relation to the windshield or under the dashboard away from metal but range will be diminished Metallic window tint can also affect range so this should be a consideration when determining the mounting location After determining the best mounting l...

Page 14: ...l stage shock sensor inside the control unit Adjustments are made via the rotary control as indicated in the diagram Since the shock sensor does not work well when mounted firmly to metal we do not recommend screwing down the control module The full trigger of the on board shock sensor reports Zone 2 See Table of Zones section of this guide Note When adjusting the sensor it must be in the same mou...

Page 15: ...RED 12V Constant and BLACK Ground These wires supply constant 12 volts and ground to the optional sensor BLUE GREEN Multiplex Input These wires are multiplex inputs If a input of less than 0 8 seconds is supplied to either wire the Warn Away response will occur A input of longer than 0 8 seconds to either wire will initiate the triggered sequence and report Zone 4 ...

Page 16: ...e H1 2 will supply a 200 mA output suitable for driving factory parking light relays NOTE For parking light circuits that draw 10 amps or more the jumper must be switched to a light flash output P N 8617 or a standard automotive SPDT relay must be used on the H1 2 light flash output harness wire Important DO NOT connect the H1 2 light flash wire to a negative vehicle light flash wire before changi...

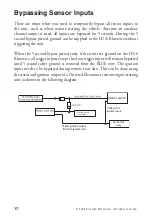
Page 17: ...riggering the unit When the 5 second bypass period ends if the unit sees ground on the H1 6 Blue wire all trigger inputs except the door trigger input will remain bypassed until 5 seconds after ground is removed from the BLUE wire The ignition input needs to be bypassed during remote start also This can be done using the status and ignition output of a Directed Electronics remote engine starting u...

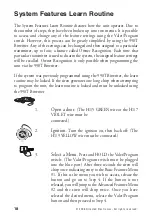
Page 18: ...iter If the system was previously programmed using the 998T Bitwriter the learn routine may be locked If the siren generates one long chirp when attempting to program the unit the learn routine is locked and must be unlocked using the 998T Bitwriter 1 Open a door The H1 5 GREEN wire or the H1 7 VIOLET wire must be connected 2 Ignition Turn the ignition on then back off The H1 9 YELLOW wire must be...

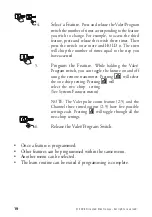
Page 19: ...eature While holding the Valet Program switch you can toggle the feature on and off using the remote transmitter Pressing will select the one chirp setting Pressing will select the two chirp setting See Systems Features menus NOTE The Valet pulse count feature 2 5 and the Channel three timed output 2 9 have five possible settings each Pressing will toggle through all the two chirp settings 6 Relea...

Page 20: ...hen press it once more and hold it The siren would chirp seven times to confirm access to the seventh feature To select another menu Press and hold the Valet Program switch After three seconds the unit will advance to the next menu and the siren will chirp indicating which menu has been accessed For instance if you just programmed some features in Menu 1 Basic Features and you wish to program a fe...

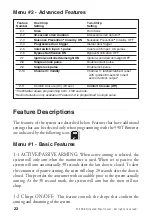
Page 21: ... 2 Chirps ON Chirps OFF 1 3 Ignition controlled door locks ON Ignition controlled door locks OFF 1 4 Active locking only Passive locking 1 5 Panic with ignition on No panic with ignition on 1 6 0 8 second door lock pulses 3 5 second door lock pulses 1 7 Forced passive arming ON Forced passive arming OFF 1 8 Automatic Engine Disable ON Automatic Engine Disable OFF 1 9 Armed When Driving AWD Vehicle...

Page 22: ...ort Closure Off The Bitwriter allows programming from 1 180 seconds Second unlock is only available if Feature 2 8 is programmed to single pulse Feature Descriptions The features of the system are described below Features that have additional settings that can be selected only when programming with the 998T Bitwriter are indicated by the following icon Menu 1 Basic Features 1 1 ACTIVE PASSIVE ARMI...

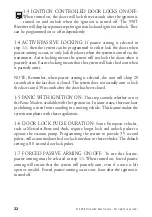
Page 23: ... 20 seconds after the last door is closed The system does not actually arm or lock the doors until 30 seconds after the door has been closed 1 5 PANIC WITH IGNITION ON This step controls whether or not the Panic Mode is available with the ignition on In some states there are laws prohibiting a siren from sounding in a moving vehicle This feature makes the system compliant with these regulations 1 ...

Page 24: ...o change its code each time the transmitter and receiver communicate This makes the group of bits or word from the transmitter very long The longer the word is the easier it is to block its transmission to the unit Disabling the Code Hopping feature lets the receiver ignore the Code Hopping part of the transmitted word As a result the unit may have better range with Code Hopping off Menu 2 Advance...

Page 25: ...chirp 10 times prior to the full triggered sequence The door trigger is still treated as an instant trigger and closing the door quickly will not prevent a full triggered sequence from occurring If the progressive door trigger is programmed off the full siren output will occur the moment the door is opened 2 5 VALET PULSE COUNT ONE TO FIVE PULSES The system can beprogrammedtocountthenumberpresseso...

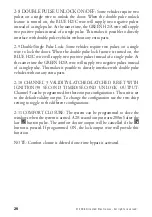
Page 26: ...stead of a single pulse At the same time the GREEN H2 A wire will supply two negative pulses instead of a single pulse This makes it possible to directly interface with double pulse vehicles without any extra parts 2 10 CHANNEL 3 VALIDITY LATCHED LATCHED RESET WITH IGNITION 30 SECOND TIMED SECOND UNLOCK OUTPUT Channel 3 can be programmed for these output configurations The unit is set to the defau...

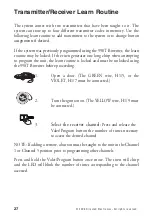
Page 27: ...empting to program the unit the learn routine is locked and must be unlocked using the 998T Bitwriter before proceeding 1 Open a door The GREEN wire H1 5 or the VIOLET H1 7 must be connected 2 Turn the ignition on The YELLOW wire H1 9 must be con nect ed 3 Select the receiver channel Press and release the Valet Program button the number of times nec es sary to access the desired channel NOTE If ad...

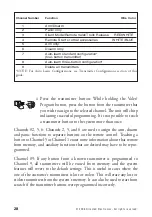
Page 28: ... successful programming It is not possible to teach a transmitter button to the system more than once Channels 2 5 6 Channels 2 5 and 6 are used to assign the arm disarm and panic functions to separate buttons on the remote control Teaching a button to Channel 5 or Channel 1 erases some information about that remote from memory and auxiliary functions that are desired may have to be repro grammed ...

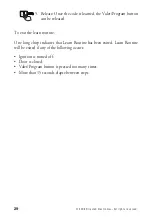
Page 29: ...gram button can be released To exit the learn routine One long chirp indicates that Learn Routine has been exited Learn Routine will be exited if any of the following occurs Ignition is turned off Door is closed Valet Program button is pressed too many times More than 15 seconds elapse between steps ...

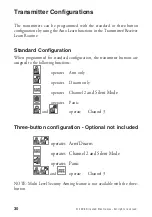
Page 30: ...nfiguration When programmed for standard configuration the transmitter buttons are assigned to the following functions operates Arm only operates Disarm only operates Channel 2 and Silent Mode operates Panic and operate Channel 3 Three button configuration Optional not included operates Arm Disarm operates Channel 2 and Silent Mode operates Panic and operate Channel 3 NOTE Multi Level Security Arm...

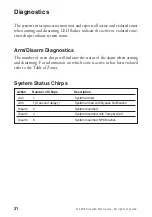
Page 31: ...atus Arm Disarm Diagnostics The number of siren chirps will indicate the status of the alarm when arming and disarming For information on which zone is active or has been violated refer to the Table of Zones System Status Chirps Action Number of Chirps Description Arm 1 System armed Arm 1 3 second delay 1 System armed with Bypass Notification Disarm 2 System disarmed Disarm 4 System disarmed with ...

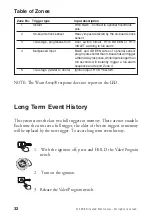
Page 32: ...secondswilltrigger aWarnAwayresponse whileinputslongerthan 0 8 seconds will instantly trigger a full alarm sequence and report Zone 4 5 Two stage similar to doors Ignition input H1 9 YELLOW NOTE The Warn Away response does not report on the LED Long Term Event History The system stores the last two full triggers in memory These are not erasable Each time the unit sees a full trigger the older of t...

Page 33: ...l flash for one minute or until the ignition is turned off NOTE The Warning Zone triggers are not stored to memory and will not be reported Multi Level Security Arming Multi Level Security arming allows the operator to select which inputs and sensors are active during a particular arming cycle For a full description of Multi Level Security Arming operation for testing purposes refer to the owner s...

Page 34: ...Prevention Circuitry Nuisance Prevention Circuitry bypasses any zone that triggers the system more than three times within a one hour period For a full description of NPC opera tions refer to the owner s manual Important When testing the systems sensor and trigger inputs reset NPC by turning on the ignition after every third system trigger Rapid Resume Logic Rapid Resume Logic ensures that the whe...

Page 35: ...k this turn the ignition key on and off to clear the NPC from memory and then retest the shock sensor For a detailed description of NPC see Owner s Guide Door input does not immediately trigger full alarm Instead I hear chirps for the first three seconds That s how the progressive two stage door input works This is the instant response feature of this system Even if the door is closed immediately ...

Page 36: ...at the impact sensor caused the trigger the sensor may be detecting the door opening Reducing the sensitivity or relocating the sensor can often solve this problem If the LED indicates that the door caused the trigger you may have programmed the progressive door trigger off See Feature 2 4 in the Feature Descriptions section of this guide The Valet button doesn t work Is it plugged into the correc...

Page 37: ... 2008 Directed Electronics All rights reserved 37 Blue 2 pin plug valet switch plug from 6111T 6111T control center White 2 pin LED plug from 6111T ...

Page 38: ......

Page 39: ......

Page 40: ...N3105V 2008 12 Vista CA 92081 www directed com 2008 Directed Electronics All rights reserved ...

Reviews: