background image


meat. Skip a couple and continue 
the process until the entire rack is 
accordion pleated. Fasten the 
second meat hook into the rack. 
Turn your rotis burner on high. 
Rotis for 50 minutes or until done. 
 

PORK ROAST 


Apple cider vinegar basting sauce: 
1 c. apple cider vinegar 
6 oz. water 
½ stick butter 
Salt, pepper, parsley and garlic 
seasoning 
2 oz. lemon juice 
10 lbs. pork roast 
 
Time: 1-1/2 hours to 2 hours 
Bring pork to room temperature 
before placing it on the spit rod. 
Place on the rod and test for 
balance. Light rotis burner. Turn 
control knob to high. Use the 
above basting sauce for rotisserie. 
 

TURKEY 


12 lb. turkey 
Beer basting sauce: 
1 can beer 
12 oz. water 
1 stick butter 
1 tsp. salt 
1 tsp. pepper 
½ tsp. garlic flakes 
1 tsp. parsley 
 
Thaw the bird completely. Wash 
inside out. Securely tie the legs 
and wings. Light rotis burner. Turn 
to high. Combine all the 
ingredients for basting sauce in a 
shallow pan. Place it under the 
turkey 15 to 20 minutes. Cook for 
approximately 3 hours. The 
basting sauce combined with 
turkey drippings makes a delicious 
gravy. 

23 

Summary of Contents for 720-0070

Page 1: ...ASSEMBLY OPERATING INSTRUCTIONS FOR OUTDOOR GAS GRILL FOR MODEL 720 0070 LP OUTDOOR GRILL ...

Page 2: ...gas and wish you many years of enjoyment Note This appliance is NOT intended to be installed in or on recreational vehicles or boats PLEASE RETAIN THIS MANUAL FOR FUTURE TABLE OF CONTENTS SECTION ONE SECTION FIVE Precaution 2 3 Care and Maintenance 14 Placement of The Grill 3 Troubleshooting 15 SECTION TWO SECTION SIX Assembly Instruction 4 9 Grill Parts List 16 17 SECTION THREE SECTION SEVEN Gas ...

Page 3: ...s appliance basic safety practices must be followed including the following Read this Care and Use Manual carefully and completely before using your grill to reduce the risk of fire burn hazard or other injury Begin by ensuring proper assembly Do not repair or replace any part of the grill unless specifically recommended in this manual All other service should be referred to a qualified technician...

Page 4: ...te the grill under unprotected combustible construction Use only in well ventilated areas Do not use in buildings garages sheds breezeways or other such enclosed areas THIS UNIT IS FOR OUTDOOR USE ONLY Keep the area surrounding the grill free from combustible materials trash or combustible fluids and vapors such as gasoline or charcoal lighter fluid Do not obstruct the flow of combustion and venti...

Page 5: ...ion Quantity 1 Truss head screw 1 4 20 1 1 2 inch 12pcs 2 Truss head screw 1 4 20 1 2 inch 18pcs Step 1 Remove side panel marked L and two 3 casters from the carton Put two casters and side panel marked L together with provided wrench Repeat this figure for the right side panel Step 2 Assemble bottom panel to side panels with 8 pieces of Truss Head 20 x 1 1 2 screws Follow the mark L and R accordi...

Page 6: ...rst align with the door bracket then with top of the 2 side panels use the four pieces 1 4 20X11 2 screws for the both side panels Step 4 Remove the upper portion of grill from carton A Slide in the upper portion of the grill onto the cart as shown below 5 ...

Page 7: ...rtion of the grill to the cart with Truss head 20 x Screw in 4 corners of the grill housing Make sure 4 screws are tight Step 6 Assemble the back panel with 4 pieces of Truss head 1 4 20x 1 2 screw Truss Head Screw 1 4 20 1 2 6 ...

Page 8: ...e right side of grill housing and screw through the holes in the side burner grate and tighten into the grill housing as per the diagram below Repeat this step for the side shelf Step 8 Place two flame tamers cooking grids warming rack and grease tray as shown below 7 ...

Page 9: ... place the Motor onto the motor bracket and last assemble the rotisserie as the figure shows Step 10 To install the battery turn the ignition button housing counterclockwise and remove it The rotisserie burner ignition switch uses an AAA size battery Please keep the positive pole facing toward you Replace the ignition button housing after batteries are installed 8 ...

Page 10: ...Your gas grill is ready to use 9 ...

Page 11: ... gas supply cylinder please follow the steps below 1 Make sure tank valve is in its full off position turn clockwise to stop 2 Check tank valve to assure it has proper external male threads type 1 connection per ANSIZ21 81 3 Make sure all burner valves are in their off position 4 Inspect valve connections port and regulator assembly Look for any damage or debris Remove any debris Inspect hose for ...

Page 12: ...led and must not be stored in a building garage or any other enclosed area The gas must be turned off at the supply cylinder when the unit is not in use If the appliance is stored indoors the cylinder must be disconnected and removed from the appliance Cylinders must be stored outdoors in a well ventilated area out of the reach of children Gas flow check Each grill burner is tested and adjusted at...

Page 13: ...lb cut of meat or poultry The motor slides onto the metal motor mount The rotisserie motor must be electrically grounded in accordance with local codes or in the absence of local codes with the National Electrical Code ANSI NFPA 70 1990 The skewer for the rotis is assembled into the motor assembly by placing the pointed end into the motor and resting the grooved bushing on the support at the oppos...

Page 14: ...F If the igniter does not function the burner can be lit by holding a lit match to the burner with the control knob at HI Keep a spray bottle of soapy water near the gas supply valve and check the connections before each use Do not attempt to light the grill if odor of gas is present Call for service 1 800 913 8999 USING THE SIDE BURNER WARNING IMPORTANT USING THE SIDE BURNER Inspect the gas suppl...

Page 15: ...ER CLEANING Clean the exterior of the burner with a wire brush Clear any clogged burner ports with a straightened paper clip Never enlarge the burner ports Never use a wooden toothpick as it may break off the clog the port GREASE TRAY CLEANING The grease tray should be emptied and wiped down periodically and washed in a mild detergent and warm water solution A small amount of sand or cat litter ma...

Page 16: ... tip of the igniter when the button is pressed You should also hear a repeating click If there is no spark and no click replace the battery under the ignition button housing If you replace the battery and there is still no sparks can you match light the burner If the burner lights with a match you can continue operating the grill but you will need to call our customer service line to repair the el...

Page 17: ...Parts List ILLUSTRATED PARTS BREAKDOWN Model 720 0070 LP Outdoor Gas Grill 16 ...

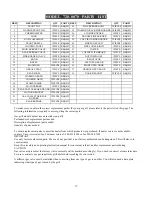
Page 18: ...20 REAR BAFFLE REAR BURNER 3PIECES BBQ020 21 MOTOR BRACKET 2PIECES BBQ021 22 GAS COLLECTOR REAR BURNER 3PIECES BBQ022 23 REAR BURNER 2PIECES BBQ023 To make sure you obtain the correct replacement part s for your gas grill please refer to the parts list on this page The following information is required to assure getting the correct part Gas grill model number see data sticker on grill Part number ...

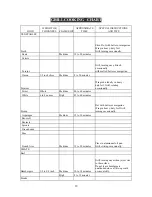
Page 19: ...in heavy duty foil Grill rotating occasionally Sweet Whole Medium 40 to 60 minutes White 6 to 8 ounces High 45 to 60 minutes Frozen Dot with butter or margarine Wrap in heavy duty foil Grill turning occasionally Asparagus Medium 15 to 30 minutes Broccoli Brussels Sprouts Green beans Peas French fries Medium 15 to 30 minutes Place in aluminum foil pan Grill stirring occasionally MEATS Beef Hamburge...

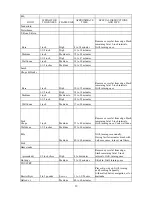
Page 20: ...um to 13 to 20 minutes 1 1 2 inch High 18 to 25 minutes Well done 1 inch Medium 17 to 30 minutes Pork Chops 1 inch Medium 15 to 40 minutes Remove excess fat from edge Slash remaining fat at 2 inch intervals Grill turning once Cook well done Well done 1 1 2 inches Medium 25 to 60 minutes Ribs Medium 40 to 60 minutes Grill turning occasionally During last few minutes brush with barbecue sauce turn s...

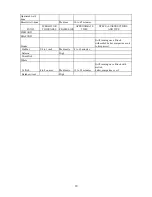
Page 21: ...NSTRUCTIONS AND TIPS FISH AND SEAFOOD Steaks Grill turning once Brush withmelted butter margarine or oil to keep moist Halibut 3 4 to 1 inch Medium to 8 to 15 minutes Salmon High Swordfish Whole Catfish 4 to 8 ounces Medium to 12 to 20 minutes Grill turning once Brush with melted butter margarine or oil Rainbow trout High 20 ...

Page 22: ...he marinade In the meantime sauté onions from the marinade in butter in a skillet on your side burner for 3 minutes To serve slice steak diagonally into thin slices sprinkle onions over top Garnish with vegetable kabobs BAKED CHILI CORN 6 medium ears corn husked 3 tbs Butter or margarine melted Dash ground cumin Dash ground coriander About hour before cooking turn the butter on for grill Place eac...

Page 23: ...uce 2 tsp oil and the next 8 ingredients until smooth Pour over meat cubes and marinate about 4 hours turning occasionally Drain and reserve marinade Onto to four 12 skewers alternately thread meat pepper banana and mushrooms Preheat grill Brush the kabobs with oil Grill 7 8 minutes each side Bring marinade to boil on the side burner in a saucepan Add remaining 1 3 c water and peanut butter Stir t...

Page 24: ...rature before placing it on the spit rod Place on the rod and test for balance Light rotis burner Turn control knob to high Use the above basting sauce for rotisserie TURKEY 12 lb turkey Beer basting sauce 1 can beer 12 oz water 1 stick butter 1 tsp salt 1 tsp pepper tsp garlic flakes 1 tsp parsley Thaw the bird completely Wash inside out Securely tie the legs and wings Light rotis burner Turn to ...

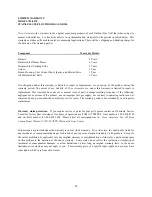
Page 25: ...ly use contrary to operating instructions or alteration by any person other than our factory service center The warranty period is not extended by such repair or replacement Warranty claim procedure If you require service or parts for your grill please contact our Warranty Service Center for factory direct assistance Our hours of operation are 8 AM to 5 PM PST Our number is 1 909 598 8799 and our ...

Reviews: