4
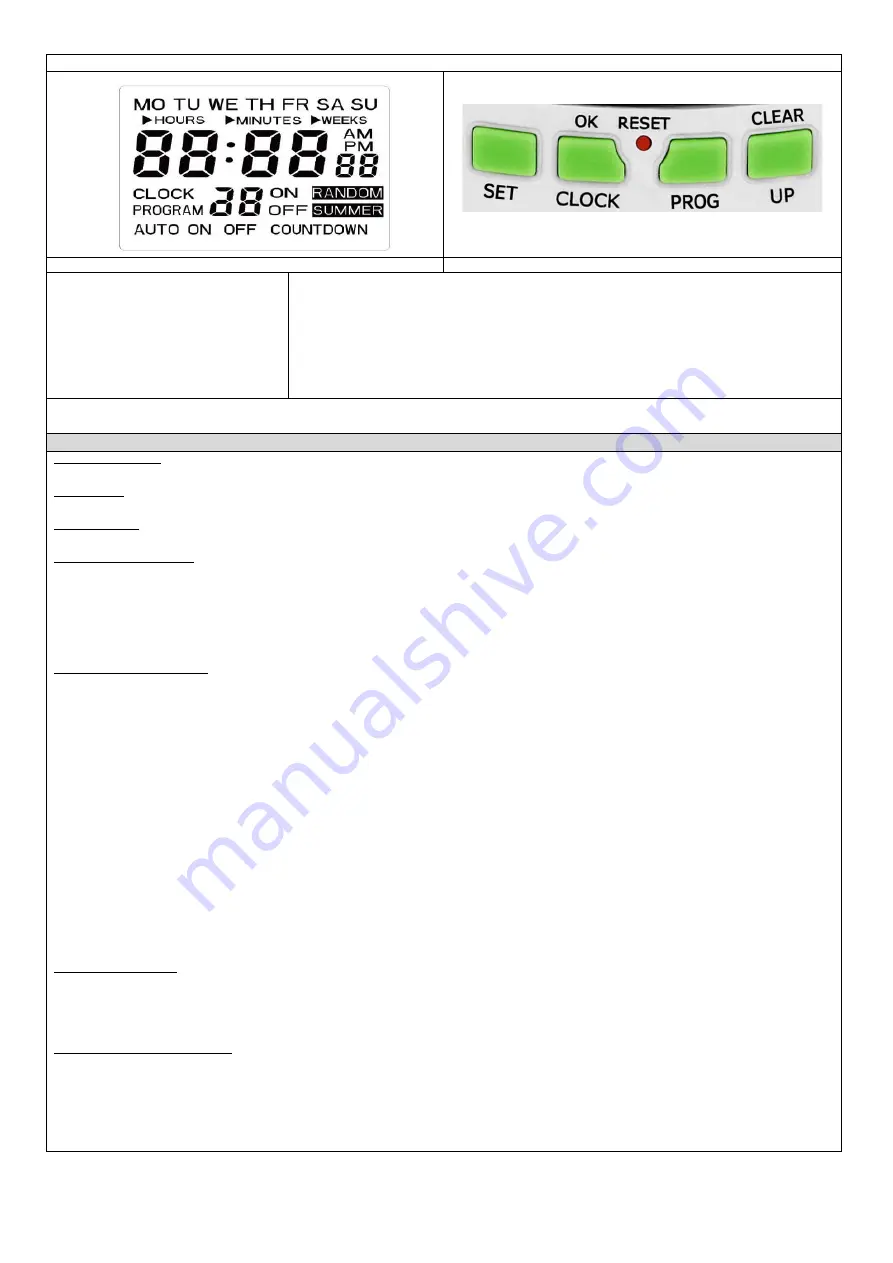
1. LCD DISPLAY AND FUNCTIONAL BUTTONS
rys. 1 LCD Display
rys. 2 Functional buttons
1.2 Clock display:
HOUR
MINUTE
WEEK
1.1 Description of buttons
SET
–
the button activates the parameter setting mode for individual functions and is used to change the operating
mode ON - AUTO - OFF
CLOCK
–
the button is used to enter the clock setting mode
PROG
–
the button is used to enter the programming mode
UP
–
the button is used to set the parameters of the function
CLEAR
–
the button is used to delete the setting
OK
–
button to confirm the settings
RESET
–
resetting all settings
2. SETTINGS:
When the device is connected to the network for about 3 seconds, all LCD screen fields will light up (Fig. 1).
IMPORTANT:
Before first use, place the device in socket for at least 30 minutes to charge the battery. Press the RESET button before programming.
2.1 CLOCK SETTINGS:
Press “CLOCK” button more than 3 seconds, and it will enter into clock setting mode.
1) Time setting
Press “SET” button, the triangle before “HOURS” will blink, then press “UP” button to set the hours (range 0
-24).
2) Minutes setting
Press “SET” button again, the triangle before “MINUTES” will blink, then press “UP” button to set the minutes (range 0
-60).
3) Setting the day of the week
Press “SET” button once more, the triangle before “WEEKS”will blink, then press “UP” button to set the week, successively
MO-TU-WE-TH-FR-SA-SU
4) Press “OK” button to enter into clock mode
5) Press “CLOCK”+“SET” buttons, you can choose SUMMER TI
ME or WINTER TIME
6) Press” CLOCK”+“PROG” buttons, you can choose 24 Hours Time or 12 Hours Time
2.2 TIMER PROGRAM SETTING:
1) Press “PROG” button, it will enter into timer program setting mode, you can set 16 groups ON and OFF timer program.
2)
Press “SET” button for setting 1st program ON time, the triangle before “HOURS” will blink, then press “UP” button to set the
hours.
3) After finishing “HOURS” setting, pls press “SET” button again, the triangle before “MINUTES” will blink, then press “UP”
button to set the minutes.
4) After finishing “MINUTES” setting, press “SET” button once more, the triangle before “WEEKS” will blink, then press “UP” b
utton to set the week.
You can set the following day of the week combinations:
of individual days MO→TU→WE→TH→FR→SA→SU
Monday, Tuesday, Wednesday, Thursday, Friday MO TU WE TH FR
weekend (Saturday, Sunday) →SA SU→
Monday to Saturday MO TU WE TH FR SA
Monday, Wednesday, Friday MO WE FR
Tuesday, Thursday, Saturday TU TH SA
Monday, Tuesday, Wednesday MO TU WE
Thursday, Friday, Saturday TH FR SA
all week from Monday to Sunday MO TU WE TH FR SA SU
5) After finishing above all operation, press “PROG” button to enter into 1st program OFF time setting. If you want set next
group program ON and OFF time, continue
to
press “PROG” button, and do as above operation.
6) After finishing all timer program setting, press “OK” button to enter into clock mode.
7) If you want the timer will be turned on some times later, press “SET” button to change “OFF” mode into “AUTO” mode
; if you want the timer will be turned off some
times later, press “SET” button to change “ON” mode into “AUTO” mode.
8) If you want to cancel set timer program, press “PROG” button to select that one, and then press “CLEAR” button for canceli
ng.
2.3 RANDOM FUNCTION
Random function is only activated from PM6:00 to AM6:00, If you want start this function, except choosing the AUTO mode, you should set a timer program, and the
timer program shoulld be within the range (PM6:00 to AM6:00).
1) Press “SET” and “UP” button at the same time, Random function will be activated.
2) If you want to cancel Random function, pls press “SET” and “UP” button at the same time,then the letters “RANDOM” on LCD w
ill disappear.
2.4 COUNT DOWN TIME FUNCTION
The countdown function only works in "ON" and "OFF" modes and does not work in RANDOM mode.
1) Press “UP” and “PROG” button at the same time, and it will enter into countdown time setting mode.
2) Press “SET” button, the triangle before “HOURS” will blink, then press “UP” button to set the hours (0
-99).
3) After finishing “HOURS” setting, press “SET” button again, the triangle before “MINUTES” will blink, then press “UP” butto
n to set the minutes(0-59).
4) After finishing above all operation, press “OK” button
to enter into countdown time mode.
5) If you want to cancel countdown time function, press “UP” and “PROG’ at the same time, the letters “COUNTDOWN” on LCD will
disappear, and then it will return to
clock mode.


