3: Installing a GW6500 Series router
Virtual Access GW6500 Series Quick Start Guide
© Virtual Access Ltd.
Issue: 1.0
Page 6 of 16
3
Installing a GW6500 Series router
3.1
Installing a GW6510 router on an ADSL connection
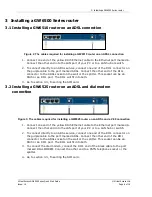
Figure 2: The cables required for installing a GW6510 router on an ADSL connection
1.
Connect one end of the yellow RJ45 Ethernet cable to the Ethernet port marked A.
Connect the other end into the LAN port of your PC or to a LAN hub or switch.
2.
To connect directly to an ADSL service, connect one end of the RJ11 connector on
the purple cable to the port marked ADSL. Connect the other end of the RJ11
connector to the ADSL socket on the wall or the splitter. This socket can be an
RJ45 or an RJ11 port. The RJ11 will fit into both.
3.
Go to section 3.3, ‘Inserting the SIM card.
3.2
Installing a GW6525 router on an ADSL and dial modem
connection
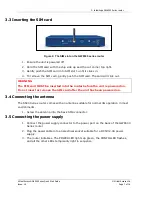
Figure 3: The cables required for installing a GW6525 router on an ADSL and a V.90 connection
1.
Connect one end of the yellow RJ45 Ethernet cable to the Ethernet port marked A.
Connect the other end into the LAN port of your PC or to a LAN hub or switch.
2.
To connect directly to an ADSL service, connect one end of the RJ11 connector on
the purple cable to the port marked ADSL. Connect the other end of the RJ11
connector to the ADSL socket on the wall or the splitter. This socket can be an
RJ45 or an RJ11 port. The RJ11 will fit into both.
3.
To connect the dial modem, connect the RJ11 end of the black cable to the port
marked DIAL MODEM. Connect the other end to a PSTN telephone socket or the
splitter.
4.
Go to section 3.3, ‘Inserting the SIM card.


