2: Physically installing the GW8600 SMG
Installing and Configuring the GW8600 SMG
© Virtual Access Ltd.
Issue 1.1
Page 6 of 12
1.
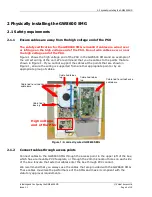
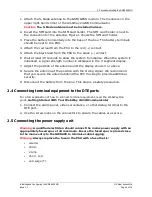
Attach the S-blade antenna to the GSM/GPRS module. The module is on the
upper right-hand corner of the WebWay 2424B Communicator.
Caution:
The S-blade antenna must be installed indoors.
2.
Insert the SIM card into the SIM card holder. The SIM card holder is next to
the connection for the antenna. Figure 1 shows the SIM card holder.
3.
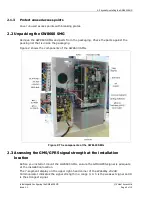
Place the battery horizontally into the base of the box. The battery terminals
should be next to the PSU.
4.
Attach the red lead from the PSU to the red (+) contact.
5.
Attach the black lead from the PSU to the black (–) contact.
6.
Wait at least 30 seconds to allow the system to initialise. When the system is
initialised, a signal strength number is displayed in the 7-segment display.
7.
Adjust the position of the antenna until the display shows 3 or above.
8.
Secure the antenna at the position with the strong signal. We recommend
that you secure the antenna behind the PVC trucking to provide additional
security.
9.
Disconnect the battery from the box. This step is a safety precaution.
2.4
Connecting terminal equipment to the DTE ports
For a full explanation of how to connect terminal equipment, read the WebWayOne
guide,
Getting Started With Your WebWay 2424B Communicator
.
1.
Connect the alarm panel, video surveillance, or other dialup terminal to the
DTE port.
2.
Use the screw locks on the connectors to ensure the cables are secure.
2.5
Connecting the power supply unit
Warning:
A qualified electrician should connect the mains power supply with an
appropriately fused spur of 3A maximum. Ensure the fused spur is placed close
to the mains entry to the GW8600 to minimise cable tugging.
Warning:
Always replace the fuse in the PSU with a fuse that is:
•
ceramic
•
20mm
•
2 Amp
•
250 V, and
•
anti-surge (T).


