background image

13

off. The switch must be set back into the stop position 
before turning on the tool again. 

Progressive start up.

It allows the tool to be started at low speed and increase 
speed gradually. The axle turns on and speeds up gradually 
without jerking until the set speed is reached.

Constant speed.

The turning speed remains constant regardless of the 
pressure on the working surface.  Constant turning speed 
ensures optimum sanding quality.

Speed selector.

The speed selecting knob 17 allows the user to select 
the appropriate turning speed (it can be changed even 
during operation). The user can test and select the desi-
red working speed depending on the working material. 
If you have been operating this tool at low speed for 
a long time, 3-minute cooling time should be allowed.  
To cool the machine down, set the speed selecting knob 
at the top speed position and make the tool work idle.

9. RECOMMENDED USE FOR THIS POWER TOOL

Choose the right brush.

Select the most appropriate brush (nylon, metal, sand 
paper…) for the job.  
The intended use for each brush type should be indi-
cated on its packaging. You may also ask your supplier 
for guidance. 

General recommendations.

Turn on the tool and let it turn at the selected speed.  
Then, slowly bring the brush 26 onto the working piece.  
Do not apply exceeding pressure on the tool. Excess of 
pressure will not produce better results and you may 
cause the motor to overload as well as premature brush 
wear. Move the tool at moderate constant speed. Do not 
make sudden movements or fluctuations. It is strongly 
recommended that you make a test on a trial surface 
in order to determine the recommended turning speed. 
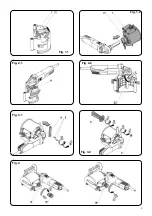
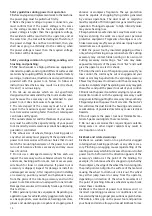
Regulate the position of the wheel 12 as the brush is 
being worn out (Fig. 5).

10. MAINTENANCE

Unplug the machine from the main before 

starting any maintenance procedures. 

Tool cleaning procedures.

For a long life of this tool, it must be properly main-
tained and cleaned. 
When working with metal, conducting dust may gather 
inside the tool. Blow compressed air through the vent 

slots 1 to clean this tool regularly. When working with 
resinous materials, dust may stick onto some of the tool 
parts. For that type of jobs, it will be necessary:
- To verify that the inside of the protective guard 7 
is clean.
- To keep the rollers 12 and 15 clean. Their surface must 
be clean, and they must rotate freely.
- Check that the dust exhaust outlet 16 is free from 
any obstructions.
- Check the vent slots 1, particularly at the lower part 
of the tool and remove any obstructions. 
Properly clean the above-mentioned components and 
remove any obstructions as required.

11. OPTIONAL ACCESSORIES

6291214 nylon roller for satin finish 


6291216 Sand paper flap wheel for metal sanding 
6291217 Scotch wheel for metal polishing
6291215 Metal wheel for deburring old hardened wood 
1746245 5 m dust collector coupling                                           
6446073 2.25 m dust collector coupling

12. NOISE AND VIBRATION LEVEL

The noise and vibration levels of this device have been 
measured in accordance with European standard EN 
60745-2-3 and EN 60745-1 and serve as a basis for 
comparison with other machines with similar applications.
The indicated vibration level has been determined for 
the device’s main applications and may be used as 
an initial value for evaluating the risk presented by 
exposure to vibrations. However, vibrations may reach 
levels that are quite different from the declared value 
under other application conditions, with other tools or 
with insufficient maintenance of the electrical device 
or its accessories, reaching a much higher value as a 
result of the work cycle or the manner in which the 
electrical device is used.
Therefore, it is necessary to establish safety measures 
to protect the user from the effects of vibrations, 
such as maintaining both the device and its tools in 
perfect condition and organising the duration of work 
cycles (such as operating times when the machine is 
subjected to loads, and operating times when working 
with no-load, in effect, not in use, as reducing the 
latter may have a considerable effect upon the overall 
exposure value).

13. WARRANTY

All VIRUTEX power tools are guaranteed for 12 months 
from the date of purchase, excluding any damage which 
is a result of incorrect use or of natural wear and tear 
on the machine. All repairs should be carried out by the 
official VIRUTEX technical assistance service.

Summary of Contents for ST62

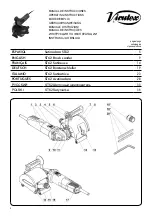
Page 1: ...h sander Satineuse B rstenschleifer Satinatrice Acetinadora Satyniarka ST62 MANUAL DE INSTRUCCIONES OPERATING INSTRUCTIONS MODE D EMPLOI GEBRAUCHSANWEISUNG MANUALE D ISTRUZIONI MANUAL DE INSTRU ES INS...

Page 2: ...D ISTRUZIONI MANUAL DE INSTRU ES INSTRUKCJA OBS UGI p gina page seite pagina strona ESPA OL Satinadora ST62 5 ENGLISH ST62 Brush sander 9 FRAN AIS ST62 Satineuse 14 DEUTSCH ST62 B rstenschleifer 19 IT...

Page 3: ...3 Fig 1 1 Fig 1 2 Fig 3 1 Fig 3 2 Fig 2 2 Fig 2 1 Fig 4...

Page 4: ...4 Fig 5 1 Fig 5 2 Fig 6 1 Fig 6 2 Fig 5 3 Fig 7 1 Fig 7 2...

Page 5: ...sorio da ado Antes de cada uso inspeccione los accesorios como por ejemplo los discos de abrasi n en caso de virutas y grietas los platos de apoyo en caso de grietas roturas o desgaste excesivo el cep...

Page 6: ...orio Las esquinas los bordes afilados o los rebotes pueden enganchar el accesorio giratorio y provocar la p rdida de control o el efecto rebote No instale una cuchilla de motosierra para cortar madera...

Page 7: ...Para desmontar la carcasa protectora 7 repetir el procedimiento anterior en orden inverso 5 Silapalancadefijaci n11nofijalacarcasaprotectora 7 en su posici n correcta apretar la tuerca 22 mediante una...

Page 8: ...anteymoderada sin movimientos bruscos u oscilaciones Es recomendable hacer una prueba del trabajo a efec tuar sobre una muestra para determinar la velocidad aconsejable Ajustar la posici n del rodillo...

Page 9: ...de la herramienta el mantenerla en buen estado de conservaci n y limpieza Durante el trabajo con metal es posible que se acumule polvoconductorenelinteriordelaherramienta Limpiecon regularidad la her...

Page 10: ...e wear dust mask hearing protectors gloves and workshop apron capable of stopping small abrasive or workpiece fragments The eye protection must be capable of stopping flying debris generated by variou...

Page 11: ...keylock for this purpose will cause failure of the power tool and make the warranty void Reducing dust exposure Thechemicalsubstancescontainedindust generated in sanding cutting sawing grinding drill...

Page 12: ...e vibrations and cause failures Protective gloves should be worn when replacing the brush 1 Press down the tab 14 and remove the guard 8 as indicated in Fig 6 1 2 Press the lock button on the axle 9 T...

Page 13: ...inous materials dust may stick onto some of the tool parts For that type of jobs it will be necessary To verify that the inside of the protective guard 7 is clean To keep the rollers 12 and 15 clean T...

Page 14: ...et ou des blessures graves Ne pas utiliser d accessoires n ayant pas t con us et recommand s sp cifiquement par le fabricant de l outil Le fait que l accessoire puisse se connecter l outil lectrique n...

Page 15: ...mauvaise utilisation ou d une op ration incorrecte des proc d s ou conditions d op ration de l outil lectrique et il est possible de l viter en suivant les pr cautions suivantes Tenez l outil lectriqu...

Page 16: ...rendement con ue pour le polissage et le satinage de diff rentes surfaces et mat riaux en combinant l utilisation de ses diff rents rouleaux ajustables 5 MONTAGE ET R GLAGE DES L MENTS DE L OUTIL D b...

Page 17: ...iez que le voltage de la machine co rrespondeavecceluidur seau lectrique L indication du voltage se trouve sur la plaque des caract ristiques de l outil Pour brancher l outil appuyez sur la partie arr...

Page 18: ...llespourpon agedem taux 6291217 Rouleau scotch pour polissage de m taux 6291215 Rouleau m tallique pour le d grossissage sur du bois dur ou vieilli 1746245 Assemblage aspiration de 5 m 6446073 Assembl...

Page 19: ...nicht rund vibrieren und k nnen zu einem Kontrollverlust und Unf llen f hren Benutzen Sie keine besch digten Zubeh rteile Pr fen Sie die Zubeh rteile vor jedem Einsatz auf Sch den wie zum Beispiel Ri...

Page 20: ...tung muss mit der angegebenen Laufrichtung auf dem Elektrowerkzeug bereinstimmen BeimBearbeitenvonkleinenundleichtenWerkst cken m ssen diese sicher befestigt sein Wenn dies nicht m glichist d rfendies...

Page 21: ...L ASC682 or ASM582T zu verwenden Einstellen der Position der F hrungsrollen Abb 5 Die F hrungsrolle 12 muss nachjustiert werden wenn sich die B rste abnutzt 1 L sen der Fl gelschraube 13 Abb 5 1 2 Bew...

Page 22: ...rstensatz Nylon Metall Vlies zur Durchf hrung Ihrer Arbeit Die geeignete Anwendung f r jeden B rstensatz sollte auf der Verpackung angegeben sein Sie k nnen auch den Hersteller um Rat fragen Generell...

Page 23: ...ss das Produkt nach seiner Nutzungsdauer nichtzusammenmitanderenHaushaltsabf llenentsorgt werden darf Gem der EU Richtlinie 2002 96 EG k nnen sich die Nutzer an die Verkaufsstelle bei der sie das Prod...

Page 24: ...lontanodall accessoriorotante potrebbe tagliare o scollegare il cavo e la tua mano o il tuo braccio potrebbero essere diretti verso l accessorio rotante Non lasciare mai l utensile elettrico sdraiato...

Page 25: ...presenti in alcune sostanze chimiche Possono essere Biossido di silicio trasparente e altri prodotti di muratura di muri in mattoni e cemento l Arseniatodiramecromato CCA presentenellegnocon trattame...

Page 26: ...Si raccomanda di indossare guanti pro tettivi quando il pennello cambiato 1 Premere la linguetta 14 e rimuovere il coperchio 8 come mostrato in Fig 6 1 2 Premere il pulsante di blocco dell albero 9 pr...

Page 27: ...allo possibile accumulare polvereconduttivaall internodellostrumento Pulirere golarmentelostrumentoconariacompressaaattraverso le feritoie di ventilazione 1 Nel lavoro di legni resinosi la polvere pu...

Page 28: ...verificar a tens o Avisosgeraisdeseguran apararebarbar lixar escovar metais e polir A m quina de acetinar ST62 uma m quina de alto desempenho projetada para polimento e acetinar di ferentes superf cie...

Page 29: ...perf cie do material e fazer com que o disco dispare ou seja ejectado O disco pode ser disparado na dire o do operador ou em dire o contr ria dependendo da dire o do movimento do disconopontodeinterfe...

Page 30: ...do o uso de seus diferentes rolos encaix veis 5 MONTAGEM E AJUSTE DOS ELEMENTOS DA FERRAMENTA Desligue a m quina da rede el ctrica antes de realizar qualquer opera o de manuten o N o aperte demais os...

Page 31: ...rruptor para frente Pressione a frente do interruptor para mant lo na posi o de opera o Para desligar a ferramenta pressione a parte traseira do interruptor 2 7 ASPIRA O DE POEIRAS A aspira o de poei...

Page 32: ...e servem como base de compara o com uma m quina de aplica o semelhante O n vel de vibra es indicado foi determinado para as principais aplica es da ferramenta e pode ser utilizado como valor de parti...

Page 33: ...bre como e onde poder o levar o produto para que este seja submetido a uma reciclagem ecol gica e segura A VIRUTEX reserva para si o direito de poder modificar os seus productos sin a necessidade de a...

Page 34: ...34...

Page 35: ...35 CCA 2 50 60 1 400 1 000 4 000 1 110x100x19 91dBA 102dBA K 3dBA ah 2 5 2 K 1 5 2 3 65 3 ST62 6 4 ST62 5 1 2 7 1 1 1 2 7 21 1 2 3 7 2 1 4 7 5 11 7 22 2 2 3 1 4 3 3 1 2 6 4 3 2...

Page 36: ...5 AS182K AS282K AS382L ASC682 ASM582T 5 12 1 13 5 1 2 12 12 15 5 2 5 3 3 13 5 1 6 7 m 30 1 14 8 6 1 2 9 6 2 3 27 23 19 23 7 1 4 26 25 24 7 2 5 9 6 8 8 14 7 26 6 2 2 7 18 6446073 2 25 1746245 5 AS182K...

Page 37: ...37 17 3 9 26 12 5 10 1 7 12 15 16 1 11 6291214 6291216 6291217 6291215 1746245 5 6446073 2 25 12 EN 60745 2 3 EN 60745 1...

Page 38: ...lne urz dzenie przeznaczone jest do szlifowania satynowania i nadawania struktury wielu rodzajom materia w przy u yciu ro nych narz dzi robo czych Nale y uwzgl dnia wszystkie wskaz wki bezpiecze stwa...

Page 39: ...rz dziem przew d sieciowy mo e zosta przeci ty lub wci gni ty a d o lub ca a r ka mog dosta si w obracaj ce si narz dzie robocze Nigdy nie wolno odk ada elektronarz dzia przed ca kowitym zatrzymaniem...

Page 40: ...iczne schorzenia dr g oddechowych i wady wrodzone lub zaburza zdolno rozrodcz Substancje te to m in Py mineralny z kamienia betonu itp lub do mieszki stosowane podczas obr bki drewna chro miany rodki...

Page 41: ...prac bez obci enia przez 30 sekund Narz dzia zu yte lub zepsute powoduj wi ksze wi bracje i mog spowodowa awari elektronarz dzia Zaleca si u ywanie r kawic ochron nych przy wymianie narz dzi 1 Naci ni...

Page 42: ...si zamontowanych narz dzi 10 KONSERWACJA Od cz urz dzenie od r d a zasilania przed przyst pieniem do jakichko lwiek prac konserwacyjnych Czyszczenie Aby zapewni bezpieczn i wydajn prac elektronarz dz...

Page 43: ...wane przez oficjalny serwis VIRUTEX 14 UTYLIZACJA URZ DZE ELEKTRYCZNYCH Nigdy nie usuwaj sprz tu elektrycznego razem ze mieciami domowymi Utylizuj sprz t akcesoria i opakowaniawspos b kt ryzminimalizu...

Page 44: ...www virutex es registre Acceda a toda la informaci n t cnica Access to all technical information Acc s toute l information technique Zugang zu allen technischen Daten Accedere a tutte le informazioni...

Reviews: