background image

4

a un desplazamiento de la varilla de ajuste fino Y de 1 mm, teniendo 
un recorrido máximo de 5 mm. Cada división del indicador graduado 
del ajuste fino A1 corresponde a un avance de 0.1 mm. 
Una vez tenga el equipo preparado, sitúe la máquina en la posición de 
inicio del fresado de la canal. Ponga en marcha la máquina y baje la 
herramienta de corte hasta que la varilla haga tope en la torre giratoria 
y a continuación bloquee la altura de la máquina con la palanca de 
bloqueo V. Para tener absoluta seguridad, deberá bloquear la máquina 
con la tuerca y contratuerca A3. Realice el fresado de la primera canal 
del escurridor y vuelva a dejar la máquina en la posición de reposo.
Si lo considera necesario, disminuya el desnivel de la canal bajando la 
altura del equipo de fresar canales.

5.8. FRESADO DE LAS CANALES DEL ESCURRIDOR

Según las dimensiones de anchura del fregadero, determine el número 
y la distancia entre cada una de canales del escurridor, para que sean 
apropiadas para el correcto desagüe en el fregadero. 
Para realizar el fresado de todas las canales, libere la presión de la 
ventosa de apriete K del equipo plantilla llevando la palanca central 
a la posición vertical y seguidamente, afloje el pomo de fijación E 
(Fig. 2). Sitúe el equipo en la posición de fresado de la segunda canal, 
desplazando la guía a través del riel. Utilice como referencia de des-
plazamiento, el índice del visor N de la brida de fijación, sobre el regle 
milimetrado (Fig. 1). Vuelva a bloquear firmemente el pomo de fijación 
de la brida E y la ventosa de apriete K del equipo de fresar canales en 
esta posición. Realice sucesivamente todas las canales del escurridor 
mediante el mismo procedimiento.

6. UTILIZACIÓN DEL EQUIPO PARA CORTES 
PARALELOS Y FIJACIÓN UF317S

Lea atentamente el manual de instrucciones del Equipo para cortes 
paralelos y fijación UF317S/UFN317S, antes de usarlo para otras apli-
caciones (Fig. 10 y 11).

7. GARANTÍA

Todas las máquinas electroportátiles y accesorios VIRUTEX, tienen una 
garantía válida de 12 meses a partir del día de su suministro, quedando 
excluías todas las manipulaciones o daños ocasionados por manejos 
inadecuados o por desgaste natural de la máquina.
Para cualquier reparación dirigirse al servicio oficial de asistencia 
VIRUTEX S.A.

VIRUTEX se reserva el derecho de modificar sus productos sin previo 
aviso.

E N G L I S H

UC317S DISH DRAINER ROUTING DEVICE

1. SAFETY INSTRUCTIONS FOR USING THE UC317S DISH 
DRAINER CHANNEL ROUTING DEVICE

Read these OPERATING INSTRUCTIONS and the attached 

GENERAL SAFETY INSTRUCTIONS LEAFLET carefully 

before using the UC317S DISH DRAINER ROUTING 

DEVICE. Make sure you have understood them before 

operating the machine. Keep both sets of instructions 

for future reference.

Also carefully read the Operating Instructions for the machine you 
are going to use with this equipment and follow the safety measures 
indicated.

2. GENERAL DESCRIPTION AND APPLICATIONS

The UC317S DISH DRAINER ROUTING DEVICE is designed to be used 
with the UF317S/UFN317S parallel cutting and fastening equipment 

and the FRE317VD angle trimmer, which are especially appropriate for 
working with mineral-based materials such as Corian, Rausolid etc.
Applications:
• The UC317S equipment for routing channels in countertop dish 
drainers, in combination with the UF317S/UFN317S parallel cutting 
and fastening equipment, enables us to create several channels in 
Corian countertops in order to make a dish drainer, using the UC317S 
equipment as a guide and a FRE317VD router to cut them (Fig. 3 and 4).
• The UF317S/UFN317S parallel cutting equipment also enables us to 
make parallel cuts by sliding the machine along its guide rail (Fig. 10) 
and to perform other tasks that require attaching the machine base 
to the part being worked on, such as when correcting small defects in 
the material. The base of the machine may be attached directly to the 
rail (Fig. 10), or by using the two suction pads mounted on each side 
of the machine and on the part (Fig. 11).

3. STANDARD EQUIPMENT

The box contains the following items:

1. UC317S DISH DRAINER CHANNEL ROUTING DEVICE 
2. 1746268 Template guide assembly for channels
3. UCP90 Suction pad
4. 3-mm Allen key
5. Operating instructions and miscellaneous documentation

4. OPTIONAL ACCESSORIES

1745838 UF317S Parallel cutting and fastening equipment
1746846 UFN317S Parallel cutting 
1706539 Complete 650-mm rail
9045754 Complete 1.40-m rail
9045755 Complete 2.40-m rail
6046672 UCP90 Suction pad
6045710 Set of 2 holding G-clamps
9045812 UCP90 rail joint kit
5046437 Set of 2 units V-clamp.

5. USING THE UC317S DISH DRAINER 
CHANNEL ROUTING DEVICE
5.1. RAIL PREPARATION

From the UF317S/UFN317S parallel cutting and fastening equipment, 
select the rail (A) measuring 650 mm, which includes the millimetre 
ruler (B) (Fig. 1).
First, insert the guide bar (C) with the fixing clamp (D) into one end 
of the slot indicated on the millimetre rail (A), until it is in the correct 
position. Then turn the tightening knob (E) to fasten the assembly to 
the rail (Fig. 1).

5.2. MOUNTING THE UC317S CHANNEL 
ROUTING DEVICE ON THE RAIL

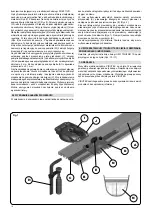
Position the base (F) (Fig. 2) of the channel routing device under the 
fixing clamp (D) (Fig. 1) and fasten it firmly in place, using the service 
key to tighten the two screws (G) (Fig. 2). Rest the entire assembly 
on the countertop so that the rail is positioned over the sink and the 
channel milling machine is over the area of the dish drainer (Fig. 2).
The position of the channel routing device on the rail will depend on 
the dimensions of the sink and the space available on the dish drainer 
in order to securely fasten the equipment and comfortably perform 
the milling of all channels.
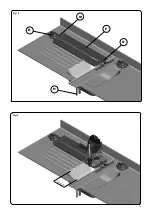
To aid in this aspect, the equipment has been specially designed so 
that the milling machine, once positioned on the channel milling 
equipment, may be used from either right to left (Fig. 3) or left to right 
(Fig. 4). Before attaching the rail to the countertop, it is necessary to 
analyse where the start and end of each channel will be located in 
each case, in order to ensure that it will be correctly milled along its 
entire length.
When the machine operates from right to left, the rail must be positioned 
over the sink, at least 170 mm (approximately) from the inside edge of 
the sink (Fig. 3). On the other hand, when the machine operates from 

Summary of Contents for UC317S

Page 1: ...tura per fresare scolapiatti Equipamento para fresar canais de escorrimento de pratos Устройство для формирования сточных желобов Listwa prowadząca do frezowania ociekaczy UC317S MANUAL DE INSTRUCCIONES OPERATING INSTRUCTIONS MODE D EMPLOI GEBRAUCHSANWEISUNG MANUALE D ISTRUZIONI MANUAL DE INSTRUÇÕES ИНСТРУКЦИЯ ПО ЭКСПЛУАТАЦИИ INSTRUKCJAOBSŁUGI ...

Page 2: ...sa de apriete UCP90 6045710 Juego de 2 sargentos de apriete 9045812 Kit unión rieles UCP90 5046437 Juego 2 u V clamp 5 UTILIZACIÓN COMO EQUIPO DE FRESAR CANALES ESCURREPLATOS UC317S 5 1 PREPARACIÓN DEL RIEL Del equipo de cortes paralelos y fijación UF317S UFN317S seleccione el riel A de 650 mm que incluye el regle milimetrado B Fig 1 En primer lugar deberá introducir el regle guía C con la brida d...

Page 3: ... de 30 mm abierta en la parte delantera especialmente diseñada para trabajar con el cabezal de la máquina inclinado que se suministra con el Equipo UC317S Para montar la guía plantilla especial 1746268 en la base de la fre sadora Fig 7 deberá introducirla por la parte inferior sin necesidad de desmontar los tornillos y las arandelas P y una vez en el centro girarla para situarla en la posición de ...

Page 4: ...fastening equipment and the FRE317VD angle trimmer which are especially appropriate for working with mineral based materials such as Corian Rausolid etc Applications The UC317S equipment for routing channels in countertop dish drainers in combination with the UF317S UFN317S parallel cutting and fastening equipment enables us to create several channels in Corian countertops in order to make a dish ...

Page 5: ... the beginning of the channel Start up the machine and lower the cutting tool until the rod presses against the revolving turret and then lock the height of the machine with the locking lever V For absolute safety the machine must be secured using the A3 nut and left to right the minimum distance from the rail to the inside edge of the sink is approximately 60 mm Fig 4 Once you have determined the...

Page 6: ...llèles grâce au coulissement de la machine sur un rail de guidage Fig 10 ainsi que différentes opé rations nécessitant le blocage de la machine sur la pièce à travailler comme la réparation des petits défauts Le socle de la machine peut être fixé directement sur le rail Fig 10 ou à l aide de deux ventouses de serrage montées de chaque côté de la base de la machine et sur la pièce à travailler Fig ...

Page 7: ...ionner la machine dans le sens de travail choisi Introduire la tige Q Fig 8 dans les orifices situés à la base de la défonceuse en s assurant que les deux butées R sont bien en place aux deux extrémités de la base et les goujons de serrage situés vers l extérieur Fig 8 Ensuite introduire les extrémités de la tige dans l orifice et la rainure situés sur les parties latérales de l accessoire de frai...

Page 8: ...opfflächen Abb 3 und 4 Mit der Parallelschnittvorrichtung UF137S lassen sich durch Vers chiebenderMaschineaufderFührungsschiene Abb 10 auchparallele Schnitte durchführen Zudem können damit verschiedene Arbeiten ausführt werden bei denen die Maschine auf dem Werkstück arre tiert sein muss wie z B das Ausbessern kleiner Materialfehler Die Maschinenbasis kann direkt auf der Führungsschiene Abb 10 ode...

Page 9: ...chtung UC317S geführt Diese mit der Vo rrichtung UC317S mitgelieferte Führung wurde speziell für Arbeiten mit geneigtem Fräskopf entwickelt Zum Montieren der speziellen Vorlagenführung 1746268 auf der Basis der Fräsmaschine Abb 7 wird diese von der hinteren Seite eingeführt ohnedassdabeidieSchraubenundUnterlegscheibenPentferntwerden müssen SobaldsieinderMitteist wirdsieindieSperrpositiongedreht Zi...

Page 10: ...è stata progettata per lavorare in combinazione con l apparecchiatura per tagli paralleli e fissaggio UF317S UFN317S e la fresatrice angolare FRE317VD specialmenteidoneaperlalavorazionedimaterialiminerali come il Corian Rausolid ecc Applicazioni L apparecchio UC317S per eseguire canali nello scolapiatti del top in combinazione con l apparecchiatura per tagli paralleli e fissaggio UF317S UFN317S pe...

Page 11: ... angolare FRE317VD Con la macchina inclinata di 10º montare l utensile scelto seguendo le istruzioni del manuale della fresatrice angolare FRE317VD La fresatrice angolare FRE317VD viene guidata lungo l apparecchio UC317S medianteunguida dimaspeciale1746268daldiametroesterno di 30 mm aperto nella parte anteriore appositamente progettato per lavorare con la testa della macchina inclinata e fornito i...

Page 12: ...ÇÕES GERAIS DE SEGURANÇA que se fornece Assegure se de os ter compreendido correctamente antes de começar a operar com a máquina Conserve os dois manuais de instruções para possíveis consultas posteriores Leia também atentamente o Manual de Instruções da máquina que irá utilizar juntamente com o equipamento e tome as medidas de segurança indicadas 2 DESCRIÇÃO GERAL E APLICAÇÕES OEQUIPAMENTOPARAFRE...

Page 13: ...fique se o acessório fica bem fixo na bancada em todas as posições de trabalho 5 5 PREPARAÇÃO DA FRESADORA A ferramenta de corte mais adequada para a fresagem dos canais de um escorredor é a fresa de topos de R 10 mm 1740324 que é fornecida com a fresadora FRE317VD ou então a opcional de R 5 mm 1740322 Para utilizar esta fresa deve inclinar se a cabeça da fresadora 10º no mínimo 10º seguindo as in...

Page 14: ...magarantiaválidapor12meses contados a partir do dia do seu fornecimiento ficando dela excluídas todas aquelas manipulações ou danos ocasionados por utilizações não adequadas ou pelo desgaste natural da máquina Para qualquer reparação há que se dirigir ao Serviço Oficial de Assistência Técnica VIRUTEX AVIRUTEXreservaparasiodireitodepodermodificarosseusproductos sin a necessidade de aviso prévio Р У...

Page 15: ... E Затем заблокируйте устройство в позиции прижимая вакуумную присоску K к поверхности заготовки и переместите центральный рычаг в горизонтальную позицию Рис 2 АДАПТЕР ДЛЯ ВАКУУМНОЙ ПРИСОСКИ На небольших столешницах если не имеется достаточное пространство для расположения вакуумной присоски непосредственно на основании устройства для фрезерования желобов Вы можете зафиксировать устройство на мест...

Page 16: ...етки при его перемещении вдоль миллиметровойшкалы Рис 1 Сновазатянитекрепежнуюручку назажиме E иустановитевакуумнуюприсоску K наустройстве для фрезерования желобов в этом положении Повторите эту же операцию для создания каждого последующего желоба на сушилке для посуды 6 ИСПОЛЬЗОВАНИЕУСТРОЙСТВАUF317SДЛЯПАРАЛЛЕЛЬНОГО РЕЗА И ФИКСАЦИИ Внимательно прочитайте Руководство по эксплуатации параллельного р...

Page 17: ...ymocuj listwędoobrabianegomateriałuzapomocąprzyssawki K dociskając dźwigienkę przyssawki w pozycji poziomej Rys 2 ŁĄCZNIK DO PRZYSSAWKI Na małych blatach jeśli nie ma wystarczająco dużo miejsca aby zamontować przyssawkę bezpośrednio do listwy możesz zabezpieczyć osprzęt na miejscu montując przyssawkę do boku listwy za pomocą łącznika O Rys 5 Aby to zrobić zabezpiecz łącznik mocno za pomocą śrub M ...

Page 18: ...eżę i następnie zablokuj wysokość urządzenia za pomocą dźwigni blokującej V W celu zapewnienia maksymalnegobezpieczeństwa urządzenienależyzabezpieczyćza pomocą nakrętkiA3 i nakrętki zabezpieczającej Wyfrezuj pierwszy kanał w ociekaczu i wróć z urządzeniem do pozycji początkowej Można skorygować wysokość nachylenia poprzez obniżenie wysokości listwy 5 8 WYKONANIE KANAŁÓW W OCIEKACZU W zależności od...

Page 19: ...19 Fig 2 K H M Fig 3 170 mm F G ...

Page 20: ...20 Fig 5 Fig 4 60 mm K J M O ...

Page 21: ...21 Fig 6 Fig 7 P ...

Page 22: ...22 Fig 8 R Q T X A1 A2 A3 V Z U Y W S Fig 9 U ...

Page 23: ...23 Fig 10 Fig 11 ...

Page 24: ...stre Acceda a toda la información técnica Access to all technical information Accès à toute l information technique Zugang zu allen technischen Daten Accedere a tutte le informazioni tecniche Aceso a todas as informações técnicas Dostęp do wszystkich informacji technicznych Доступ ко всей технической информации ...

Reviews: