1717 W Civic Drive, Milwaukee, WI 53209
414-354-6600
Design Modification Rights Reserved
© 2018 Visa Lighting
When using electrical equipment, basic safety precautions should always be followed, including the following:
•Read all instructions carefully before installing and save for future use.
•Make sure all connections are in accordance with the National Electrical Code and local regulations.
•To avoid possible electric shock, be sure the power supply is turned off before servicing or installing the fixture
•Service should be performed by qualified personnel.
•These instructions may not cover all details or variations. If additional information is needed, please contact Visa Lighting.
!
Model: CV2424
Linesse Linear Slot
Publication: 762302XX
Document Description: Installation Instructions
for 3” Linesse Linear Recessed
Series Luminaires
4
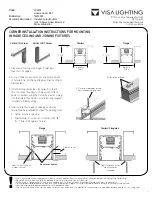
INSTALLATION INSTRUCTIONS FOR MOUNTING
IN T-GRID AND JOINING FIXTURES
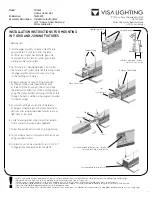
1. Remove lens.
2. Install hanger brackets on each side of fixture
approximately 4” inches in from the ends.
For 9/16” lay-in grid, place smaller gap side
of bracket towards lens. For other grids place
wider gap side towards lens.
3. Set fixture into opening between T-Grid. After
the fixture is set, screw in #8 self threading screws
in hanger bracket and attach support wiring
to the building and fixtures.
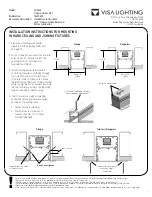
4. Bring conduit and conduit fitting (supplied
by others) to the power feed hole location
at the end of the housing or in end cap. Make
the electrical connections to the building power
using the starter harness and plug into the fixture
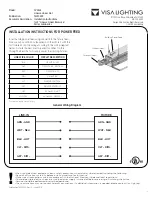
through harness. Use the wiring diagram included
to identify wiring.
5. For row mounting fixtures, attach male end
of harness to female end of harness. Small lens
sections are centered between fixtures to avoid
light leak at lens ends.
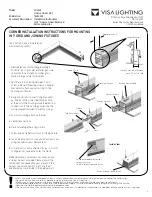
6. Slide fixture together using sliders that extend
from fixtures to insure proper alignment.
7. Screw internal reflectors down to joining fixture.
8. Tuck harness at end of rows and attach end caps
using supplied screws.
9. Grid end caps can be adjusted for lay in or Slot T
configurations (use extra holes to adjust).
Hanger Brackets
Approximately 4”
Smaller Gap Side of Bracket
for 9/16” Lay-in Grid
Starter Harness
Building Power Feed
Thru Harness
Support Wire
Mounting Screws
Thru Harness
Sliders
Lens
Fasten extended reflector tabs to joining
fixture. break tab at end of run
Fasten endcap to end of run


