Calibration
Electronic Calibration (E-CAL)
VT400 Technical Manual, Rev. A5
34
Doc
#
UM-VT400-EN
3. Press
( ) to select the
ZEro
option (zero calibration).
4. The display shows
E Scl
. Clear the scale, and wait about 10 seconds.
5. Press
( ) to record the zero position. The display counts down for about 10
seconds (50 measurements are taken and an average is calculated).
6. The display should now show 0. If the zero point is not accurate, press
ZERO
( )
and go back to step 3.
4.1.2
Span Calibration
To perform span calibration:
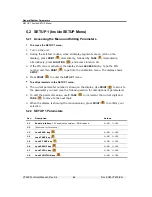
1. Enter the setup menus and use
TOTAL
(
) to scroll to the
CAL
menu. Press
( )
to enter the menu.
2. Press
( ) to enter the
S-CAL
menu.
3. Use
TOTAL
(
) to scroll to the
SPAN
option, and press
( ) to select it.
4. The display shows the maximum capacity of the scale. Enter the correct calibration
weight, using
P.TARE
(
) to edit the current digit, and
TARE
( ) to move to the
next digit.
5. Press
( ) to confirm the calibration weight.
6. The display shows
Add Ld
. Place the calibration weight on the scale, and wait about
10 seconds.
7. Press
( ). The display counts down for about 10 seconds, and then shows
the calibration weight.
8. If the weight shown is not accurate, press
ZERO
( ) and go back to step 4.
4.2 Electronic
Calibration
(E-CAL)
Electronic calibration involves setting two values, using the indicator keypad:
The signal level in mV, corresponding to the zero, or dead-load point (see section
4.2.2).
The signal level in mV, corresponding to the maximum capacity of the scale (see
section
4.2.3).
To learn how to calculate these values from the load cell specifications provided by
the manufacturer, see section
4.2.1 below. You must perform both of the above for
the scale to be calibrated properly.
After calibrating the scale, you must save the values in permanent memories by
entering the setup menus and selecting the
STORE
option (see section
4.3). It
is also advised to lock calibration (see section
4.4).

