X6100
Operation
Page 8
NOTE: Assembly Steps 6, 7, and 8 refer to Model X6100 only.
For Models X6200/ X6200HRC proceed to Step 9 for Console
installation.
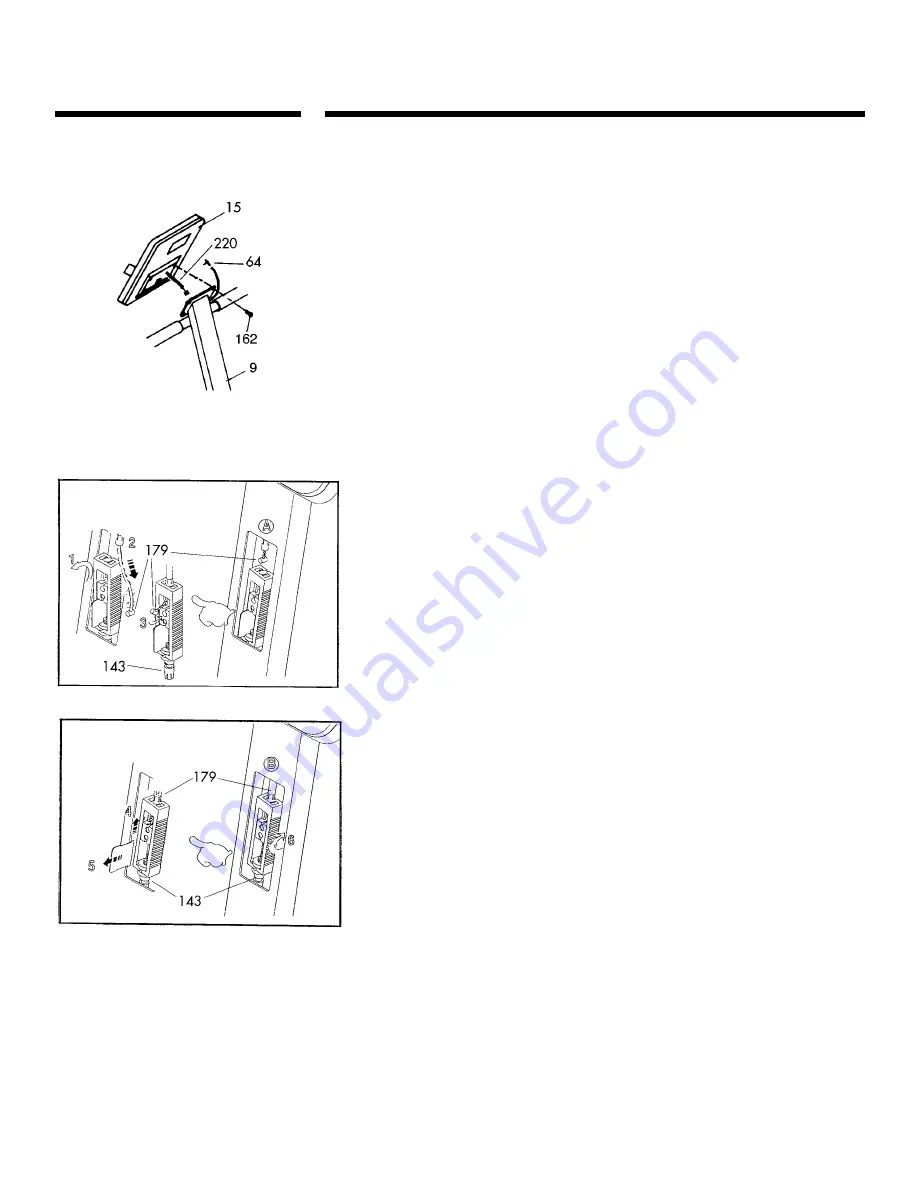
Step 6 • Console -
Model X6100 only
1: Insert Upper Magnet Shift Cable (220) into the top of the Console
Mast (9).
2: Mount the Console (15) to the Console Mast (9) using the four
Console Attachment Bolts (162). Make sure you DO NOT
PINCH the Upper Magnet Shift Cable (220) and RPM Sensor
Wire (64) between the Console (15) and Console Mast (9).
3: Plug the RPM Sensor Wire (64) into the receptacle located on
the back of the Console (15). Make sure the RPM Sensor Wire
fits in the slot cut in the left side of the Console Mast (9).
Step 7 • Cable Connection -
Model X6100 only
1: Turn the Tension Knob to position 8. Reach inside the opening
of the Console Mast (9) and connect the Upper Magnet Shift
Cable (220) to the rectangular red cable-slide on the end of
the Lower Magnet Shift Cable (66), as shown in the
accompanying illustrations.
2: While holding the metal separating tab (5), turn the Tension
Knob to Level 1 and then pull the tab out and discard.
3: Press the Console Mast Cover (225) into the opening of the
Console Mast (9).
NOTE: Always read the Owner’s Manual before operating your
Vision Fitness Elliptical Trainer.
Step 8 • Install Batteries and Test Operation
Model X6100 only.
1: Remove the battery compartment lid on the back of the
Console (15) and install the Batteries. Two C-cell batteries are
required.
2: Use arrows on Console panel to select either Miles (ML) or
Kilometers (KM). Wait 30 seconds for Console to stop flashing.
Console will hold setting until batteries are removed.
3: The Console provides accurate workload readouts because it
knows which position the magnet is in through a sensor
located at the base of the tension knob. To check the
operation of this sensor, immediately after battery installation
the ‘ML’ icon will be flashing and a number from 1 to 8 will
show in the WORKLOAD window. This number should indicate
the position of the tension knob.Turn the tension knob from
1 through 8 and check that the number in the WORKLOAD
window matches the number on the tension knob. Once the
‘ML’ icon stops flashing, the WORKLOAD window will display
only watts.
4: Operate the Elliptical Trainer and make sure that all console
feedback functions are operational.


