background image

S

CANNING


FROM

 TWAIN S

OFTWARE

97

6. The TWAIN interface will now open.

Note

: If you choose to use OneTouch Configure Before Scan for 

scanning from the TWAIN interface, the final image will be sent to 
the destination application set for that button. Please see “Setting 
Destination Application Properties” on page 40 for more information 
on OneTouch destinations.

Note

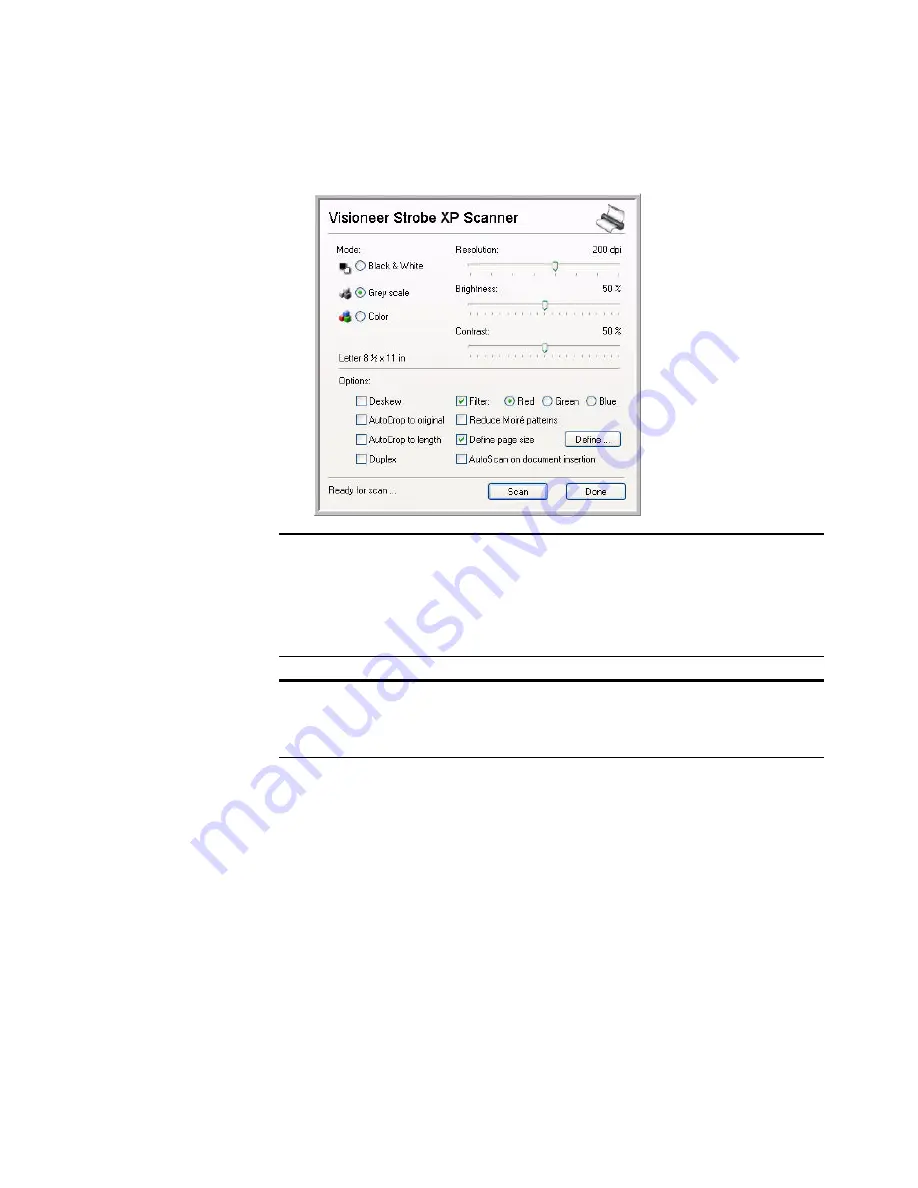
: At this time the TWAIN interface is where you will adjust your 

scan settings. Please see the following section for adjusting the scan 
settings in the TWAIN interface.

Summary of Contents for RoadWarrior Strobe XP 300

Page 1: ...for Windows Visioneer Strobe XP 300 User s Guide...

Page 2: ...Visioneer Strobe XP 300 USB Scanner User s Guide F O R W I N D O W S...

Page 3: ...ASE IF A VALID REGISTRATION IS NOT RECEIVED DURING THE INITIAL 90 DAY PERIOD THE 12 MONTH WARRANTY IS NO LONGER AVAILABLE AND YOUR PRODUCT WARRANTY WILL TERMINATE AFTER THE 90 DAY INITIAL PERIOD EXPIR...

Page 4: ...r 13 Additional Applications for Your Scanner 17 View the User Guides 18 Step 3 Register Your Scanner 20 Set Up Your Scanner 21 Strobe XP 300 Stand 21 Scanning on the Go 22 Configure the Strobe XP 300...

Page 5: ...eating an HTML Web Page from Your Scanned Documents 82 Transferring Scanned Documents to Storage 84 Scanning to Multiple Folders 86 To Transfer Documents to a Server or Mapped Drive 90 Check the Hardw...

Page 6: ...TABLE OF CONTENTS iii To Install Another Driver 123 Visioneer Strobe XP 300 Scanner Specifications 124 Visioneer Scanner Parts List 125 Index 127...

Page 7: ...iv TABLE OF CONTENTS...

Page 8: ...TROBE XP 300 Please check the contents of the box to make sure that all parts are included If any items are missing or damaged contact the dealer where you purchased the scanner Visioneer Strobe XP 30...

Page 9: ...ner when its sensors detect the presence of a document Universal Serial Bus USB Port Connects the scanner to the USB port on your computer Scanner can draw power from the computer through the USB port...

Page 10: ...16 bit or True Color 24 bit or 32 bit Resolution set to at least 800 x 600 pixels To set your monitor s colors and resolution Open the Windows Control Panel Double click on Display then select the Se...

Page 11: ...ke sure to turn it back on again when installation is finished If you already have a scanner connected to your computer you need to remove its driver programs first before beginning the installation o...

Page 12: ...automatically opens Note If the CD does not start check the following Make sure the CD drive s door is completely shut Make sure the CD was inserted in the drive in the proper direction label side up...

Page 13: ...llation Menu select Install Products 4 Make sure the boxes for Nuance PaperPort and Scanner Driver are checked If you also want to install the additional software provided with your scanner select the...

Page 14: ...rt software will not be installed 4 On the Customer Information window accept the current values or enter new information then click Next 5 On the Setup Type window keep the default Setup Type and cli...

Page 15: ...etup Wizard opens 1 Click Next 2 On the Visioneer License Agreement window read the license agreement If you accept the terms select I Agree If you choose not to accept the license agreement the insta...

Page 16: ...and Microsoft s Windows Image Acquisition WIA Installing this option means that you can use several different methods to scan as explained in this User Guide TWAIN Driver Only the TWAIN driver is inst...

Page 17: ...lor Space setting The Color Space setting sets the gamma value for the scanner so scanned items look good on your monitor Gamma controls the brightness of the midtones of colors That setting can be ch...

Page 18: ...K yet Leave the window open and proceed to Step 2 Connect and Calibrate the Scanner on page 12 Note If you want to see more information about your scanner and a quick explanation of how to use the One...

Page 19: ...r and then plug the other end into any USB port on your computer Connection to a USB 2 0 High Speed port provides optimum performance but your scanner can also connect to a USB 1 1 port The USB symbol...

Page 20: ...in the calibration window for completing this process To calibrate the scanner 1 Close the scanner s back panel so the calibration paper will feed straight through the scanner 2 Insert the calibration...

Page 21: ...receive a message that your computer has found the new hardware or updated the driver database If your computer is running Windows XP or Windows Vista you will see a message similar to the following N...

Page 22: ...oaded return to the Complete the installation by connecting your hardware window and click OK to complete the installation process You can also click More to see a quick overview about accessing and n...

Page 23: ...16 VISIONEER STROBE XP 300 SCANNER USER S GUIDE 6 Click Close on the OneTouch 4 0 Installation complete window 7 You can now install the additional applications you received with your scanner...

Page 24: ...If you select OmniPage pro to install you see a window telling you to remove the Disc 1 installation CD from your computer s CD ROM drive and then insert Disc 2 into the driver to proceed with the Om...

Page 25: ...R GUIDES To view the user guides available for your scanner and the software provided with your scanner 1 Return to the installation Disc 1 Main Menu 2 On the Main Menu click User Guides The Visioneer...

Page 26: ...setup the SharePoint link and use the SharePoint features when choosing new scan settings for your scanner The OneTouch OmniPage Mini Guide has information about a new features in the OneTouch 4 0 sof...

Page 27: ...dates from the pop up menu 3 Follow the instructions on the screen and register your scanner by entering your scanner s serial number and your email address The serial number is located on the undersi...

Page 28: ...of your keyboard The stand that comes with the scanner is specifically designed so the scanner easily fits between your computer keyboard and monitor Place the scanner on its stand so the lip on the s...

Page 29: ...an airplane at a remote job site in your car or anywhere else where an electric outlet is not available Connect the scanner to your laptop with the USB cable The scanner will draw its power from the...

Page 30: ...hat are used in various countries The three plug adapters that you received with your scanner are interchangeable on the AC Power Adapter To replace the AC Power Adapter plug 1 Press down on the latch...

Page 31: ...ulled through the scanner To adjust the Paper Guides slide them toward each other until they match the width of the item you re scanning Note Always remove any staples or paper clips from documents be...

Page 32: ...les and retail receipts especially when using duplex two sided scanning Generally you should use the transparent sleeves for paper items on paper stock that is less than 20 lb 1 Slide the thin paper i...

Page 33: ...ter screen Open the OneTouch scan panel and window adjust the scan settings if you want put the document in the scanner and then click the icon on the OneTouch panel See Scan from the OneTouch Panel o...

Page 34: ...rt face down to scan a single side The scanner grabs the top edge of the paper and automatically begins to scan and feed the paper through the scanner 2 A scan progress window will open and the image...

Page 35: ...o you can choose new settings before scanning Use this window to select a new destination application file format and so forth See Selecting New OneTouch Scan Settings on page 38 to modify the setting...

Page 36: ...can use the TWAIN interface or some other application s interface for scanning You can turn the AutoLaunch technology off and on from either the OneTouch icon or from the Windows Control Panel To tur...

Page 37: ...be XP opens 4 Uncheck the option Enable the generation of events when paper is inserted into the scanner This turns off the AutoLaunch feature 5 Click OK then click OK on the Hardware Properties windo...

Page 38: ...w to select a new destination application file format and scan configuration See Selecting New OneTouch Scan Settings on page 38 to modify the settings The OneTouch Icon If you click the OneTouch icon...

Page 39: ...feed the paper through the scanner 3 You can also click the icon on either OneTouch panel to start scanning For instance you can click the PaperIn icon to start scanning The item is scanned using pre...

Page 40: ...n the OneTouch panel press the button on the top of the scanner or click the OneTouch icon 2 To see the details for the current scan settings right click on the PaperIn icon The Properties window also...

Page 41: ...ws the current scanners connected to your computer If the Properties window is not open right click the icon on the Detail View or PaperIn View to open it From the Hardware View and Detail View click...

Page 42: ...OneTouch Properties window 1 Open the OneTouch Properties window by either of the following methods Press the button on the top of the scanner Click the OneTouch icon at the bottom right of the screen...

Page 43: ...Options for the OneTouch Properties Window on page 54 for more information Select Configuration The list of available scan configurations The configuration settings include scanning mode resolution d...

Page 44: ...ormats that apply to Adobe Acrobat The available formats depend on the scanner you purchased and its installed software The icon names indicate their file types See Selecting Page Format Options on pa...

Page 45: ...nts sent when scanning is finished See Selecting Options for the OneTouch Properties Window on page 54 to display a full list of the Destination Applications that you can use with the scanner Selectas...

Page 46: ...u select For example if you select Microsoft Word as the Destination Application the available formats are for text such as txt and rtf However if you select Microsoft Paint as the Destination Applica...

Page 47: ...s properties that you can select 1 On the OneTouch Properties window click a Destination Application 2 Click the Properties button A OneTouch 4 0 Link Properties dialog box appears for the type of Des...

Page 48: ...g the folder to receive your scanned items 1 Select the PaperPort folder where you want the file of the scanned image to be located 2 Click OK 3 Click OK or Apply on the OneTouch Properties window Whe...

Page 49: ...Click in the OCR settings boxes for the options you want The options will apply to all the applications in the group Always send a file even when no text was found The scanned file is sent to the OCR...

Page 50: ...led in and the application icon appears in step 3 4 Select the icon in step 3 of the dialog box That is the icon that will appear in the OneTouch Destination List 5 In step 4 of the dialog box select...

Page 51: ...will apply to all the applications in the group Convert Bitmaps using Screen Resolution Use this option to ensure that an image will fit on the computer s screen When a computer screen is set to a low...

Page 52: ...5 Click Refresh on the OneTouch Properties window STORAGE PROPERTIES These properties apply to the Destination Application named Transfer to Storage If a CD burner is attached to your computer you al...

Page 53: ...ned documents are saved in those folders New folders are created for each month and week so you can keep track of when you scanned the documents 2 Click the Browse button to specify the location to st...

Page 54: ...e AOL you need to know which folder contains the scanned documents so you can manually attach them to your email messages 1 Click the Browse button for Folder for storing attachments and choose a fold...

Page 55: ...to AOL 4 Select the options for color document handling Convert Bitmaps using Screen resolution Use this option to ensure that an image will fit on the computer s screen When a computer screen is set...

Page 56: ...ages and text The Text Formats are for text file types The names of the formats indicate their file types See Text Formats on page 51 for details CREATE SINGLE IMAGE FILES The TIFF and PDF formats sup...

Page 57: ...d you can select the degree of quality for your scanned images from the JPEG file format icon The PDF format is often used to create images of text pages You may want to select PDF as the page format...

Page 58: ...tions 4 Click OK or Apply on the OneTouch Properties window TEXT FORMATS Selecting the text format option also selects OCR processing as an automatic step for scanning Therefore when you scan a docume...

Page 59: ...e file type that you want for the text format Your selection of a file type pertains only to the Destination Application currently selected on the OneTouch Properties window Other Destination Applicat...

Page 60: ...See Scanning with sPDF or nPDF and Searching for Text on page 76 for details Normal PDF The nPDF file format used by Adobe Acrobat and OmniPage Pro This format also converts scanned text into PDF with...

Page 61: ...low Show All Destinations This option selects all the Destination Application categories The list of Destination Applications available will include all the applications on your computer that fall int...

Page 62: ...documents in a folder or sending them to a CD burner to create a CD containing the scanned documents See Transferring Scanned Documents to Storage on page 84 and Scan and Burn to a CD on page 78 for d...

Page 63: ...s section see the figure on page 57 and the description below By selecting the Fax and Print box and clicking the Create copies of scanned documents option every scanned document you fax or print from...

Page 64: ...tton and find the folder for the copies Select the grouping option for the documents Group by type arranges the scanned documents by the type of file such as doc or jpg If you also want to group them...

Page 65: ...available New configurations will be unlocked until you manually lock them To create a new configuration 1 Open the OneTouch Properties window and make sure the PaperIn tab is selected 2 Scroll throu...

Page 66: ...going to set up the new configuration to scan duplex two sided include that in the name such as Scan for Dark Print Duplex to remind you that it is a duplex scan If the configuration is locked click...

Page 67: ...um is 75 dpi The higher the dpi setting the sharper and clearer the scanned image However higher dpi settings take longer to scan and produce larger files for the scanned images Brightness and Contras...

Page 68: ...Only the options that apply to the selected Destination Application are available AutoCrop to Original Select this option to let the scanner automatically determine the size of the item being scanned...

Page 69: ...the scanner automatically determine if a page is skewed and then straighten its image The scanner detects page edges and can sense when the page is fed through at an angle However if the page is fed t...

Page 70: ...s the ability of your scanner to automatically remove a color from a scanned item For example if you are scanning a letter with a red watermark you can choose to filter out the red so the scanned lett...

Page 71: ...nd right to change the color settings As you do the image changes to show the effects of the new settings 10 Click OK to save the new configuration It will now appear in the list of Scan Configuration...

Page 72: ...e page the image will automatically be reduced to fit the page Actual size crop image if necessary If the scanned image is too big to be printed or faxed on a single page the image will automatically...

Page 73: ...e if the device is your printer the dialog box is your printer s setup settings 2 Click OK or Apply THE STORAGE OPTIONS TAB ARCHIVE A Storage Options tab appears on the Scan Configurations dialog box...

Page 74: ...u can keep track of when you scanned the documents 3 Click the Browse button to specify the location to store the scanned documents or type a location directly into the box 4 Click OK or Apply Note Th...

Page 75: ...tion click the Edit button The Scan Configuration Properties dialog box opens for that configuration Note The original scan configurations listed on the OneTouch Properties window should not be edited...

Page 76: ...first be unlocked before you can edit or delete it Click the Lock icon to unlock the configuration Clicking it toggles between locking and unlocking the configuration 5 Edit the settings and click OK...

Page 77: ...ouch Properties window for that button TO SET CONFIGURE BEFORE SCAN 1 Open the OneTouch Properties window 2 Right click on Configure Before Scan and choose an interface to use for configuring before s...

Page 78: ...ent to the Destination Application specified in the OneTouch 4 0 Properties In the example shown on the previous page the Destination Application is PaperPort TO SCAN MULTIPLE PAGES You can use Config...

Page 79: ...erface to close the interface and send the file to the Destination Application CANCELING A CONFIGURE BEFORE SCAN To cancel a scan after scanning has begun 1 Click on the Cancel button in the scanning...

Page 80: ...ck on the Scan button in the TWAIN interface to continue scanning At the end of the scanning batch all pages from the first portion of the scan and second will be sent to the Destination Application C...

Page 81: ...ge Software can both be installed on your computer at the same time however the features in the OneTouch OmniPage Module will take precedence over the OmniPage software features when using OneTouch 4...

Page 82: ...sing To select OCR settings 1 Select the Destination Application 2 Right click on a text format icon A menu appears The following figure shows a sample of the Text menu when the Destination Applicatio...

Page 83: ...same features plus you can edit the text in an nPDF image if you have a PDF editing program These two PDF formats can also produce images with different image quality so you may want to experiment wi...

Page 84: ...t was selected for it 8 To search for the text open Adobe Acrobat Reader or Adobe Acrobat 9 From the Adobe Acrobat File menu choose Open and open the file you just scanned 10 From the Adobe Acrobat Ed...

Page 85: ...ut a blank CD into your computer s CD Drive 2 Open the OneTouch Properties window 3 Select Burn to CD as the Destination Application The Burn to CD Destination Application is only available if you hav...

Page 86: ...aiting to be burned to the CD 7 On the OneTouch window make sure that the Burn to CD Destination Application is still selected and click the Properties button 8 The OneTouch 4 0 Link Properties window...

Page 87: ...cation to use After you select the application its interface will open and you can use it to continue with the scanning To scan with event forwarding 1 Open the OneTouch Properties window 2 Select Sti...

Page 88: ...anning a page A dialog box appears for you to select the application to use for scanning 6 Select the application in the box and click OK Now the application you selected opens and you can continue th...

Page 89: ...d for any internet plug ins or other special processing This is essentially from your scanner to a web ready format in one automatic step To scan and create an HTML web page 1 Open the OneTouch Proper...

Page 90: ...ave As from the Internet Explorer File menu give the page a name and save it in the location you use for your web page files You may also want to write down the address shown in the Address bar to mak...

Page 91: ...ext format for the file format the documents are also automatically converted by the OCR process into editable text and numbers before being stored To scan and transfer to storage 1 Open the OneTouch...

Page 92: ...EW ONETOUCH SCAN SETTINGS 85 5 Click Apply or OK Your scanned pages are stored in the location that you specified on the OneTouch 4 0 Link Properties window Your scanned documents will be stored at th...

Page 93: ...you create multiple scan configurations with Transfer to Storage as the Destination Application Setting up multiple folders for transfer to storage 1 Using Microsoft Windows create the folders that y...

Page 94: ...which folder it is give the new configuration a name that indicates the folder name such as Storage for Business Receipts 6 Click the Storage Options tab 7 Click the Browse button 8 Select the folder...

Page 95: ...folder will now be set as the Storage Location such as Business Receipts 10 Click Apply The new configuration is now listed as a Transfer to Storage configuration 11 Repeat the process to create addit...

Page 96: ...ents to separate folders Scan to multiple storage folders 1 Click the OneTouch icon 2 If the Transfer to Storage option is not selected right click the PaperIn icon to see the OneTouch Properties wind...

Page 97: ...two separate folders TO TRANSFER DOCUMENTS TO A SERVER OR MAPPED DRIVE When selecting the storage location for scanned documents you can select a local folder or a folder on a server or mapped drive Y...

Page 98: ...scanned documents Servers and mapped drives are represented by an icon that indicates its network connection 3 Click OK Now when you scan using Transfer to Storage as the Destination Application the d...

Page 99: ...ose Show Hardware from the pop up menu You can also click the scanner icon at the top of the OneTouch Button Panel If the Hardware View of the panel is open you can also right click on the Visioneer S...

Page 100: ...SELECTING NEW ONETOUCH SCAN SETTINGS 93 2 Click the Properties button The Device Configuration Properties window opens You use this window to select new device settings for you scanner...

Page 101: ...es available The Paper pickup delay is the amount of time you want the scanner to wait until it feeds the item into the scanner to start scanning 2 To set the Paper pickup delay click the drop down ar...

Page 102: ...erPort and ArcSoft PhotoImpression which were provided with your scanner and many other applications will use the TWAIN interface for scanning This section specifically describes how to use the featur...

Page 103: ...tton on the scanner Below are instructions for accessing the TWAIN interface from OneTouch and from PaperPort Opening the TWAIN Interface from OneTouch 1 Press hold down then release the Scan button 2...

Page 104: ...the final image will be sent to the destination application set for that button Please see Setting Destination Application Properties on page 40 for more information on OneTouch destinations Note At...

Page 105: ...n this section are for scanning with your scanner s TWAIN interface To scan an item using PaperPort 1 On the Windows taskbar click Start point to Programs point to ScanSoft PaperPort and then click Pa...

Page 106: ...y only occurs the first time you select from the list while PaperPort initializes the scanner Later on the scanner initializes immediately when you select it from the list Note If the Scan button at t...

Page 107: ...either black or white Use this setting for letters memos and other black and white material This scan mode produces the smallest file size GrayScale to scan items such as documents containing drawings...

Page 108: ...image Increasing the contrast emphasizes the difference between the lighter and darker portions decreasing the contrast de emphasizes that difference Contrast is used in conjunction with brightness De...

Page 109: ...nner to automatically remove a color from a scanned item For example if you are scanning a letter with a red watermark you can choose to filter out the red so the scanned letter just shows the text an...

Page 110: ...e of the units inches or mm millimeters to toggle between them Click OK The currently selected page size appears in the middle of the TWAIN interface on the left hand side The Define page size option...

Page 111: ...the AutoScan feature is not turned on The scanner starts scanning and a progress box shows the image 3 If you are not scanning multiple pages click the Done button on the TWAIN interface 4 Your scan...

Page 112: ...r top right corners so you can click to flip through the pages in the stack The page counter underneath the thumbnail name shows which page you re viewing The small icon at the bottom right corner of...

Page 113: ...your scanner to work with the selected option Note Setting up your scanner is a one time only process for each option from the Scanner selection list Therefore you may have to set up your scanner onc...

Page 114: ...r scanner 1 From the Scanner drop down list select one of the options such as TWAIN Visioneer Strobe XP 2 Click the Setup button A window opens to begin the setup process 3 Click Yes then click Next T...

Page 115: ...checking the connection between your scanner and the computer 5 Click Next After the Setup Wizard checks the connections the next window is displayed It has a series of setup options but only the Bas...

Page 116: ...PORT 109 6 Click Next The TWAIN Interface opens 7 Insert a page into the scanner and the Scan button on the TWAIN Interface will become active Note If you are setting up the scanner for the WIA scanni...

Page 117: ...that says Basic scan test passed 9 Click Next on the message window The final Setup window opens to let you know the setup process is finished 10 Click Finish Your scanner is now setup for the scannin...

Page 118: ...mputer is running an earlier version of Windows it cannot use WIA to scan See Scanning from TWAIN Software on page 95 This section shows how to use Microsoft Paint to scan using the WIA interface To s...

Page 119: ...scanner 3 Click the button most appropriate for the item you re scanning To scan with the Custom Settings option see the next section Fine Tuning Your Scans 4 Align the document between the Paper Gui...

Page 120: ...settings before you scan an item to fine tune exactly how you want to scan a particular item To select the scanner settings before you scan 1 On the Scan using Visioneer Strobe XP window click Adjust...

Page 121: ...t and choose the dots per inch dpi of the resolution The maximum resolution is 600 dpi the minimum is 75 dpi The higher the dpi setting the sharper and clearer the scanned image However higher dpi set...

Page 122: ...during installation but after many hours of use you may find that scanned images may not be a sharp and clear as when you began using the scanner In that case recalibration may solve the problem If y...

Page 123: ...from the pop up menu Click the small scanner icon on a OneTouch Panel or right click the scanner icon on the OneTouch Hardware Panel to open the Hardware Properties window right away If you scanning f...

Page 124: ...117 3 When the Hardware Properties window appears click the Properties button The Device Configuration Properties window opens and shows the Device Settings Note that the Last calibrated date is red...

Page 125: ...essage for inserting the cleaning page is similar 5 Insert the calibration page into the page feed The scanner grabs the paper and feeds it through the scanner The scanner will automatically pass the...

Page 126: ...Note Do not discard the cleaning paper You can use it several times If additional cleaning is necessary add a few drops of Isopropyl alcohol rubbing alcohol to the cleaning paper and use it again Note...

Page 127: ...securely Is the AC adapter plugged in Make sure the AC adapter is securely plugged into a working electrical outlet Problem The scanner won t scan What s wrong Check for one of these possible problems...

Page 128: ...n your computer for another scanner They are interfering with the installation and OneTouch options and you need to remove those other drivers and re install your Visioneer Strobe XP scanner Please se...

Page 129: ...k the Change Remove or Uninstall button 5 Follow the uninstall wizard through removing the scanner driver 6 When the uninstall is complete unplug the scanner s USB cable from the computer UNINSTALLING...

Page 130: ...ve Programs icon Windows Vista Double Click the Programs and Features icon c Select OneTouch 4 0 then click on the Remove button d An Add or Remove message box opens and asks if you are sure you want...

Page 131: ...ay Output Bit Depth 24 bit color 8 bit grayscale 1 bit black and white Scan Method Fast Sheet fed Interface USB 2 0 High Speed Scanner dimensions Height 1 75 inches 4 45 cm Width 2 0 inches 5 08 cm Le...

Page 132: ...scanner Visit our web site at www visioneer com to order replacement parts Part Part Name Part Number Calibration Sheet and Cleaning Sheet 05 0679 000 Duplex Document Sleeve and Duplex Receipt Sleeve...

Page 133: ...126 VISIONEER STROBE XP 300 SCANNER USER S GUIDE US Clip RPA 10 D2 37 0073 000 Plinth Scanner Mounting Stand 85 0237 000 Carrying Bag 88 0489 000...

Page 134: ...60 101 114 csv file format 53 D Destination Application 38 text file format 51 destination software 32 Device Settings 59 65 Document Format 38 Document Management 55 documentation 3 dots per inch dp...

Page 135: ...5 PaperPort desktop 105 Scan Configuration 38 scan with event forwarding 80 scanner recalibration 115 specifications 124 troubleshooting 120 scanning AutoScan 27 Windows Image Acquisition WIA 111 Sear...

Page 136: ...INDEX 129 adjust picture quality 113 Windows 2000 3 Vista 4 XP 3 Windows XP 111 Word Document 53 X xls file format 53...

Page 137: ...INDEX 130...

Page 138: ...Copyright 2007 Visioneer Inc 05 0626 100 visioneer...

Reviews: