background image

74

V

ISIONEER

 S

TROBE

 XP 450 S

CANNER

 U

SER

S

 G

UIDE

AutoScan on document insertion

—Your Visioneer Strobe XP 450 

scanner includes AutoLaunch technology that senses when an item is 
inserted into the paper feed and starts scanning immediately. The item is 
scanned with the current settings on the TWAIN interface. If this option is 
not selected, the scanner waits for you to click the 

Scan

 button. 

D

ISPLAY


THE

 D

EVICE

 S

ETTINGS

1.

Click the 

Visioneer Strobe XP 450 

icon in the top right corner of the 

TWAIN interface.

2.

The device configuration window opens and shows the Device Settings 
information about your scanner.

See the section “Checking the Hardware and Lamp Settings” on 
page 67 for more information about the device settings.

Summary of Contents for Strobe XP 450

Page 1: ...for Windows Visioneer Strobe XP 450 Scanner User s Guide...

Page 2: ...Visioneer Strobe XP 450 Scanner User s Guide F O R W I N D O W S...

Page 3: ...TO THE 12 MONTH PERIOD AFTER THE DATE OF YOUR ORIGINAL PURCHASE IF A VALID REGISTRATION IS NOT RECEIVED DURING THE INITIAL 90 DAY PERIOD THE 12 MONTH WARRANTY IS NO LONGER AVAILABLE AND YOUR PRODUCT W...

Page 4: ...g Interfaces 22 Chapter 3 Scanning from OneTouch 23 Loading Documents 23 Scan with the Scanner Button 24 Scan from the OneTouch Button Panel 25 Features of the OneTouch Button Panel 26 Configuring One...

Page 5: ...th the TWAIN Interface 71 The TWAIN Interface Options 72 Display the Device Settings 74 Chapter 5 Scanning from WIA 75 Chapter 6 Scanning from ISIS 77 Chapter 7 Maintenance 78 Clearing Paper Jams 78 C...

Page 6: ...ce their images on your computer WHAT S IN THE BOX Before proceeding check the contents of the box If items are missing or damaged contact the dealer where you purchased the scanner Strobe XP 450 Scan...

Page 7: ...o Status Light Troubleshooting Codes on page 82 for additional details Output tray Holds documents after being fed through the scanner ADF cover release Opens the cover on the ADF Power switch Turns t...

Page 8: ...Service Pack 3 for Windows XP and Service Pack 1 for Windows Vista Windows 2000 and XP Minimum of 512 megabytes MB of internal memory RAM Windows Vista Minimum of 1 gigabyte GB of internal memory RAM...

Page 9: ...instructions on using the OneTouch VRS features and the SharePoint destination link Readme On the Installation Disc contains the latest information about your scanner and software installation Nuance...

Page 10: ...stallation asking you to allow the installation to proceed The messages will differ based on the software your computer is running but in each case allow the installation to proceed Alternatively you...

Page 11: ...2 Carefully remove the protective foam from the ADF cover release then press the release and open the Automatic Document Feeder cover 3 Remove any foam particles that may have gotten inside the docume...

Page 12: ...STEP 1 ASSEMBLE THE SCANNER 7 5 Insert the pins on each side of the output tray into the holes on the front of the scanner...

Page 13: ...opens Note If the disc does not start check the following Make sure the disc drive s door is completely shut Make sure the disc was inserted in the drive in the proper direction label side up To laun...

Page 14: ...STEP 2 INSTALL THE SOFTWARE 9 3 On the Main Menu select Install Products 4 Make sure the boxes for Nuance PaperPort and Scanner Driver are checked 5 Click Install Now...

Page 15: ...Information window accept the current values or enter new information then click Next 4 On the Setup Type window keep the default Setup Type and click Next 5 Click Install to begin the installation 6...

Page 16: ...License Agreement window read the license agreement If you accept the terms select I Agree and click Next If you choose not to accept the license agreement the installation will terminate and the scan...

Page 17: ...installed and you will not be able to scan using the button on the scanner TWAIN only The TWAIN driver is installed without the OneTouch 4 0 software or the ISIS driver You can use the Visioneer Stro...

Page 18: ...e setting Select the option that looks best to you then click on Next The selection in this window sets the default gamma value for OneTouch You can change this setting later on 6 STOP when you see th...

Page 19: ...Plug the power supply into the power port on the scanner 2 Plug the power cord into the power supply and into a wall outlet Note Only use the power supply HEG42 240200 7L made by HiTron included with...

Page 20: ...located on the back of the scanner to the left of the power port The status light comes on and flashes indicating that the scanner is receiving power If you are using Windows XP or Windows Vista and h...

Page 21: ...y loaded return to the Complete the installation by connecting your hardware window 5 Click OK You can also click More to see a quick overview about accessing and navigating OneTouch When you re finis...

Page 22: ...eturn to the disc s main menu and click on Install Products Software that is already installed will have Installed next to them 2 Select the additional applications you want to install then click Inst...

Page 23: ...ser s Guide section on the scanner s Installation Disc Click on Main Menu then select User Guides QuickScan A desktop imaging solution for scanning image enhancement and OCR QuickScan is a standalone...

Page 24: ...pen in any standard browser If you need to click Adobe Reader to install it now Follow the instructions on the installation windows If your computer already has Adobe Reader installed please do not in...

Page 25: ...s how to setup the SharePoint link and use the SharePoint features when choosing new scan settings for your scanner The OneTouch VRS Mini Guide has information about a feature in the OneTouch 4 0 soft...

Page 26: ...corner of the screen 2 Choose Check for Online Updates from the pop up menu 3 Follow the instructions on the screen and register your scanner by entering your scanner s serial number and your email a...

Page 27: ...tton Panel is the same as pressing the scanner button except you click an icon that represents the scanner button See Scan from the OneTouch Button Panel on page 25 TWAIN Interface This option uses yo...

Page 28: ...f the paper and make sure the output tray is fully extended Note Always remove any staples or paper clips from documents before inserting them into the scanner s Automatic Document Feeder Staples and...

Page 29: ...he tops of the page inserted into the Automatic Document Feeder SCAN WITH THE SCANNER BUTTON 1 Press the button on the scanner 2 A scan progress window opens and the images are sent to the selected lo...

Page 30: ...into the Automatic Document Feeder 2 Now click on the OneTouch icon in the Windows Notification Area at the bottom right corner of the screen 3 On the screen click the Scan button 4 The scanner begins...

Page 31: ...to open the scanner s hardware properties Red x click to close the OneTouch panel The Button View Left click on a Destination Application icon to start scanning Right click on a Destination Applicati...

Page 32: ...s that you can use to open the OneTouch Properties Left click on the OneTouch icon in the Windows Notification Area then right click on the Scan button Or left click on the detailed information Press...

Page 33: ...es and close the window 5 Place a page in the scanner 6 Press the scanner button or click on the Destination Application icon on the OneTouch Panel 7 The scanner starts scanning and sends the image to...

Page 34: ...olution dpi page size brightness Br and contrast Cr To see a selected Scan Configuration s settings click its icon Click the icon again to close the detailed information Note If you select a word proc...

Page 35: ...ndow for selecting OneTouch Properties options See Selecting OneTouch Properties Options on page 55 Properties button Displays a window for selecting properties for each type of Destination Applicatio...

Page 36: ...of another configuration select the configuration then click the Copy button 4 Click on OK at any time to save the configuration and close the Scan Configuration Properties window Or click Cancel to...

Page 37: ...higher dpi settings take longer to scan and produce larger files for the scanned images Brightness Drag the slider to the right or left to adjust the brightness level Brightness refers to the lightnes...

Page 38: ...tab are available AutoCrop to Original Select this option to let the scanner automatically determine the size of the item being scanned Always make sure the paper guides are against the edge of the p...

Page 39: ...vent paper feeding in at too great of an angle Invert Image Only available for Black White scanning this option reverses the black and whites of an image Color Filter Color filter is the ability of yo...

Page 40: ...Grayscale scanning mode Drag the sliders to the left and right to change the color settings As you do the image changes to show the effects of the new settings Color Saturation the strength or purity...

Page 41: ...it on the page Center image on page The image will be printed in the center of the page instead of at the top left corner Maintain aspect ratio The aspect ratio is the length to width relationship of...

Page 42: ...nts are put into folders by month week or type Folders are created based on your selection month week or type and the scanned documents are saved in those folders By default the location of the archiv...

Page 43: ...unlock the configuration Clicking it toggles between locking and unlocking the configuration The key icon indicates the configuration is unlocked 5 Edit the settings and click OK Note Your scanner co...

Page 44: ...he Scan Configuration Configure Before Scan 3 Right click on Configure Before Scan and choose an interface to use for configuring before scanning TWAIN The TWAIN Interface opens for you to make change...

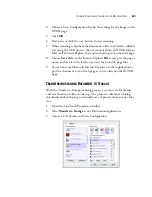
Page 45: ...lick the Scan button on the OneTouch Panel The TWAIN or WIA interface will open This example shows the TWAIN Interface 3 Choose the scan settings such as Black White Grayscale or Color Resolution Brig...

Page 46: ...elete any scanned pages then start over the correct scan Mode selected No Scanning stops and the TWAIN interface remains open You can place a new set of pages into the ADF adjust the TWAIN settings fo...

Page 47: ...by right clicking on the text format icon The names of the formats indicate their file types CREATE SINGLE IMAGE FILES TIFF PDF and the text File Formats support multiple page documents If you are sca...

Page 48: ...of text pages You may want to select PDF as the File Format when scanning text pages that do not require OCR processing or other processing The PDF format is also used to put multi page documents on...

Page 49: ...Formats are only available if an OCR application is installed on your computer See Scanning with Optical Character Recognition OCR on page 45 To select a file type for the text format 1 Select a text...

Page 50: ...n work with the text and numbers to edit spell check change font or type size sort calculate and so forth The PaperPort software must be installed for the OCR options to be available for the TXT RTF X...

Page 51: ...with the text ready for editing and other text processing To select OCR settings 1 Select the Destination Application 2 Right click on a text format icon 3 Choose OCR options Note OCR scanning is also...

Page 52: ...oduce a single column of text in the Destination Application even if the original image had multiple columns of text 5 Click OK Note that the OCR options apply to all the Destination Applications for...

Page 53: ...he PaperPort folder to receive your scanned items 1 Select the folder where you want the file to be located 2 Click OK Then click OK or Apply on the OneTouch Properties window When PaperPort opens aft...

Page 54: ...options will apply to all the applications in the group Always send a file even when no text was found The scanned file is sent to the OCR reader even if the image does not appear to contain text This...

Page 55: ...the icon that will appear in the OneTouch Destination List 5 In step 4 of the dialog box select the file formats that the application will accept Refer to the documentation that you received with the...

Page 56: ...resolution bitmap images with a higher resolution may be too big to fit on the screen Converting the bitmap image to match the screen resolution ensures that the image fits on the screen Convert Bitm...

Page 57: ...in the Storage Location Documents are put into folders by month week or type Folders are created based on your selection month week or type and the scanned documents are saved in those folders New fol...

Page 58: ...AOL folder For scanned images to be auto attached to a blank email message you must have the specific folder location AOL uses to find the attachments Please contact AOL for more information about the...

Page 59: ...er resolution bitmap images with a higher resolution may be too big to fit on the screen Converting the bitmap image to match the screen resolution ensures that the image fits on the screen Convert Bi...

Page 60: ...ndow and click the Options tab 2 Select the Options you want Show All Destinations Selecting this option activates all the Destination Application categories for the scan button so that in the OneTouc...

Page 61: ...r or sending them to a CD burner to create a CD containing the scanned documents See Transferring Scanned Documents to Storage on page 61 and Scan and Burn to a CD on page 58 for details Fax and Print...

Page 62: ...ons are selected because by default file copies for those types of Destination Applications are already automatically saved in a folder on your computer Folder Copy Options This section of the dialog...

Page 63: ...your scanner onto a CD This feature is available only on computers running Windows XP or Windows Vista 1 Open the OneTouch Properties window 2 Select Burn to CD as the Destination Application 3 Choose...

Page 64: ...application to use for scanning at the start of the process you can use event forwarding 1 Open the OneTouch Properties window 2 Select Still Image Client as the Destination Application You cannot cho...

Page 65: ...FROM YOUR SCANNED DOCUMENTS You can convert scanned pages to HTML format for posting directly to your web site Those pages are then viewable by visitors to your web site without the need for any inte...

Page 66: ...orer File menu give the page a name and save it in the location you use for your web page files 9 You can now use Microsoft Internet Explorer or other application to post the document to your web page...

Page 67: ...ample one folder might be for Business Receipts a second folder might be for Personal Receipts and a third folder might be for Annual Receipts To scan to multiple folders you create multiple Scan Conf...

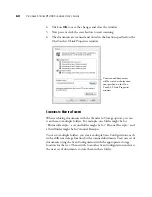
Page 68: ...the OneTouch Properties window 3 Select Transfer to Storage as the Destination Application 4 Click the New button 5 To help you remember which folder it is give the new configuration a name that indi...

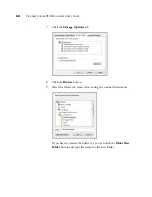
Page 69: ...IDE 7 Click the Storage Options tab 8 Click the Browse button 9 Select the folder you created for storing the scanned documents If you haven t created the folder yet you can click the Make New Folder...

Page 70: ...now listed as a Transfer to Storage configuration 12 Repeat the process to create additional new configurations such as one named Personal Receipts 13 You will now have multiple configurations set up...

Page 71: ...guration you created for storage and click OK 4 Now press or click the scan button to start scanning 5 When scanning is finished insert the next set of documents in the scanner 6 Open the OneTouch Pro...

Page 72: ...how Hardware from the pop up menu You can also click the Hardware icon at the top of the OneTouch Button Panel or right click on the Strobe XP 450 icon when the OneTouch button panel is in the Hardwar...

Page 73: ...nge the time before the scanner powers down from 1 minute to a maximum of 3 hours 3 Click the arrows for the Lamp time out setting and choose a time setting To turn the lamp on and off manually withou...

Page 74: ...described in this section A Note About Your Scanner and the TWAIN standard TWAIN is a widely recognized standard that software applications use to receive images from scanners and digital cameras The...

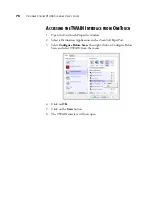
Page 75: ...TOUCH 1 Open the OneTouch Properties window 2 Select a Destination Application such as ScanSoft PaperPort 3 Select Configure Before Scan then right click on Configure Before Scan and select TWAIN from...

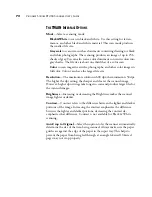
Page 76: ...Select the options you want from the TWAIN interface then load the documents face down with their tops into the Automatic Document Feeder 2 Click the Scan button if the AutoScan feature is not turned...

Page 77: ...600 dpi the minimum is 50 dpi The higher the dpi setting the sharper and clearer the scanned image However higher dpi settings take longer to scan and produce larger files for the scanned images Brig...

Page 78: ...the Grayscale or Color Mode at lower resolutions Define page size Click this option to activate the Define button Click the Define button to see the Define page size dialog In this window you can ente...

Page 79: ...h the current settings on the TWAIN interface If this option is not selected the scanner waits for you to click the Scan button DISPLAY THE DEVICE SETTINGS 1 Click the Visioneer Strobe XP 450 icon in...

Page 80: ...digital cameras and other digital devices This section shows how to use Microsoft Paint to scan using the WIA interface Please refer to your Windows documentation for full instructions on using the W...

Page 81: ...tton most appropriate for the item you re scanning 5 Select a paper size from the Page Size list 6 Adjust the image settings as desired Change the button selection for the type of image Change the siz...

Page 82: ...SIS interface The QuickScan User s Guide is available on the installation disc that you received with the scanner ACCESSING THE ISIS INTERFACE FROM QUICKSCAN Open the QuickScan software to access the...

Page 83: ...number of paper jams smooth and straighten the paper before scanning and adjust the guides to the paper size and insert the paper evenly into the ADF CLEAN THE AUTOMATIC DOCUMENT FEEDER You may need t...

Page 84: ...ormation 1 Press the ADF cover release on the top left of the scanner body to open the Automatic Document Feeder cover 2 The ADF pad is located in the top of the scanner 3 Squeeze the plastic clamps t...

Page 85: ...scanner s status light on Turn on the scanner s power If the status light doesn t come on plug the power supply into another electrical outlet Did you restart the computer after installing the softwar...

Page 86: ...sometimes I get blank pages or pages with lines What s wrong The pages were probably scanned in crooked or skewed To use AutoCrop to Original the pages must be scanned in straight Adjust the paper gui...

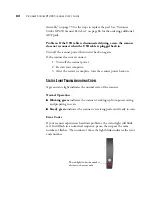
Page 87: ...computer 3 After the restart is complete turn the scanner power back on STATUS LIGHT TROUBLESHOOTING CODES A green status light indicates the normal state of the scanner Normal Operation Blinking gre...

Page 88: ...try plugging the scanner power directly into a wall outlet 5 The scanner is open Make sure the scanner is fully closed after performing maintenance on the scanner or removing a jammed page 6 The lamp...

Page 89: ...emove button 4 Click Yes when asked to confirm that you want to remove these software programs 5 Follow the same steps to select and remove the Kofax VirtualReScan module from the installed programs l...

Page 90: ...orted Microsoft Operating Systems Windows 2000 Service Pack 4 32 bit Windows XP Service Pack 2 32 bit or 64 bit Windows Vista Scanner dimensions Width 13 inches Depth 6 5 inches Height 6 38 inches Wei...

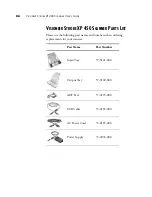
Page 91: ...SCANNER PARTS LIST Please use the following part names and numbers when ordering replacements for your scanner Part Name Part Number Input Tray 57 0101 000 Output Tray 57 0102 000 ADF Pad 57 0103 000...

Page 92: ...Scan 39 cancel 41 Contrast 32 72 D Destination Application 27 OCR 46 Device Settings Tab 36 Disc 1 8 Document Management 56 documentation 4 E eMail 56 Properties 52 error codes 82 Excel Spreadsheet 45...

Page 93: ...ding 59 scanner components 2 connecting 14 troubleshooting 80 scanner button configuring 27 screen button configuring 27 Select Configuration 29 Select Destination 29 55 Select Format 30 setup 5 Share...

Page 94: ...Copyright 2008 Visioneer Inc 05 0567 700 visioneer...

Reviews: