background image

DQ Technology, Inc. / VisionNet   

Page 84 

M605N User Manual Revision 3.1 

Section   9.3   –   Update   the   Running   Configuration      


When   to   update   the   Running   Configuration

:   

   
When   you   wish   to   test   new   settings   without   affecting   the   default   configuration.      


Behavior   of   the   Running   Configuration:      

   
The   running   configuration   only   affects   the   modems   functionality   during   operation   and   standard   reboots.   It   is   erased   when   

the   customer   presses   the   reset   button   or   the   

“Restore   Default”


function   is   activated.


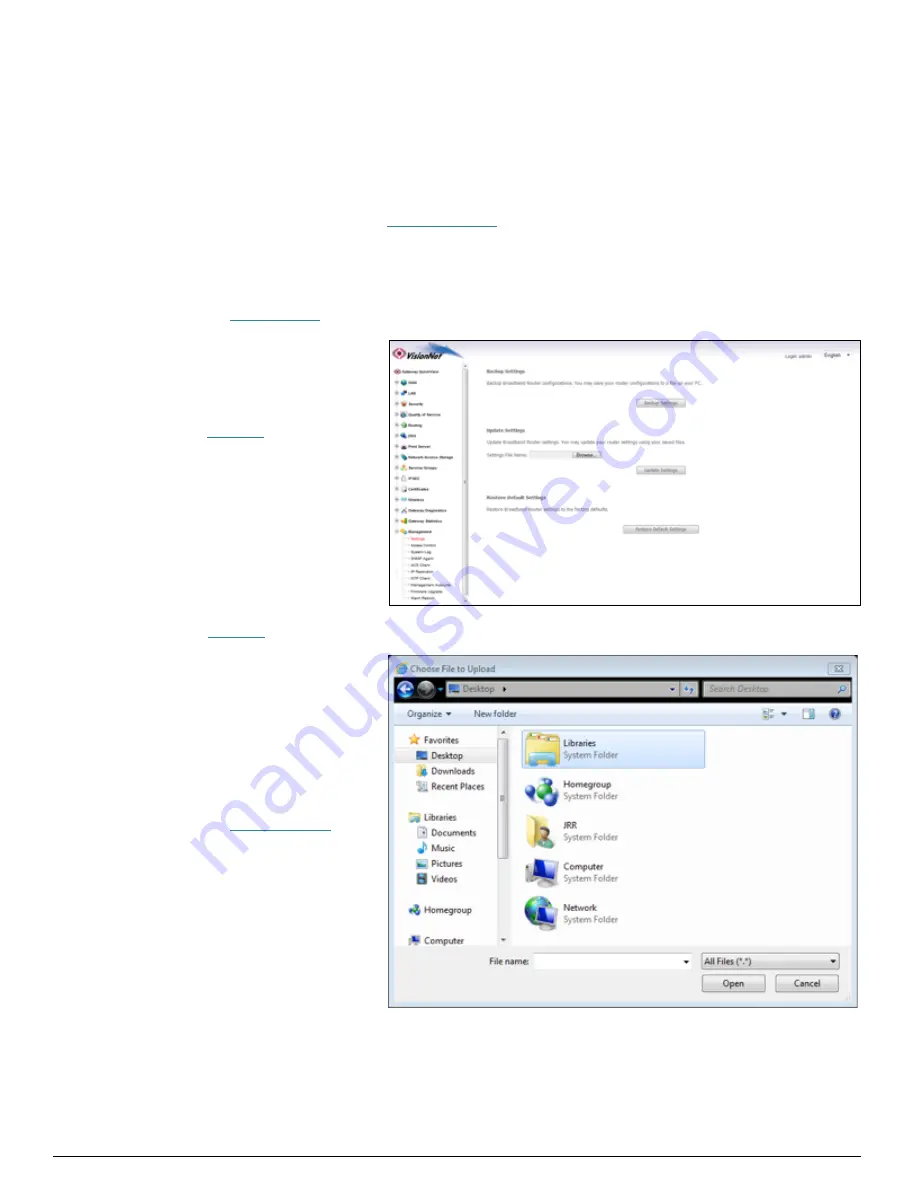
Step   1:   Access   the   GUI   to   find   Backup   Configuration   Tool   


1.A   

Select   the   

“Management”   

tab   located   within   the   left-­‐hand   frameset.      


Then,   In   the   left-­‐hand   frameset,   
select   

“Settings”   


1.B   

Select   

“Browse”   

button   and   choose   your   file   location   via   your   browser’s   upload   tool.   


Select   the   

“Update   Settings”   

button   


Summary of Contents for M605N

Page 1: ...ription VDSL2 ADSL2 Ethernet WAN Residential Gateway featuring Qty 4 10 100 Ethernet Ports Qty 1 Gigabit Ethernet Port Qty 1 USB 2 0 802 11b g n 2T2R To Contact VisionNet for Tier 2 Support Voice 1 925 730 3940 Email support visionnetusa com Online http www visionnetusa com ticketportal User Manual ...

Page 2: ... 3 7 Creating an IPoE WAN Service 28 3 8 Creating a PPPoE WAN Service 30 3 9 Creating a Bridge WAN Service 36 3 10 WAN Interface Prioritization 38 3 11 Gateway Prioritization 39 3 12 Universal Static Gateway Service 40 3 13 DNS Prioritization 41 3 14 Universal Static DNS Service 43 SECTION 4 PUBLIC WAN IP ADDRESS ALLOCATION 4 1 Public IP Allocation Public Subnet WAN Interface within Subnet 45 4 2 ...

Page 3: ... 9 2 Over Writing the Default Configuration 83 9 3 Update the Running Configuration 84 9 4 Restoring the Default Settings 85 9 5 Updating the Modem Firmware 87 9 6 Rebooting the Modem 88 9 7 ACS Configuration 89 9 8 SNMP Configuration 90 9 9 NTP Configuration 91 9 10 IP Restriction Management ACLs 92 9 11 Remote Access 93 SECTION 10 WI FI 10 1 Wireless Channel Configuration 94 10 2 SSID Configurat...

Page 4: ...ss bar to access the modem remotely ie http 67 125 108 137 Use the modem s LAN IP Address to access the GUI locally http 192 168 1 254 1 B Once the modem responds you will be challenged for a User Name and Password Remote Access Privileged Username support Password ISP Specific Restricted Username techsupport Password ISP Specific Local Access Privileged Username admin Password ISP Specific Restri...

Page 5: ...ology Inc VisionNet Page 5 M605N User Manual Revision 3 1 1 C You will be directed to the Main GUI Page PLEASE NOTE ONLY the End User Login should be given to End Users NEVER RELEASE ANY OTHER LOGIN INFORMATION ...

Page 6: ... to the Overview WAN Section 1 B Status At least one WAN Service should be Up If there is not an up link then there will be no WAN Access IP Address Only one WAN Service should have an IP Address Without a WAN IP address there will be no WAN Access With exception of Bridged Connections Protocol ISP Specific WHAT THESE STATISTICS MEAN This page will verify that the WAN connection is operating corre...

Page 7: ...stics tab located within the left hand frameset Then scroll to the WAN Section Select the icon next to the active WAN connection 1 A Select the Gateway Quickview tab located within the left hand frameset WHAT THESE STATISTICS MEAN This page will verify that data is being received and transmitted You will also be able to view detailed IPV4 IPV6 and Configuration Settings ...

Page 8: ...s Step 1 Access the GUI to find DSL Statistics 1 A Select the Gateway Statistics tab located within the left hand frameset Then In the left hand frameset select xDSL WHAT THESE STATISTICS MEAN This page will verify DSL Link and will provide information regarding line characteristics and capacities ...

Page 9: ... ATM Statistics Step 1 Access the GUI to find ATM Statistics 1 A Select the Gateway Statistics tab located within the left hand frameset Then In the left hand frameset select ATM WHAT THESE STATISTICS MEAN This page will verify ATM Operation and specify the type of packets being sent ...

Page 10: ...stics 1 A Select the Gateway Statistics tab located within the left hand frameset Then In the left hand frameset select DHCP WHAT THESE STATISTICS MEAN This page will provide the IP Addresses assigned by the modem s DHCP server the MAC addresses of dynamically assigned devices and the amount of time that the device has spent on the network ...

Page 11: ...N devices and is especially useful when using the Reserve an IP Address feature 1 A Select the Gateway Statistics tab located within the left hand frameset Then In the left hand frameset select Hosts WHAT THESE STATISTICS MEAN This page will provide the MAC Addresses of all recognized devices connected to the modem A device will only be recognized once it has requested data from the modem ...

Page 12: ...on 2 7 View LAN Statistics Step 1 Access the GUI to find LAN Statistics 1 A Select the Gateway Statistics tab located within the left hand frameset Then In the left hand frameset select LAN WHAT THESE STATISTICS MEAN This page will verify that LAN Devices are communicating ...

Page 13: ...way Diagnostics tab located within the left hand frameset Then In the left hand frameset select either Inbound Toolkit LAN or Outbound Toolkit WAN 1 B You may use this tool to ping either a domain name or an IP Address TO TEST LOCAL LAN DEVICES Enter the IP Address of the LAN Device and select Ping Request ie 192 168 1 64 TO TEST REMOTE WAN IP ADDRESSES Enter the WAN IP Address and select Ping Req...

Page 14: ...his does not guarantee that the Device has WAN Access If you can Ping the WAN Gateway The modem s DHCP Client has properly obtained an IP Address If you can Ping a WAN IP Address The modem can access the internet but this does not necessarily mean that DNS resolution is operational If you can Ping a WAN Domain Name The modem can access the internet correctly ...

Page 15: ... hand frameset select either Inbound Toolkit LAN or Outbound Toolkit WAN 1 B You may use this tool to trace the path of either a domain name or an IP Address TO TEST LOCAL LAN DEVICES Enter the IP Address of the LAN Device and select Trace Route ie 192 168 1 64 This test should not show more than one hop TO TEST REMOTE WAN IP ADDRESSES Enter the WAN IP Address and select Trace Route ie 4 2 2 4 Thi...

Page 16: ...DQ Technology Inc VisionNet Page 16 M605N User Manual Revision 3 1 ...

Page 17: ...ion 3 1 Section 2 10 Local Remote System Logging Step 1 Access the GUI to begin SysLog Configuration 1 A Select the Management tab located within the left hand frameset Then In the left hand frameset select System Log 1 B Select the Configure System Log Button ...

Page 18: ... Log Log Enabled Mode Both Enables Internal and PC Server Logging Log and Display Levels Debugging Server IP Address Default 192 168 1 239 This must match the IP of the computer running Kiwi VisionNet suggests that the computer running Kiwi be statically assigned to 192 168 1 239 Server UDP Port 514 2 B Select Save Apply ...

Page 19: ...lect the WAN tab located within the left hand frameset Then In the left hand frameset select WAN Services 1 B Select the Edit Button associated with the relevant PVC ie 0 34 or 0 35 2 A Edit the PPP Authentication Page PPP DEBUG Enabled 2 B Proceed through the remainder of the edit section PLEASE NOTE THIS IS TEMPORARY ONLY AND MUST NOT BE LEFT AS A PERMANENT CONFIGURATION ...

Page 20: ...INSPECTION VIA COMMAND LINE Step 1 Open a Telnet Client 1 A Point the Telnet Client at the IP Address of the CPE LOCAL Use the private IP Address REMOTE Use the public IP Address 1 B Login using the appropriate username and password Enter the following command cat proc net nf_conntrack ...

Page 21: ...oubleshooting you may be requested to change DSL Modulation settings The below instructions will guide you through making these changes Step 1 Direct Your Browser to the LAN Configuration Page 1 A Select the WAN tab located within the left hand frameset Then In the left hand frameset select DSL Services 1 B For Each DSL Protocol a checked box indicates that it is enabled while an unchecked box ind...

Page 22: ... from Now that there are multiple WAN Interfaces to choose from you must create the WAN Interface and the WAN Service separately PREVIOUS METHOD NEW METHOD SO WHAT CHANGED VisionNet Gateways now support ATM Traditional DSL PTM Used for VDSL2 and PTM over ADSL2 Ethernet Used for Ethernet WAN Port Operation Which means that there are now two separate processes BUILDING A WAN SERVICE Create WAN Inter...

Page 23: ...s you have VLAN Mux Enabled you can only use one interface per physical port Hence do not attempt to build a new interface until you have removed any conflicting interfaces Step 1 Selecting the WAN Interface to Create 1 A Select the WAN tab located within the left hand frameset Then In the left hand frameset select the appropriate WAN Interface DSL Ethernet PTM ...

Page 24: ... Revision 3 1 Section 3 4 Creating a DSL Interface Step 1 Selecting the WAN Interface to Create 1 A Select the WAN tab located within the left hand frameset Then In the left hand frameset select the appropriate WAN Interface DSL Interfaces 1 B Select Add ...

Page 25: ... Link EoA IPOE MER PPPOE Bridged PPPoA IPoA Select Connection Mode Default Mode Standard Single Service VLAN MUX Multiple VLANs over a single PVC Encapsulation Mode ISP Specific Service Category ISP Specific Select ISP QoS Strict Policy Standard for single service config Weighted Fair Queuing Use multiple service configurations IE Data PVC 1 8 IE IPTV PVC 1 1 2 B Select Apply Save You will see the...

Page 26: ... Revision 3 1 Section 3 5 Creating a PTM Interface Step 1 Selecting the WAN Interface to Create 1 A Select the WAN tab located within the left hand frameset Then In the left hand frameset select the appropriate WAN Interface PTM Interfaces 1 B Select Add ...

Page 27: ...ould be checked Select PTM Priority Normal Priority High Priority Pre Emption Select Connection Mode Default Mode Standard Single Service VLAN MUX Multiple VLANs over a single PVC Select ISP QoS Strict Policy Standard for single service config Weighted Fair Queuing Use multiple service configurations 2 B Select Apply Save You will see the Interface reflected in the updated Interface Table ...

Page 28: ...sion 3 1 Section 3 6 Creating an Ethernet Interface Step 1 Selecting the WAN Interface to Create 1 A Select the WAN tab located within the left hand frameset Then In the left hand frameset select the appropriate WAN Interface Ethernet Interfaces 1 B Select Add ...

Page 29: ... A Select the WAN tab located within the left hand frameset Select Connection Mode ENET 1 4 ENET 4 Default OmniPort Select Connection Mode Default Mode Standard Single Service VLAN MUX Multiple VLANs over a single PVC 2 B Select Apply Save You will see the Interface reflected in the updated Interface Table ...

Page 30: ... 3 7 Creating an IPOE WAN Service Step 1 Selecting the WAN Service to Create 1 A Select the WAN tab located within the left hand frameset Then In the left hand frameset select the appropriate WAN Interface Ethernet Services 1 B Select Add 1 C Select the desired WAN Interface ...

Page 31: ...P Tag Only for VLAN Mux Services 1 Untagged Otherwise choose appropriate tag 802 1Q Tag Only for VLAN Mux Services 1 Untagged Otherwise choose appropriate tag 2 B Select Next and Proceed to WAN IP Settings Obtain IP Address Automatically For DHCP Service Options 55 to 61 Only if specified by your Network Ops Manager Use the following Static IP Enter appropriate information MTU 1500 unless specifie...

Page 32: ...st is to be used for IPTV IGMP Proxy 2 D Routing Default Gateway The DHCP Interface should be allocated to the Selected Default Gateway Interfaces This can be changed later The gateway priority is arranged from Top to Bottom Gateways that are not allocated will not be used for the Routing Table 2 E DNS Server Configuration You may prioritize the Dynamic DNS Servers or You may specify static DNS Se...

Page 33: ... 3 8 Creating a PPPoE WAN Service Step 1 Selecting the WAN Service to Create 1 A Select the WAN tab located within the left hand frameset Then In the left hand frameset select the appropriate WAN Interface Ethernet Services 1 B Select Add 1 C Select the desired WAN Interface ...

Page 34: ...tion Method AUTO unless specified by your Network Operations Manager MTU 1492 unless specified by your Network Operations Manager Enable NAT Enabled unless otherwise specified by Network Operations Enable Full Cone NAT Disabled unless specified otherwise by Network Operations Dial on Demand Disabled unless specified otherwise by Network Operations PPPIP Extension Disabled unless specified otherwis...

Page 35: ... be changed later The gateway priority is arranged from Top to Bottom Gateways that are not allocated will not be used for the Routing Table 2 D DNS Server Configuration You may prioritize the Dynamic DNS Servers or You may specify static DNS Servers 2 E When complete you may approve the settings You will see the service populated in the WAN Services table ...

Page 36: ... 3 9 Creating a Bridge WAN Service Step 1 Selecting the WAN Service to Create 1 A Select the WAN tab located within the left hand frameset Then In the left hand frameset select the appropriate WAN Interface Ethernet Services 1 B Select Add 1 C Select the desired WAN Interface ...

Page 37: ...Select WAN Service Type Bridging Enter Service Description Will not affect service no spaces allowed 802 1P Tag Only for VLAN Mux Services 1 Untagged Otherwise choose appropriate tag 802 1Q Tag Only for VLAN Mux Services 1 Untagged Otherwise choose appropriate tag 2 B Select Next to complete the Bridge WAN Service Select Apply Save ...

Page 38: ...ccess the GUI to find the WAN Interface Page 1 A Select the WAN tab located within the left hand frameset Then In the left hand frameset select WAN Services 1 B Select the appropriate setting under WAN INTERFACE SELECTION ATM Interface DSL ONLY Omni Port Interface Ethernet ONLY Activate Omni Port when no DSL Sync is present DSL Primary Ethernet Secondary Timeout Period Time after boot up without D...

Page 39: ...purpose You may specify which WAN Services are used for outbound traffic and in which order through Gateway Prioritization Step 1 Access the GUI to find the Gateway Page 1 A Select the Routing tab located within the left hand frameset Then In the left hand frameset select Default Gateway 1 B Check Select Default Gateway Interfaces Gateways are prioritized from top to bottom 1 C Select Save ...

Page 40: ... to specify a universal gateway address You may do so via the Gateway Prioritization Page Step 1 Access the GUI to find the Gateway Page 1 A Select the Routing tab located within the left hand frameset Then In the left hand frameset select Default Gateway 1 B Check Enable Static Gateway IP Address Enter the desired Static Gateway 1 C Select Save ...

Page 41: ...y use the DNS Server page to prioritize DNS Selection based upon WAN Services Step 1 Access the GUI to find the DNS Server Page 1 A Select the DNS tab located within the left hand frameset Then In the left hand frameset select DNS Server 1 B Select Select DNS Server Interfaces from available WAN Interfaces ...

Page 42: ...DQ Technology Inc VisionNet Page 42 M605N User Manual Revision 3 1 1 C Prioritize WAN Interfaces from Top to Bottom 1 D Select Apply Save and then reboot the modem ...

Page 43: ... DNS addresses for each WAN Service In the event that Static IPs are to be used you may update and change the settings with the following procedure Step 1 Access the GUI to find the DNS Server Page 1 A Select the DNS tab located within the left hand frameset Then In the left hand frameset select DNS Server 1 B Select Use the following Static DNS IP Address ...

Page 44: ...DQ Technology Inc VisionNet Page 44 M605N User Manual Revision 3 1 1 C Enter the Primary and Secondary WAN DNS Addresses 1 D Select Apply Save and then reboot the modem ...

Page 45: ... for a Public WAN Subnet you must obtain the following information 1 The WAN Subnet to be used ie 172 16 100 9 29 2 The WAN Gateway to be used 3 The WAN DNS Addresses to be used Step 1 Select the appropriate WAN Service for modification 1 A Create the desired WAN Interface Enter the required Public IP Information 1 B Ensure the following settings NAT must be DISABLED Firewall must be DISABLED IGMP...

Page 46: ...e the Default Gateway 2 A You may need to specify the gateway interface if you are using a PPP connection Select Routing Enter ISP WAN Gateway 2 B You may also specify the static DNS Page by access DNS and then DNS SERVER You may enter the Static DNS Information 2 C Select Save Apply ...

Page 47: ...P Disabled Enable IGMP Snooping Disabled Enable LAN Side Firewall Disabled DHCP Server Enabled Or Disabled depending Start IP Address Second Host IP Address End IP Address 6 th Host IP Address Subnet Mask 255 255 255 248 DNS Servers Enter primary and Secondary Leased Time hour 24 Reserve IP Address Unnecessary Configure Secondary IP Address Unchecked 3 B Once complete select Save Reboot PLEASE NOT...

Page 48: ...ED A SERIES OF STATIC IP ADDRESSES PLEASE OBTAIN APPROVAL FROM A SUPPORT MANAGER BEFORE BEGINNING THIS PROCEDURE Prior to configuring the modem for a Public WAN Subnet you must obtain the following information The WAN Subnet to be used ie 172 16 100 144 29 Why Virtual IP Allocation You may wish to allocate IP Addresses directly to devices that are assigned to the customer but not the primary WAN I...

Page 49: ...N User Manual Revision 3 1 Step 1 Edit an existing WAN Connection 1 A In the left hand frameset select WAN Then select WAN Services 1 B Choose the appropriate WAN Service and select Edit 1 C Disable Firewall ONLY ENABLE NAT SHOULD BE ENABLED ...

Page 50: ...er to the LAN Configuration Page 2 A Select the LAN tab located within the left hand frameset Then In the left hand frameset select LAN IP Configuration 2 B Select Configure the Second IP Address and Subnet Mask for LAN Interface Enter the first usable Host within the desired subnet Enter the Subnet Mask 255 255 255 248 2 C Select Apply Save ...

Page 51: ... Manual Revision 3 1 Step 3 Configure Hosts 3 A EACH HOST MUST BE CONFIGURED WITH THE FOLLOWING SETTING IP ADDRESS Usable Host Subnet Mask 255 255 255 248 Gateway First Usable Host CPE LAN IP Address DNS Address Choose appropriate Birch DNS Servers ...

Page 52: ... for a Public WAN Subnet you must obtain the following information 1 The WAN Subnet to be used ie 172 16 100 144 29 2 The WAN Gateway to be used 3 The WAN DNS Addresses to be used Why 1 1 NAT Multi NAT Multi NAT will allow you to forward traffic destined for a WAN IP Address within the assigned subnet to an internal Host assigned with a private LAN IP ...

Page 53: ...N User Manual Revision 3 1 Step 1 Edit an existing WAN Connection 1 A In the left hand frameset select WAN Then select WAN Services 1 B Choose the appropriate WAN Service and select Edit 1 C Disable Firewall ONLY ENABLE NAT SHOULD BE ENABLED ...

Page 54: ...1 D Review the WAN Setup Summary Select Apply Save Step 2 Apply Static LAN IPs to Devices to that will have direct WAN Access 2 A Please see section 4 2 for further instruction Step 3 Configure 1 1 NAT 3 A In the left hand frameset select Security Then select Multi NAT ...

Page 55: ...r Manual Revision 3 1 3 B Select Add Rule Type One to One Use Interface Choose appropriate WAN Interface Internal AddrStart Choose LAN IP Address ie 192 168 1 200 External AddrStart Choose WAN IP Address ie 172 20 111 147 3 C Review the NAT Table ...

Page 56: ...u may wish for the IP Address obtained by the Gateway to forward to a LAN Host You may not wish for a full subnet to be assigned PPPIP Extension will forward the Gateway s WAN IP to the first LAN Host that makes a DHCP request Step 1 When creating a WAN Connection 1 A PPP Configuration PPPIP Extension must be enabled 1 B NAT must be DISABLED Full Cone NAT must be DISABLED Firewall must be DISABLED...

Page 57: ...DQ Technology Inc VisionNet Page 57 M605N User Manual Revision 3 1 1 C The LAN Section will be modified automatically ...

Page 58: ...he left hand frameset select LAN IP CONFIGURATION Step 2 Configure LAN Settings 2 A Configure the LAN IP Characteristics IP Address 192 168 1 254 Subnet Mask 255 255 255 0 Enable IGMP Snooping Unchecked DHCP Server Enabled Start IP Address 192 168 1 64 End IP Address 192 168 1 100 Primary DNS Server 192 168 1 254 Secondary DNS Server WAN DNS Address Leased Time hour 24 All other settings Unnecessa...

Page 59: ...he specified MAC Address The Reserved IP Address will not be assigned to any other LAN Devices Prior to Assigning the Reserved IP Address you must determine the MAC Address of the target LAN Device You may copy the MAC Address from the ARP Table located within the Device Info Section of the GUI Step 1 Direct Your Browser to the LAN Configuration Page 1 A Select the LAN tab located within the left ...

Page 60: ... the IGMP values and conventions There are times that you may wish to define one protocol exclusively IE IGMP v3 in lieu of v2 Step 1 Direct Your Browser to the LAN Configuration Page 1 A Select the LAN tab located within the left hand frameset Then In the left hand frameset select IGMP Force 1 B Make desired changes 1 C Select Apply Save ...

Page 61: ...ss 192 168 1 254 IP CAMERAS IP Camera Port Forwarding Rules have been enabled Designation WAN Port LAN IP LAN Port Protocol Camera 1 6231 192 168 1 231 80 TCP UDP Camera 2 6232 192 168 1 232 80 TCP UDP Camera 3 6233 192 168 1 233 80 TCP UDP Camera 4 6234 192 168 1 234 80 TCP UDP The most effective method of utilizing these rules is to request that the end user change the IP Address of their Camera...

Page 62: ...tion Page 1 A Select the Security tab located within the left hand frameset Then In the left hand frameset select Port Forwarding 1 B Select the Add Button Please Note If the port to be assigned is already specified in the existing Port Forwarding Table you must remove the rule containing this port prior to creating a new one ...

Page 63: ...ess the device on the WAN Side External Port End This should be the same as External Port Start Protocol This should be TCP UDP to avoid possible errors due to end user mis communication Internal Port Start This should be the port that the device listens on see IP Camera example External Port End This should be the same as Internal Port Start Remote IP This should left blank unless only one remote...

Page 64: ... VPN ports and requires Port Triggering to work The following are the port triggering rules required for Nortel Contivity VPNs Port Triggering for Nortel Contivity VPNs LAN Device Outbound Port Outbound Protocol Port Temporarily Forwarded to Initiating LAN Device Inbound Protocol 500 TCP UDP 500 TCP UDP 10001 TCP UDP 10001 TCP UDP In this scenario a LAN Device ie The end user s laptop will make an...

Page 65: ...tion Page 1 A Select the Security tab located within the left hand frameset Then In the left hand frameset select Port Triggering 1 B Select the Add Button Please Note If the port to be assigned is already specified in the existing Port Triggering Table you must remove the rule containing this port prior to creating a new one ...

Page 66: ...me applications however may use a succession of ports In this case you will enter the final port in that range If these ports are not in succession you must enter the next port as another row in the rule Protocol This should be TCP UDP to avoid possible errors due to end user mis communication Open Port Start This is the WAN Port that the remote server will reply on Open Port End This will usually...

Page 67: ...vice as the DMZ host to see if this resolves the issue If this does not resolve the issue the port triggering rule should be removed and replaced with port forwarding Once port forwarding has been verified to work then port triggering may be re visited If port triggering does not work then further research should be done to identify the behavior of the communication between the LAN device and the ...

Page 68: ...pecific device is to be assigned as a DMZ host this device should have either a Static IP or a Reserved IP Step 1 Direct Your Browser to the DMZ Host Configuration Page 1 A Select the Security tab located within the left hand frameset Then In the left hand frameset select DMZ Host 1 B Enter the desired DMZ Host IP Address This is the IP Address of the LAN Device which will receive all non specifie...

Page 69: ...UPnP will dictate how devices share information on the LAN and the Dynamic port rules to be used for Internet Content Step 1 Direct Your Browser to the UPnP Page 1 A Select the Security tab located within the left hand frameset Then In the left hand frameset select UPnP 1 B Select Enable UPnP You may enable disable UPnP by toggling the checkbox 1 C Select Apply Save ...

Page 70: ... certain traffic is detected You must enable or disable these algorithms to adjust operation These algorithm port conventions are only honored when the Firewall is enabled Step 1 Direct Your Browser to the Algorithm Page 1 A Select the Security tab located within the left hand frameset Then In the left hand frameset select Algorithm 1 B Enable Disable Algorithms H323 IRC RTSP IPSEC SIP 1 C Select ...

Page 71: ...Page 1 A Select the Security tab located within the left hand frameset Then In the left hand frameset select WAN Access Control 1 B Define Access Time Restrictions UserName This is simply for organizational purposes and does not affect performance MAC Address Browser s MAC Address MAC Address of host accessing the GUI Other MAC Address User Defined MAC Address Days of the Week Days of the Week tha...

Page 72: ...ertain URLs Step 1 Direct Your Browser to the WAN Access Control Page 1 A Select the Security tab located within the left hand frameset Then In the left hand frameset select URL Filtering Include Only the approved URLs will be allowed Exclude Only the disallowed URLs will be blocked 1 B Define URL Restrictions URL IE facebook com Port Number 80 by default 1 C Select Apply Save ...

Page 73: ...ased upon Layer 3 Identification Step 1 Direct Your Browser to the WAN Access Control Page 1 A Select the Security tab located within the left hand frameset Then In the left hand frameset select either Inbound IP Filtering OR Outbound IP Filtering 1 B Define IP Filtering Define at least one condition for identification of traffic 1 C Select Apply Save ...

Page 74: ...1 Direct Your Browser to the WAN Access Control Page 1 A Select the Security tab located within the left hand frameset Then In the left hand frameset select either Bridge Access Control Forwarded Everything forwarded except defined traffic Blocking Everything Blocked except defined traffic 1 B Define Restrictions Define at least one condition for identification of traffic 1 C Select Apply Save ...

Page 75: ...Section 7 1 QoS Enable Disable Step 1 Access the QoS Enable Disable Page 1 A Select the Quality of Service tab located within the left hand frameset You may Enable QoS Unless specified otherwise do not change the Default DSCP Mark This will enable QoS rules within the device 1 B Select Save Apply ...

Page 76: ... within this page Step 1 Direct Your Browser to the QoS Interface Configuration Page 1 A Select the Security tab located within the left hand frameset Then In the left hand frameset select Queue Configuration 1 B Enable Disable Rules You must enable a rule for it to take precedence You may also create Queue precedence for interfaces within this section 1 C Select Apply Save ...

Page 77: ...emove the QoS Configuration Step 1 Direct Your Browser to the WAN Access Control Page 1 A Select the Security tab located within the left hand frameset Then In the left hand frameset select QoS Classification 1 B Create a new QoS Classification You may identify and modify QoS tagging within this table 1 C Select Apply Save ...

Page 78: ... provide service to particular Interfaces independent of other services The key difference between Service Grouping and Port Mapping of the past is that the VisionNet device supports multiple NAT Sessions DHCP Servers and Network Conventions between Service Grouping A Service Group Therefore Operates similarly to a traditional VLAN except that the VLAN Tagging conventions are transparent to the ad...

Page 79: ...he Service Groups tab located within the left hand frameset Then In the left hand frameset select Service Mapping 1 B Select Add You may select physical interfaces to be grouped together with specific WAN services These will operate independently of the primary gateway operation You may also group clients by DHCP Vendor IDs Boot P Classification 1 C Select Apply Save ...

Page 80: ... Step 1 Direct Your Browser to the LAN Page 1 A Select the LAN tab located within the left hand frameset Then In the left hand frameset select LAN IP Management 1 B Select the appropriate GroupName You may configure the Service Group LAN Settings independent of the Primary Service Group 1 C Select Apply Save ...

Page 81: ...DQ Technology Inc VisionNet Page 81 M605N User Manual Revision 3 1 SECTION 9 CONFIGURATION SETTINGS Section 9 0 Configuration File Logic Device Reset Behavior ...

Page 82: ...o save the backup configuration It is suggested that the backup configuration is kept on your PC Desktop and given a customer name Step 1 Access the GUI to find Backup Configuration Tool 1 A Select the Management tab located within the left hand frameset Then In the left hand frameset select Settings 1 B Select Backup Settings and choose your download location via your browser s download tool ...

Page 83: ...ing configuration when the customer holds the modem s reset button for 5 seconds It is also loaded to the running configuration when Restore Default is selected within the GUI Step 1 Access the GUI to find the Default Configuration Page 1 A The Update Default Configuration page is hidden within the GUI to prevent un authorized access The hidden URL is located at http XXX XXX XXX XXX customer main ...

Page 84: ... configuration only affects the modems functionality during operation and standard reboots It is erased when the customer presses the reset button or the Restore Default function is activated Step 1 Access the GUI to find Backup Configuration Tool 1 A Select the Management tab located within the left hand frameset Then In the left hand frameset select Settings 1 B Select Browse button and choose y...

Page 85: ... that affect performance Restoring the Default Settings via the GUI 1 A Select the Management tab located within the left hand frameset Then In the left hand frameset select Settings 1 B Select the Restore Default Settings When challenged approve the restore The modem will reset itself You may need to refresh your browser It is possible that the modem will obtain a new IP Address upon reboot Resto...

Page 86: ...DQ Technology Inc VisionNet Page 86 M605N User Manual Revision 3 1 2 A Press the Reset Button and hold down for 5 seconds 2 B Wait for the modem to reboot ...

Page 87: ...the product software Step 1 Access the GUI to find the Update Firmware Tool 1 A Select the Management tab located within the left hand frameset Then In the left hand frameset select Firmware Upgrade 1 B Select the Browse button and select the firmware file on your PC 1 C Once you have specified the firmware select the Update Software button The modem will reset itself ...

Page 88: ...re initialize network settings Rebooting the modem will reboot the modem to the running configuration not the default configuration Step 1 Access the GUI to find the Reboot Tool 1 A Select the Management tab located within the left hand frameset Then In the left hand frameset select Warm Reboot 1 B Select the Reboot button The modem will reset itself with the running configuration ...

Page 89: ...ion SNMP Traps will allow for you to monitor modem performance Step 1 Access the GUI and find the SNMP Configuration Page 1 A Select the Management tab located within the left hand frameset Then In the left hand frameset select SNMP 1 B Enter the appropriate information and the select Save Apply ...

Page 90: ...ion ACS TR 069 Servers may be used to access the Gateway Step 1 Access the GUI and find the ACS Configuration Page 1 A Select the Management tab located within the left hand frameset Then In the left hand frameset select ACS Client 1 B Enter the appropriate information and the select Save Apply ...

Page 91: ...Network Time Protocol is necessary for accurate SysLog TimeStamps Step 1 Access the GUI and find the SNMP Configuration Page 1 A Select the Management tab located within the left hand frameset Then In the left hand frameset select NTP 1 B Enter the appropriate information and the select Save Apply ...

Page 92: ...d find the SNMP Configuration Page 1 A Select the Management tab located within the left hand frameset Then In the left hand frameset select IP Restriction NOTE YOU MUST ENTER THE LAN IPs AND THE APPROPRIATE WAN IPs BEFORE YOU ENABLE THE ACL IF YOU ENABLE THE ACL WITHOUT THIS TABLE BUILT YOU WILL NEED TO DEFAULT THE UNIT 1 B Enter the appropriate information and the select Save Apply ...

Page 93: ...e Management tab located within the left hand frameset Then In the left hand frameset select Access Control Then In the drop down box select WAN Interface ATM 0 or ATM 1 Depending upon which network the device is operating 1 B Select Unselect each option The Default Settings are specified below Protocol LAN WAN Port FTP þ þ 21 HTTP þ þ 80 ICMP þ þ N A SNMP þ þ 161 SSH þ þ 22 Telnet þ þ 23 TFTP þ þ...

Page 94: ...ecomes very slow or drops there may be other devices that are impeding upon your network This is when you should consider changing your wireless channel Step 1 Direct Your Browser to the Global Wireless Configuration Page 1 A Select the Wireless tab located within the left hand frameset Then In the left hand frameset select Global Settings 1 B Enter the desired Channel 1 6 and 11 tend to operate t...

Page 95: ...meset select SSID 1 B Enter the new SSID Name Enable Wireless Wireless should be enabled Hide Access Point The SSID Name will not be broadcasted Clients Isolation No direct WiFi to WiFi connections Disable WMM Advertise This should be enabled Older devices may not support this feature Enable WMF This should be enabled some wireless devices will make Multicast requests SSID THIS IS WHERE YOU DEFINE...

Page 96: ...e Security Settings Page 1 A Select the Wireless tab located within the left hand frameset Then In the left hand frameset select Security Settings 1 B Under Manual Setup AP Select SSID Choose your network name Network Authentication WPA2 PSK is preferable Some devices may require WPA PSK WEP should not be used unless the consumer device in question only support WEP WPA Passphrase Enter the new pas...

Page 97: ...ated within the left hand frameset Then In the left hand frameset select Global Settings 1 B Under Wireless Advanced BAND 2 4Ghz is the only band supported Channel This is selected based upon the network environment Auto Channel Timer If the wireless channel is set to Auto you must specify the timeout Devices will be disconnected during a channel change Bandwidth All devices support 20Mhz Only som...

Page 98: ...ble MultiCast Rate Auto Basic Rate Default Xpress Technology Disabled This is only for Broadcom wireless clients We do not suggest Proprietary Settings be used ever Transmit Power 100 You may wish diminish output in MTUs where there are many APs in the area You cannot however control other Consumer Electronics WMM Enabled This is required for higher speeds only WMM Advertise should be disabled WMM...

Page 99: ...minimize the effects of unwanted requests and the connection of average users Step 1 Direct Your Browser to the MAC Filter Page 1 A Select the Wireless tab located within the left hand frameset Then In the left hand frameset select MAC Filtering Allow Means that only the specified MACs are allowed Deny Means that the specified MAC Addresses are not allowed access Disabled Means that the MAC Filter...

Page 100: ... Your Browser to the Wireless Bridge Page 1 A Select the Wireless tab located within the left hand frameset then select Wireless Bridging Then In the left hand frameset select MAC Filtering AP Mode Select Wireless Bridge or Access Point Bridge Restrict Disabled if you are using Bridging If enabled other APs will not be allowed to connect Remote Bridges The MAC Addresses of the allowed Bridges 1 B ...

Page 101: ...DQ Technology Inc VisionNet Page 101 M605N User Manual Revision 3 1 SECTION 11 PRODUCT DEPICTIONS AND BEHAVIOR Section 11 1 Product Depictions M605N LED VIEW M605N REAR VIEW ...

Page 102: ...e detected Solid Green Powered device connected including wake on LAN Flashing Green LAN activity present for that port Ethernet 4 Status Ethernet Port Front Off Power Off or No Powered device detected Solid Green Powered device connected including wake on LAN Flashing Green Activity present for that port DLNA Status USB Port Front Off Power Off or No Device detected Solid Green Device connected F...

Reviews: