background image

3

It is recommend to involve a computer technician for proper configuration of Visiontek 

86VT and an automobile electrician in order to install the system properly.

Follow the following steps for configuration of Visiontek 86VT. 

INITIAL SET UP FOR CONFIGURATION:

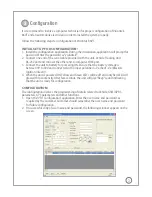
1. Install the configuration application. During the installation, application will prompt for  

password. Enter the password as “visiontek”.

2. Connect one end of the serial cable provided with the unit.  Vehicle Tracking Unit 

RS-232 port and connect the other end to computer COM port.

3. Connect the unit to battery for powering ON. Ensure that the  battery voltage is 

between 9V to 30V and connected with proper polarities (+Ve (Red) –Ve (Black) & 
Ignition (Green)).

4. When the unit is powered ON, Yellow and Green LED's will be off and only Red LED will 

glow with low intensity. After few seconds, the unit will give “Beep” sound indicating 

that the unit is ready for configuration.

CONFIGURATION:

The configuration involves the programming of details related to Vehicle, GSM/GPRS 

parameters, GPS parameters and other functions.
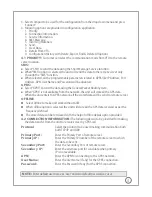
1. Open the “VTU Configuration” application. Enter the user name and password as 

required by the customer. Customer should remember the user name and password 
for future configuration.

2. On successful entry of user name and password, the following window appears on the 

screen.

3

Configuration

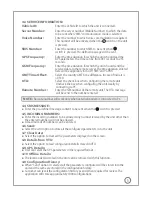
Summary of Contents for 86VT

Page 1: ...vigation data This User s manual will help you in knowing all the features of the system including installation Operational and programming procedure in a step by step manner Please keep this handy manual for easy reference For Servicing and other details kindly look at the corporate address and email id at the backside of the manual GPRS Triband GSM GPS 1 2 3 Introduction SIM Installation Configu...

Page 2: ...ided for two way communication and buzzer is provided for incoming calls alert Theunitcanbeconfiguredtoreceivetheincomingcallsfrompre definednumbers FEATURES n Tri band 900 1800 1900 MHz GSM Gprs Module n 20 Channels GPS receiver SiRF III n RS232 Serial Port n Built in battery n Ignition ON OFF detection n Wide DC input voltage range 10 5V 30V n Local Remote Configuration n SMS GPRS Communication ...

Page 3: ...2 Internal battery installation Open the SIM tray Insert the SIM card and close the tray GSM and GPS antenna ...

Page 4: ...owering ON Ensure that the battery voltage is between 9V to 30V and connected with proper polarities Ve Red Ve Black Ignition Green 4 When the unit is powered ON Yellow and Green LED s will be off and only Red LED will glow with low intensity After few seconds the unit will give Beep sound indicating that the unit is ready for configuration CONFIGURATION The configuration involves the programming ...

Page 5: ...re all the GPS data When the unit enters to GPRS network all the stored data will be send to remote server OFFLINE n n When offline option is selected the unit will store all the GPS data received as per the frequency defined n The stored data can be retreieved with the help of offline details option provided 4 2 CONNECTION INFORMATION The following details to be provided for making the data trans...

Page 6: ...the unit 4 7 Clear Date n Select the option to clear all the parameters displayed on the screen 4 8 Details from VTU n Select the option to read configuration details stored inVTU 4 9 GPS Details n User can select the GPS parameters in the required format 4 10 Offline Details n The location details stored in the unit can be retrieved with this function 4 8 Configuration History n When Send option ...

Page 7: ... GPS will glow continuously 3 LED Indications LED Status Flashing Red Yellow Green Unit Power ON Searching for GPS GPS Not available Searching for the GSM network GSM Network not available GPS Fix available GSM Network available Note The LED will flash at higher speed when sending data to remote server NOTE When the unit is in programming mode Yellow and Green LED s will not glow and only Red LED ...

Page 8: ...e for any consequential or resulting injury or for loss damage or expenses directly or indirectly arising from the use of this product Linkwell Telesystems Pvt Ltd will make every effort to carry out repairs replacement under this warranty as early as possible and it is expressly made clear that the company shall not be liable to do so within any specified time or period The decision of LinkwellTe...

Reviews: