background image

Slide VA+VA

6

I

F

GB

D

SP

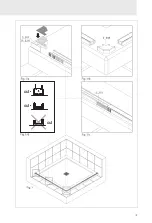
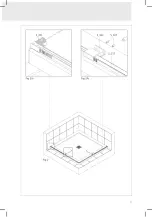
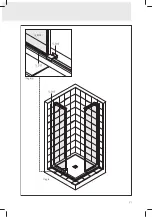
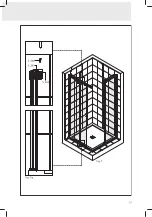
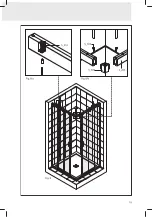
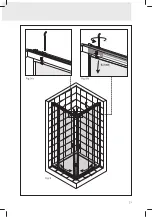
Posizionare il blocchetto guida vetro S_302 sul profilo S_215 come da disegno. 

Regolare il blocchetto in modo tale che i colori visibili in prossimità del blocchetto S_302 corrispondano a 

quelli del blocchetto a muro S_301 (es.: giallo con  giallo, rosso con rosso, ... ) . 

Procedere al bloccaggio tramite le due viti senza testa S_507.

Positionner  le guide du verre S_302 sur le profilé  S_215 selon schéma. 

Régler la pièce centrale de façon que les couleurs visibles du guide S_302 correspondent à celles de la 

pièce au mur S_301 (ex.: jaune avec jaune, rouge avec rouge, …). 

Serrer avec les deux  vis sans tête S_507 fournies.

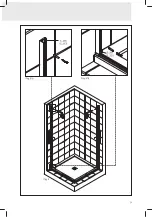
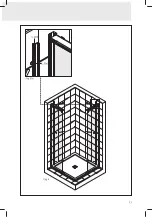
Fit the glass guide S_302 to the profile S_215, as shown in the figure.

Adjust the glass guide so that the colours next the glass guide S_302 correspond to the ones of the wall 

guide S_301 (ex. yellow to yellow, red to red, ...) 

Fix by means of the 2 screws S_507.

Die Glasführungshaltevorrichtung S_302 auf das Profil S_215 laut Skizze positionieren. 

Die Glasführungshaltevorrichtung regulieren, damit die Farben von der Stuck S_302 mit denjenigen der 

Wandhaltevorrichtung‚ S_301 übereinstimmen. 

Anschliessend mit den Schrauben ohne Kopf S_507 befestigen.

Colocar la pieza guía S_302 en el perfil S_215 como se indica en el dibujo.

Regular dicha pieza, de modo tal que, el color  visible en su costado corresponda al mismo del costado de la 

pieza S_301 situada en el extremo (ej.: amarillo con amarillo, rojo con rojo, …).

Proceder a la fijación de la pieza mediante los 2 tornillos S_507. 

Summary of Contents for Slide VA+VA

Page 1: ...ISTRUZIONI DI MONTAGGIO NOTICE DE MONTAGE ASSEMBLING INSTRUCTIONS MONTAGEANLEITUNGEN INSTRUCCIONES DE MONTAJE programma Slide VA VA ...

Page 2: ...MSS405 MSS309 ...

Page 3: ......

Page 4: ...osition it on the dry shower tray Check that the SMF KIT dimensions are suitable for the shower tray Proceed fixing the kit by using the provided double sided sticking tape Dimensions and extensibility of the SMF KIT correspond exactly to those ones of the shower enclosure N B Do not mount the shower enclosure if the SMF KIT doesn t perfectly match with the tray Prüfen Sie ob die Brausetasse waagr...

Page 5: ...out out out ...

Page 6: ...uide S_302 to the profile S_215 as shown in the figure Adjust the glass guide so that the colours next the glass guide S_302 correspond to the ones of the wall guide S_301 ex yellow to yellow red to red Fix by means of the 2 screws S_507 Die Glasführungshaltevorrichtung S_302 auf das Profil S_215 laut Skizze positionieren Die Glasführungshaltevorrichtung regulieren damit die Farben von der Stuck S...

Page 7: ......

Page 8: ...MF profile Check the profile centring on the base and the verticality Fix to the wall by means of the forseen Ø mm 6 dowel In case of low resistance walls plaster walls casket doors don t use the supplied screws but provide adequate fixing solution Das Wandprofil S_205 auf das Unterteil S_301 von KIT SMF positionieren Prüfen ob das Profil im rechten Winkel montiert wurde Das Wandprofil an der Wand...

Page 9: ......

Page 10: ...nto the bottom horizontal profile S_215 and check that it overlaps the wall profile S_205 at least 1 cm NB the fixed panel must fit on the glass guide S_302 which is already installed as per figure The fitting is easier if it is carried out inside the shower enclosure Das Glasfixteil S_602 auf das Unterwaagerechtsprofil S_215 hineinschieben damit es auf dem Wandprofil S_205 für mindestens 1 cm übe...

Page 11: ......

Page 12: ...forcer excessivement Assemble the inside part of the wall profile S_204 and fix it by means of the three V shaped screws S_506 Tighten the screws without applying an excessive torque Die Innenseite das Wandprofils S_204 e montieren und mit den 3 Schrauben S_506 befestigen Anschliessend die 3 Schrauben ohne großen Druck befestigen Ensamblar la parte interna del montante de la pared S_204 y fijarlo ...

Page 13: ......

Page 14: ...he sliding guide S_203 as per figure The closed side of the guide S_203 must be positioned against the wall Position the door into the bottom door guide S_302 and connect the guide profile S_203 to the wall profile S_201 by means of the forseen screws S_505 Die Schiebetüre S_601 in die Führungsschiene S_203 laut Skizze hineinschieben Die geschlossene Seite der Führungsschiene S_203 zur Wand positi...

Page 15: ......

Page 16: ...he sliding guide S_203 to the profile S_201 by means of 2 screws S_505 as in the figure DO NOT tighten but let the screws loose 1 2 turn for further regulation Careful to keep the door into the guide Proceed the same way for the other door Die Führungsschiene S_203 an Profil S_201 mit 2 Schrauben S_505 laut Skizze befestigen Ohne großen Druck befestigen sondern ungefähr um eine halbe Umdrehung loc...

Page 17: ......

Page 18: ...d fix with the screw M6 S_505 Check the magnetic closing of the two doors then tighten the screws M6 S_505 Adjust the component S_316 as preferred Operate inside the shower enclosure keeping the door closed Install the handles the fixing screws must be inside Das Verbindungsendstück S_309 am Ende der Führungsschiene S_203 mit Schrauben M6 S_505 befestigen Beide Türen schließen um den Magnetverschl...

Page 19: ......

Page 20: ...key into the hole of the top profile and work on the regulation screw Unscrew to lower the door screw again to lift up the door max 2 turns Do not tight too much Take out the key and close the doors to check that the magnetic profiles close correctly Justierung der Türen Die Türen von der Innenseite der Duschabtrennung öffnen und in einer Reihe der Klebepfeilen aufstellen Bild 9 a Mit Hilfe des mi...

Page 21: ......

Page 22: ... pour éviter la moindre fuite d eau IMPORTANT After installation seal externally with silicone all parts of the shower enclosure touching the tray and the walls to avoid water leaking WICHTIG Nach der Montage dichten Sie den Abstand zwischen Duschabtrennung und Duschwanne und zwischen Wandprofil und Wänden von außen mit Silikon ab um einen Wasseraustritt zu verhindern IMPORTANTE Al finalizar el mo...

Page 23: ......

Page 24: ...Vismaravetro Srl 20050 Verano Brianza MI Italy Via Furlanelli 29 telefono 0362 992244 telefax 0362 992255 e mail info vismaravetro it www vismaravetro it ...

Reviews: