background image


www.visonic.com


Page 5 of 11 

D-306783 ioXpander-12x4 Module  (Rev 2, 11/17)


4.2


Outputs: 

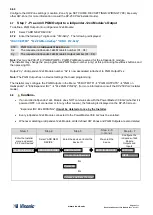
The PowerMaster-33 E G2 supports up to 16 outputs

The first 8 outputs are reserved for the ioXpander-8 Module. 

The other 8 outputs (PGM9 

– PGM16) can be distributed among the ioXpander-12x4 Module. The installer needs to 

enroll each PGM output to the required output pin of the required ioXpander-12x4 Module. For more information 
refer to section 

6: “Enrollment Process.” 

4.3


Siren and Strobe Outputs: 

The ioXpander-12x4 Module has built-in Siren and Strobe outputs. There is NO NEED TO ENROLL these outputs. 
The Siren and Strobe outputs automatically activate when their functions are enabled in the PowerMaster-33 E G2. 
The installer can choose to leave these outputs unconnected. 


Summary of Contents for ioXpander

Page 1: ...back cover tamper switches for improved tamper protection RS 485 bus to communicate with the panel The ioXpander 12x4 Module is supported by the PowerMaster 33 E G2 only 1 1 Terminology Abbreviation Definition NO NC Normally Open Normally Closed EOL DEOL End of Line Double EOL HW Zone Hard wired zone ioXpander 8 Expander and bus controller on the PowerMaster 33 E G2 PGM Programmable Relay Output P...

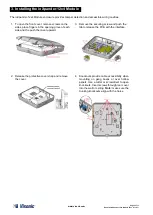
Page 2: ...fingers in the opening grove of each side and the push the cover upward 3 Remove the securing screw and push the tab to release the PCB with the interface 2 Release the protective cover snap and remove the cover 4 Knockouts provide cable accessibility when mounting on gang boxes or over hollow panels Use a cutter or screwdriver to open knockouts Insert screws through rear cover into the wall or ce...

Page 3: ...tion there is one on each side of the box and thread the wires through the holes Wrap any excess wire around the PCB 7 Assemble the protective cover by placing it over the interface and snapping it into place 6 Snap the PCB back into place and make sure the tamper cap is in place Thread the cables inside the box through the cable cavities and connect as needed to the terminal blocks 8 Place the to...

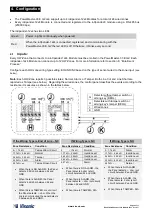
Page 4: ... shown in the tables below NC If the Wiring Type is End of Line If Wiring Type is NC If Wiring Type is NO Condition Zone Resistance Tamper Short Circuit 0 1 76 kΩ Normal 1 77 kΩ 2 64 kΩ Tamper 2 65 kΩ 3 52 kΩ Alarm 3 53 kΩ 5 26Ω Tamper Open Circuit 5 27 kΩ oc When there is NO ALARM the Panel detects 2 2K ohm between Zx and GND When there is ALARM the Panel detects 4 4K ohm between Zx and GND When ...

Page 5: ... The installer needs to enroll each PGM output to the required output pin of the required ioXpander 12x4 Module For more information refer to section 6 Enrollment Process 4 3 Siren and Strobe Outputs The ioXpander 12x4 Module has built in Siren and Strobe outputs There is NO NEED TO ENROLL these outputs The Siren and Strobe outputs automatically activate when their functions are enabled in the Pow...

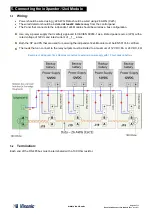
Page 6: ... configuration Use only a power supply that is safety approved for IEC EN 60950 1 as a limited power source LPS with a rated voltage of 12Vdc and rated current of __1__a max Both the CP and PS that are used for powering the ioXpander 12x4 Module must be EN 50131 6 certified The loads that can connect to the relay outputs must be limited to a maximum of 12 VDC 8A or 24 VDC 4A Example of ioXpander 1...

Page 7: ...www visonic com Page 7 of 11 D 306783 ioXpander 12x4 Module Rev 2 11 17 5 3 ioXpander 12x4 Module Circuit Board ...

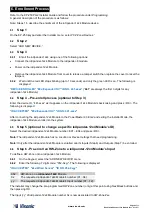
Page 8: ...der 12x4 Module s back casing and press OK The following is displayed ID ACCEPTED E0x Expander IOV ID NO 441 xxxx After connecting the ioXpander 12x4 Module to the PowerMaster 33 E G2 and exiting the Installer Mode the ioXpander 12x4 Module enrolls into the system 6 5 Step 5 optional to change a specific ioXpander 12x4 Module s ID Select the desired ioXpander 12x4 Module number E01 E04 and press O...

Page 9: ... associated attached to PGM Output Pxx Note The PGM Output has no Device Settings that need programming The Installer may configure the PGM Outputs in the Menu 05 OUTPUTS PGM OUTPUTS PGM on HwExpndrs E0x Expander IOV Pxx PGM PIN 0y for more information consult the KP 250 PG2 Installer Guide 6 8 Cautions If an enrolled ioXpander 12x4 Module does NOT communicate with the PowerMaster 33 E G2 whether ...

Page 10: ...4A RS 485 Bus Data Rate 230Kbit sec Bus Backbone 26AWG Cat 5 DC 22 AWG Bus Length 500M 1640Ft Max Termination 100 Ohm Termination The RS 485 Bus needs to be terminated at both ends with a 100 Ohm resistor Operating Environment Temp 10 C to 70 C 14 F to 159 F Humidity 20 to 80 non condensing Physical Weight 670 grams 23 57 ounces Construction ABS plastic Dimensions H x W x D 230 x 199 x 47mm 90 625...

Page 11: ...ADVISED OF THE POSSIBILITY OF SUCH DAMAGE THE MANUFACTURER SHALL HAVE NO LIABILITY FOR ANY DEATH PERSONAL AND OR BODILY INJURY AND OR DAMAGE TO PROPERTY OR OTHER LOSS WHETHER DIRECT INDIRECT INCIDENTAL CONSEQUENTIAL OR OTHERWISE BASED ON A CLAIM THAT THE PRODUCT FAILED TO FUNCTION HOWEVER IF THE MANUFACTURER IS HELD LIABLE WHETHER DIRECTLY OR INDIRECTLY FOR ANY LOSS OR DAMAGE ARISING UNDER THIS LI...

Reviews: