DE2462U
5
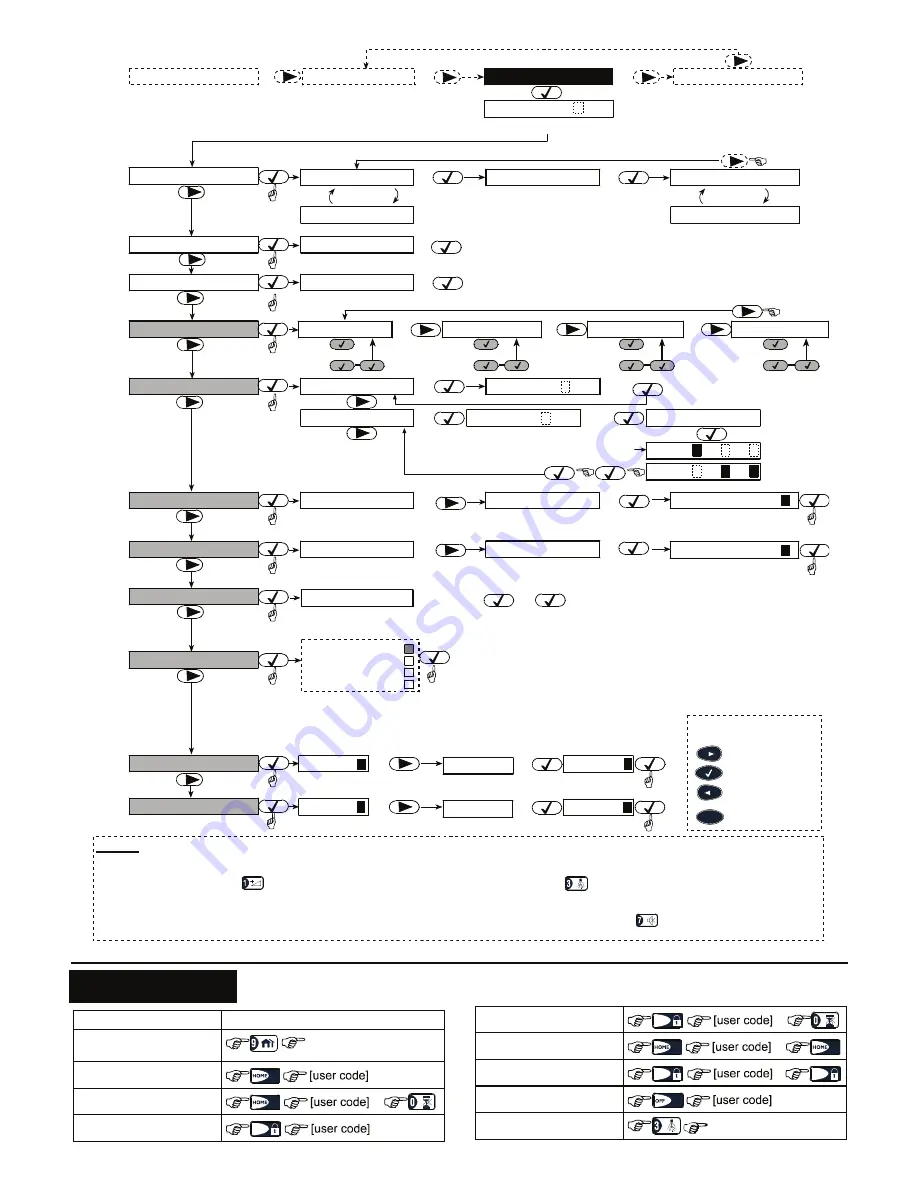
NOTES
(1) Function inside black rectangles are accessible only if master user code was entered.
(2) Press OK to display the number, state and name of first bypassed zone. Press NEXT/BACK repeatedly to view all the bypassed zones.
(3) To enter “A” (AM) press ( or one of the 3 keys above it), to enter “P” (PM) press (or one of the 3 keys above it). (Not
functional if the time format has been set to the 24 hour clock via the P.)
(4) SET/SHOW/RECALL BYPASS menus are accessible only if “manual bypass” has been selected by the installer via the P.
(5) In the SET VOICE OPTION, if you select “enable prompts”, the P mute speaker button is active.
(6) RECALL BYPASS is applicable when Partition is disabled.
SHOW BYPASS
RECALL BYPASS
BYPASS LIST
<OK> TO RECALL
(2)
SET BYPASS
NORMAL MODE
READY
<OK> TO BYPASS
Z01: BYPASSED
Z01: OPEN
KITCHEN
Alternating
KITCHEN
Alternating
(for checking state of next zone)
ENTER CODE _ _ _ _
INSTALLER MODE
(4)
(4)
(4)
(example)
SET PHONE NUMBER
)
SET USER CODES
user code 1 1 1 1 1
[code]
user code 1
(1)
AUTO ARM OPTION
disable autoarm
enable autoarm
(if it is the current option)
)
[time]
AUTO ARM TIME
arm time _ _: _ _A
SQUAWK OPTION
(1)
(1)
(1)
SET VOICE OPTION
enable prompts
(if it is the current option)
(1)(5)
)
[4-digit master/user code]
if not satisfied
)
if not satisfied
)
)
disable prompts
disable prompts
enable autoarm
(First display is READY
or NOT READY)
)
)
)
)
)
)
)
)
)
)
)
)
)
)
)
)
)
)
)
)
)
)
)
)
NEXT
BACK
Moving one level
up in the menu
To move within the menus, the
following keys can be used:
SHOW / OK
squawk disable
sqwk low volume
sqwk mid volume
sqwk hi volume
(To review options, use
NEXT or BACK button)
Tel. No.
1st private tel#
Tel. No.
2nd private tel#
Tel. No.
3rd private tel#
Tel. No.
4th private tel#
)
)
LIGHT BY TIMER
LIGHT BY SENSOR
enable
disable
disable
)
if not satisfied
)
enable
disable
disable
)
if not satisfied
USER SETTINGS
(1)
(3)
(1)
ESC
(6)
)
)
user code 2
)
to select next
user codes (3....8)
)
user code 2 1 1 1 1
[code]
)
access to part
)
U02:P1 P2 P3
(y=yes)
(for next user codes)
enter partition numbers (e.g.
for partitions 2 & 3 enter 23)
U02:P1 P2 P3
Figure 9:
User Settings Flow Chart
6. OPERATION
Function Actions
Partition selection
(when enabled)
[Partition No.]
Arming HOME
(1) (3)
Arming HOME INSTANT
(1)
Arming AWAY
AWAY
(1)
Arming AWAY INSTANT
AWAY
(1)
Forced Arming HOME
(1)
Forced Arming AWAY
AWAY
(1)
AWAY
Disarming
(1)
X-10
device
(1-15)
ON
unit # [1-15]


