background image

20 

D-303503 MKP-160 User's Guide 

WARRANTY 


Visonic  Limited  (the  “Manufacturer")  warrants  this 
product only (the "Product") to the original purchaser 
only 

(the 

“Purchaser”) 

against 

defective 

workmanship and materials under normal use of the 
Product for a period of twelve (12) months from the 
date of shipment by the Manufacturer.   
This  Warranty  is  absolutely  conditional  upon  the 
Product  having  been  properly  installed,  maintained 
and  operated  under  conditions  of  normal  use  in 
accordance  with  the  Manufacturers  recommended 
installation  and  operation  instructions.    Products 
which have become defective for any other reason, 
according  to  the  Manufacturers  discretion,  such  as 
improper installation, failure to follow recommended 
installation  and  operational  instructions,  neglect, 
willful  damage,  misuse  or  vandalism,  accidental 
damage,  alteration  or  tampering,  or  repair  by 
anyone  other  than  the  manufacturer,  are  not 
covered by this Warranty. 
The  Manufacturer  does  not  represent  that  this 
Product 

may 

not 

be 

compromised 

and/or 

circumvented  or  that  the  Product  will  prevent  any 
death  and/or  personal  injury  and/or  damage    to 
property  resulting  from  burglary,  robbery,  fire  or 
otherwise,  or  that  the  Product  will  in  all  cases 
provide  adequate  warning  or  protection.      The 
Product,  properly  installed  and  maintained,  only 
reduces the risk of such events without warning and 
it  is  not  a  guarantee  or  insurance  that  such  events 
will not occur.  

THIS 

WARRANTY 

IS 

EXCLUSIVE 

AND 

EXPRESSLY 

IN 

LIEU 

OF 

ALL 

OTHER 

WARRANTIES,  OBLIGATIONS  OR  LIABILITIES, 
WHETHER  WRITTEN,  ORAL,  EXPRESS  OR 
IMPLIED,  INCLUDING  ANY  WARRANTY  OF 
MERCHANTABILITY 

OR 

FITNESS 

FOR 

PARTICULAR  PURPOSE,  OR  OTHERWISE.    IN 
NO  CASE  SHALL  THE  MANUFACTURER  BE 
LIABLE 

TO 

ANYONE 

FOR 

ANY 

CONSEQUENTIAL  OR  INCIDENTAL  DAMAGES 
FOR  BREACH  OF  THIS  WARRANTY  OR  ANY 
OTHER 

WARRANTIES 

WHATSOEVER, 

AS 

AFORESAID. 

THE  MANUFACTURER SHALL IN NO EVENT BE 
LIABLE 

FOR 

ANY 

SPECIAL, 

INDIRECT, 

INCIDENTAL,  CONSEQUENTIAL  OR  PUNITIVE 
DAMAGES  OR  FOR  LOSS,  DAMAGE,  OR 
EXPENSE, INCLUDING LOSS OF USE, PROFITS, 
REVENUE,  OR  GOODWILL,  DIRECTLY  OR 
INDIRECTLY  ARISING  FROM  PURCHASER’S 
USE  OR  INABILITY  TO  USE  THE PRODUCT, OR 
FOR  LOSS  OR  DESTRUCTION  OF  OTHER 
PROPERTY  OR  FROM  ANY  OTHER  CAUSE, 
EVEN  IF MANUFACTURER HAS BEEN ADVISED 
OF THE POSSIBILITY OF SUCH DAMAGE. 

THE MANUFACTURER SHALL HAVE NO LIABILITY 
FOR ANY DEATH, PERSONAL AND/OR BODILY 
INJURY AND/OR DAMAGE TO PROPERTY OR 
OTHER LOSS WHETHER DIRECT, INDIRECT, 
INCIDENTAL, CONSEQUENTIAL OR OTHERWISE, 
BASED ON A CLAIM THAT THE PRODUCT FAILED 
TO FUNCTION.


However, if the Manufacturer is held liable, whether 
directly or indirectly, for any loss or damage arising 
under this limited warranty, 

THE 

MANUFACTURER'S MAXIMUM LIABILITY (IF 
ANY) SHALL NOT IN ANY CASE EXCEED THE 
PURCHASE PRICE OF THE PRODUCT,

 which 

shall be fixed as liquidated damages and not as a 
penalty, and shall be the complete and exclusive 
remedy against the Manufacturer.  
When accepting the delivery of the Product, the 
Purchaser agrees to the said conditions of sale and 
warranty and he recognizes having been informed 
of. 
Some jurisdictions do not allow the exclusion or 
limitation of incidental or consequential damages, so 
these limitations may not apply under certain 
circumstances.  
The Manufacturer shall be under no liability 
whatsoever arising out of the corruption and/or 
malfunctioning of any telecommunication or 
electronic equipment or any programs.


The  Manufacturers  obligations  under  this  Warranty 
are  limited  solely  to  repair  and/or  replace  at  the 
Manufacturer’s  discretion  any  Product  or  part 
thereof that may prove defective.  Any repair and/or 
replacement  shall  not  extend  the  original  Warranty 
period.    The  Manufacturer  shall  not  be  responsible 
for  dismantling  and/or  reinstallation  costs.    To 
exercise this Warranty the Product must be returned 
to the Manufacturer freight pre-paid and insured.  All 
freight  and  insurance  costs are the responsibility of 
the Purchaser and are not included in this Warranty. 

This  warranty  shall  not  be  modified,  varied  or 
extended, and the Manufacturer does not authorize 
any  person  to  act  on  its  behalf  in  the  modification, 
variation or extension of this warranty. This warranty 
shall  apply  to  the  Product  only.    All  products, 
accessories  or  attachments  of  others  used  in 
conjunction  with  the  Product,  including  batteries, 
shall be covered solely by their own warranty, if any.


The Manufacturer shall not be liable for any damage 
or  loss  whatsoever,  whether  directly,  indirectly, 
incidentally, consequentially or otherwise, caused by 
the  malfunction  of  the  Product  due  to  products, 
accessories,  or  attachments  of  others,  including 
batteries,  used  in  conjunction  with  the  Products. 
This Warranty is exclusive to the original Purchaser 
and is not assignable.  
This  Warranty  is  in  addition  to  and  does  not  affect 
your  legal  rights.  Any  provision  in  this  warranty 
which  is  contrary  to  the  Law  in  the  state  or  country 
were the Product is supplied shall not apply.  

Warning: 

The  user  must  follow  the  Manufacturer’s 

installation  and  operational  instructions  including 
testing  the  Product  and  its  whole  system  at  least 
once  a  week  and  to  take  all necessary precautions 
for  his/her  safety  and  the  protection  of  his/her 
property. 

1/08


MKP-160         D-303503 (Rev.


3, 3/12) 

Summary of Contents for MKP-160

Page 1: ...User Guide Keyprox User s Guide MKP 160 ...

Page 2: ...ICK ARM HOME 10 ARM AWAY QUICK ARM AWAY 11 LATCHKEY Quick Reference Guide 12 Mute exit beeps 13 Volume control 14 Show next status of open bypass zones 15 PGM X 10 16 INSTANT 17 FIRE 18 EMERGENCY 19 PANIC Press both keys simultaneously for 2 seconds 20 AUX Enroll MKP 160 Back to factory Cancel current operation 21 Control panel messages 22 Installer Mode 23 Memory Alarm 24 Trouble 25 AC failure 26...

Page 3: ...nt Cover 3 2 3 Wall Mounting Options 4 2 4 Enrolling the MKP 160 9 2 5 Configuring the MKP 160 Parameters 9 2 6 Enrolling Proximity Tags 10 3 USING THE TOUCH SCREEN KEYPROX 12 3 1 Arming and Disarming the System 12 3 2 Initiating Alarms 13 3 3 System Status and Indications 13 3 4 Bypassing Zones 16 3 5 Controlling Home Automation Devices 16 3 6 Other Functions 17 APPENDIX A SPECIFICATIONS 18 APPEN...

Page 4: ... keys marked 7 in the Quick Reference Guide The MKP 160 can be wall mounted using the supplied bracket or be used as a desktop unit For compliance with various international standards the MKP 160 is equipped with two tamper switches that can be defined to detect when the cover of the battery compartment is removed or when the unit is removed from its mounting bracket Other features of the MKP 160 ...

Page 5: ...battery is replaced by an incorrect type Dispose of used battery according to manufacturer s instructions Figure 1 Battery Insertion Insert two 1 5V batteries in each slot while ensuring battery polarity 2 2 Closing Battery Compartment Cover Desktop Installation Using Battery Cover without Tamper Hole 1 2 Figure 2 Battery Cover Mounting part a ...

Page 6: ...C Wiring channel for wall installation Note The DC cable is available in specific models 2 3 Wall Mounting Options The MKP 160 unit mounting options are illustrated in the following drawings Wall Mounting Figure 4 Wall Mounting 1 Drill 3 mounting holes 3 Attach the unit to the bracket 2 Position the bracket and secure with 3 screws 4 Secure the unit with the screw A Hole for DC power source cable ...

Page 7: ...1 Hold the power source cable from the wall and thread it through its hole in the bracket 2 Drill 2 mounting holes and then secure bracket with 2 screws A Hole for DC power source cable installed in wall B Hole for tamper WARNING The power source optional must be 5 12VDC ...

Page 8: ...into slot and lift upward to separate the battery compartment cover from the front cover 4 Connect together the power source cable and the DC cable connector supplied Note The DC cable connector is available in specific models C DC Power Cable Connection ...

Page 9: ...onnect the DC cable connector to the DC power connection Note You can connect the DC cable directly as shown in the top drawing or via one of the wiring inlets indicated by the arrows 6 Align the bracket pins with their respective slots ...

Page 10: ...ide 7 Push the MKP 160 unit downward on the bracket 8 Secure the unit with the screw Figure 5 Wall Mounting with External DC Cable Desk mount 1 Insert the bracket pins into the corresponding slots Figure 6 Desk mount installation ...

Page 11: ...meters via the 16 DEFINE ARM ST main menu 2 5 Configuring the MKP 160 Parameters Enter the main menu in the PowerMax control panel choose the number of the touch screen keyprox device to configure and follow the configuration instructions for the MKP 160 touch screen keyprox Option Configuration Instructions Enabling the function will enable a tamper open close message Options settings disable def...

Page 12: ...eyprox Options settings enable default and disable 2 6 Enrolling Proximity Tags You can enroll proximity tags in the PowerMax control panel either through the MKP 160 touch screen keyprox as described below or through the PowerMax control panel as described in the corresponding section of the control panel s User or Installer Guide Each proximity tag corresponds to its User Code Therefore be sure ...

Page 13: ...NT TAG is displayed press the AWAY key on the MKP 160 The AWAY key and the Present Prox Tag key begin to blink 5 Present the proximity tag to the MKP 160 within the 5 second timeout period If the enrollment is successful the display reads the selected Prox Tag number followed by a box Tag no 8 PRESENT TAG ...

Page 14: ...3 If Quick Arm is enabled 2 sec Quick arm HOME 2 3 If Quick Arm is enabled 2 sec Optional 3 INSTANT After arming HOME AWAY 5 7 LATCHKEY After arming AWAY 6 7 Notes 1 If Partition is disabled at the control panel skip Step 1 2 If Partition is enabled at the control panel and a partition was not selected in Step 1 Step 2 will activate all of the partitions assigned to the user 3 The Quick arm functi...

Page 15: ... section 3 3 Panic alarm 2 sec See section 3 3 When pressing the Fire and Emergency icons together the MKP 160 starts beeping After pressing the button for approx 2 seconds the MKP 160 sends the Panic command 3 3 System Status and Indications When executing a command the MKP 160 s LED 29 in the Quick Reference Guide blinks red once to indicate transmission of the command to the control panel If th...

Page 16: ...tate General Indications The Ready Not Ready Alarm Memory Trouble and Low Battery indications are provided via the indications in the following table Number Indication 1 What it Means Instructs the user to present the RFID proximity tag in order to initiate a command Volume control mode System is NOT READY one of the zones is not secured You cannot arm the system before the zone is secured or bypa...

Page 17: ...e s battery is low and must be replaced see section 2 1 1 The key indication is displayed after the first red LED blinks indicating the status request 2 Operates only during Exit Delay 3 See respective sections in the control panel s User and Installer s Guides 4 If there is more than one status indication at a single time the keys are displayed simultaneously Zone Status Indications To view the z...

Page 18: ...Devices To operate home automation devices see the table below Note Make sure that the relevant PGM and X 10 outputs are configured correctly refer to the OUTPUTS menu in the control panel s Installer Guide Step X 10 device ON PGM device ON X 10 or PGM device OFF X 10 or PGM device TOGGLE 1 2sec 2 1 to 15 P0 PGM P0 or X 10 1 to 15 PGM P0 or X 10 1 to 15 3 The keyprox s LED blinks red once to indic...

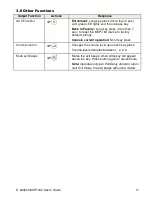
Page 19: ...e than 7 sec to reset the MKP 160 device to factory default settings Cancels current operation Short key press Volume control Changes the volume level upon each key press Volume level alternates between 1 2 3 0 Mute exit beeps Mutes the exit beeps small circle key will appear above the key Press button again to cancel mute Note Operates only per Exit Delay duration Upon next Exit Delay the exit be...

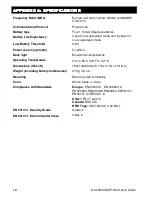
Page 20: ...sed mode Low Battery Threshold 3 8 V Power source optional 5 12VDC Back light Blue white or black white Operating Temperature 0 C to 55 C 32 F to 131 F Dimensions WxLxD 150x100x20mm 5 7 8 x 3 7 8 x 13 16 in Weight including battery and bracket 379 g 13 oz Mounting Wall mounted or desktop Color White black or silver Compliance with Standards Europe EN 300220 1 EN 300220 2 EN300330 EN301489 EN60950 ...

Page 21: ... exposure limits set forth for an uncontrolled environment The digital circuit of this device has been tested and found to comply with the limits for a Class B digital device pursuant to Part 15 of the FCC Rules These limits are designed to provide reasonable protection against harmful interference in residential installations This equipment generates uses and can radiate radio frequency energy an...

Page 22: ...However if the Manufacturer is held liable whether directly or indirectly for any loss or damage arising under this limited warranty THE MANUFACTURER S MAXIMUM LIABILITY IF ANY SHALL NOT IN ANY CASE EXCEED THE PURCHASE PRICE OF THE PRODUCT which shall be fixed as liquidated damages and not as a penalty and shall be the complete and exclusive remedy against the Manufacturer When accepting the deliv...

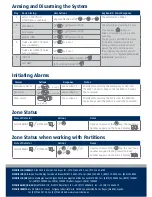
Page 23: ...resent your tag The Keyprox s LED blinks red once to indicate transmission of the arming command to the control panel The LED and the buzzer then indicate the control panel s response see System Status and Indications section 3 3 Arm HOME present TAG Disarm OFF present TAG 3 Quick arm AWAY if Quick Arm is enabled 2 sec Quick arm HOME if Quick Arm is enabled 2 sec 4 INSTANT After arming HOME AWAY L...

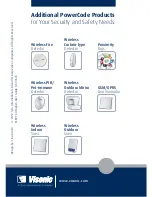
Page 24: ...or Detector Wireless PIR Pet immune Detector Wireless Curtain type Detector GSM GPRS Communicator Proximity Tags Wireless Indoor Siren Wireless Outdoor Siren Wireless Fire Detector www visonic com 2012 Tyco International Ltd and its Respective Companies All Rights Reserved MKP 160 English User Guide D 303503 ...

Reviews: