MAINTENANCE
32
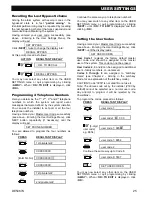
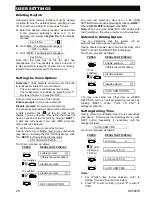
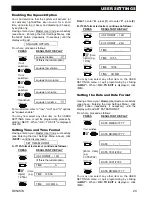
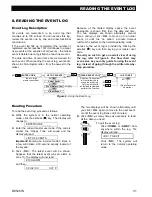
DE5467U
9. MAINTENANCE
Replacing the Backup Battery
The P uses regular electrical supply, but
incorporates backup 7.2/9.6V battery pack (see
sticker on battery cover). It is important to replace it
immediately upon receiving the following trouble
message when reviewing system troubles (see
Chapter 5 - Reviewing Trouble Information):
CPU LOW BATTERY
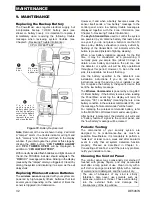
2
Remove
s c r e w
and cover
Open
d o o r
1
C o n n e c t
r e c h a r g e a b l e
battery pack (see
sticker on battery
cover) to the battery
connector. Then
remount the cover
and close the door.
3
Figure 10.
Battery Replacement
Note:
Removal of the cover shown in step 2 will start
a “tamper” alarm - the trouble indicator will light and
both “memory” and “trouble” will flash in the display
window. If you interrogate the system at this stage by
clicking the <
OK
> button, “
CPU TAMPER ALARM
”
and “
CPU TAMPER OPEN
” will be displayed, in
addition to “
CPU LOW BATTERY
”.
With correctly inserted fresh batteries and tight closure of
the lid, the TROUBLE indicator should extinguish. The
“MEMORY” message will continue blinking in the display
(caused by the “tamper” alarm you triggered). Clear it by
arming the system and disarming it as soon as the exit
delay starts.
Replacing Wireless Devices Batteries
The
wireless sensors
supplied with your system are
powered by high-capacity lithium batteries that last
several years, depending on the number of times the
sensor is triggered into transmission.
However, if and when a battery becomes weak, the
sensor itself sends a “low battery” message to the
control panel, and a low battery trouble message is
displayed together with the zone information (see
Chapter 5 - Reviewing Trouble Information).
The
keyfob transmitters
used to control the system
are powered by an alkaline battery that lasts about
one year if you do not press a button more than 10
times a day. Battery exhaustion is clearly evident by
flashing of the transmitter’s red indicator while the
button is pressed (instead of lighting steadily).
When a low battery indication appears for the first
time, it may be considered as a pre-warning. It
normally gives you ample time (about 30 days) to
obtain a new battery and replace the old one, and
the detector or keyfob unit will be fully operational
throughout this period. However, to be on the safe
side, it is advisable not to wait that long.
Use the battery specified in the detector’s own
installation instructions. If you do not have the
instructions, seek the advice of your installer or ask
him to replace the battery in the specific device that
sent the low battery message.
The
Wireless Commander
is powered by a long life 3
V Lithium battery. If the battery is weak when reading
the P event log the display will read, for
example, "C01 Low Battery" (meaning there is a low
battery condition in the wireless commander #01), and
the message "remote commander" will be heard.
For replacing the wireless commander battery, refer
to the MCM-140+ Wireless Commander user guide.
After battery replacement, the detector unit will send
a “battery restored” signal to the control panel, and
the “low battery” message will be cleared.
Periodic Testing
The components of your security system are
designed to be maintenance-free as much as
possible. Nevertheless, it is mandatory to perform a
“walk test” at least once a week and after an alarm
event to verify that all system detectors function
properly. Proceed as described in Chapter 6 -
Conducting a Walk-Test, and If there is any problem,
notify your installer at once.
Cleaning the Control Panel
The control panel may occasionally get stained if
touched with greasy fingers, and may accumulate
dust after a long period of use. Clean it only with a
soft cloth or sponge moistened lightly with a mixture
of water and mild detergent, and then wipe it dry.
The use of abrasives of any kind is strictly
forbidden. Also never use solvents such as
kerosene, acetone or thinner. These will certainly
ruin the external finish and damage the
transparency of the top window.


