LAMP INSTALLATION/REPLACEMENT:
CAUTION:
Do not exceed maximum wattage marked on luminaire label.
1. To prevent electrical shock, disconnect transformer from electrical supply before service.
2. Loosen the five (5) cover screws and remove cover.
3. Remove gasket.
4. Replace lamp with correct wattage and type marked on fixture label.
NOTE:
DO NOT touch Halogen lamp with bare hands. Always use soft cloth or the plastic wrapping (if available) from the
lamp to handle the lamp.
5. Clean gasket and channel and re-install gasket.
6. Re-install cover and tighten the five (5) screws evenly.
1625 Surveyor Avenue
•
Simi Valley, CA 93063
•
(805) 527-0987
•
(800) 766-VISTA (8478)
FAX: (888) 670-VISTA (8478) • email@vistapro.com • www.vistapro.com
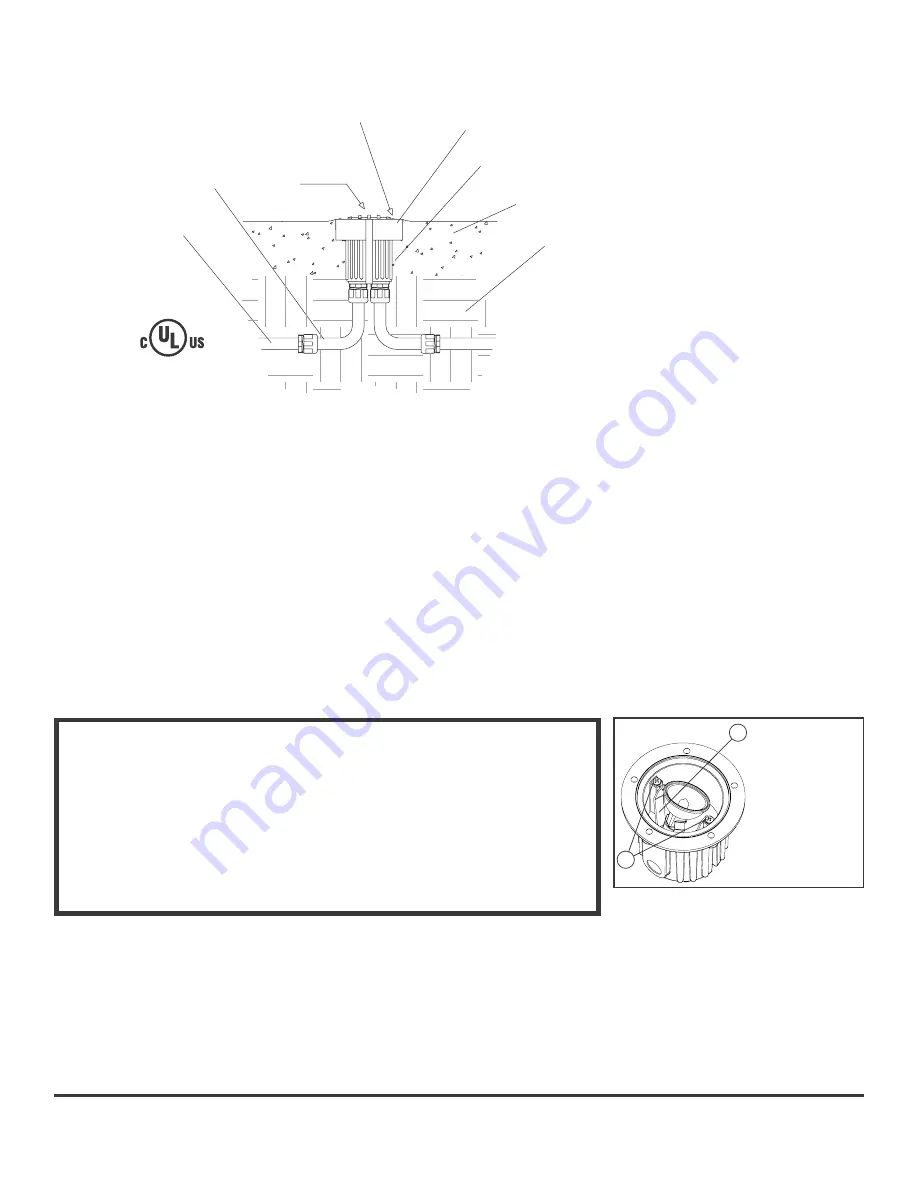
Lens
Stainless
steel screw
Rigid conduit
Concrete
pour kit
Flexible conduit
(Recomended)
Fixture housing
Concrete
Soil
TOOLS REQUIRED FOR
INSTALLATION:
●Wire strippers
●Blade head screwdriver
●Shovel
●Teflon tape
●Pipe sealer
LUMINAIRE MOUNTING:
1. To prevent electrical shock, disconnect transformer from electrical supply before installation or service.
2. Dig hole approximately 10” diameter to a depth suitable to make top of fixture flush to 1/8” above grade. Pea gravel or
sand is recommended for seating the luminaire housing to aid positioning.
3. Install JBCP-150 concrete mounting guard making sure the top edge of the ring lines up with the top edge of the lens
cover. Secure side bands to the bottom of fixture with #10 screws provided. (Side bands of JBCP-150 may be bent outward
to adjust the fit of the top ring.)
4. Install conduit through 3/4” NPT holes in bottom of luminaire using Teflon tape or other thread sealant. Using plug
(provided), seal unused conduit entry if required
.
NOTE:
UL listed flexible conduit is recommended for in and out connections to ease fixture position and adjustment during
installation.
5. Support luminaire in selected position using standard masonry procedures.
NOTE:
When installing in concrete, JBCP-150 must be flush to 1/8” above grade to promote water runoff.
6. Pull supply wires (line in), through conduit into luminaire wire compartment.
8. Wire luminaire as required using silicone filled safety connectors (provided).
9. Pour concrete at least 2” thick.
10. Install lamp with correct wattage and type marked on the fixture label and set lamp at desired aiming angle.
11. Replace silicone rubber gasket, lens, and cover, and tighten screws evenly.
NOTE:
Failure to remove all dirt and debris from gasket sealing surface may cause leakage and void the warranty.
Concrete Pour Installation:
IMPORTANT SAFETY INSTRUCTIONS
THE LIGHTED LAMP IS HOT!!
WARNING: TO REDUCE THE RISK OF FIRE, OR INJURY TO
PERSONS:
1. Turn off/unplug and allow to cool before replacing lamp.
2. Lamps get hot quickly! Contact only switch/plug when turning on.
3. Do not touch hot lens, guard or enclosure.
4. Keep lamp away from material that may burn.
5. Do not touch the lamp at any time. Use a soft cloth. Oil from the skin may damage lamp.
6. Do not operate luminaire fitting with a missing or damaged cover.
SAVE THESE INSTRUCTIONS
NOTE:
Lamp bracket may
be adjusted for
lamp aiming. Loosen
bracket screws (1),
then manually tilt
bracket (2) to desired
position. Tighten
bracket screws
afterward to secure
lamp position.
1
2


